Got celiac? Follow these seven steps to setting up a gluten-free kitchen to help you stick to your gluten-free diet and avoid getting sick. This post contains affiliate links. Please see my disclosures.
After my celiac disease diagnosis, I found it essential to set up my kitchen in a way that kept me healthy and safe.
Gluten, a protein found in wheat, barley, rye, and sometimes oats, was lurking everywhere, even in the tiny hidden bits of spaghetti clinging to the inner depths of my colander.
You can use one of two routes when setting up a gluten-free kitchen.
The first and preferred option is to make your kitchen 100 percent gluten-free. This is ideal if you live alone or if your family will be going gluten-free together.
I know many families that decide to make their kitchen a dedicated gluten-free kitchen, even if just one member of the family has celiac. I love this “we’re all in it together” attitude!
However, a more realistic route is to figure out how to navigate a shared kitchen, as most of you will be sharing your kitchen with those who still eat gluten. You must make a few simple adjustments to ensure a safe shared eating and cooking environment.
My house was a shared household for the first four years of my celiac journey. But as time passed, and my husband began to recognize how difficult it was for me to feel safe even in my own home, we decided to make our kitchen a dedicated gluten-free space.
If you can make a dedicated gluten-free kitchen either now or one day, do it. In a world full of gluten, I know I’m always safe at home, which has done wonders for my mental health and sanity.
Regardless, I’ll help you figure out how to approach setting up a gluten-free kitchen, whether setting up a dedicated gluten-free kitchen or sharing one with the gluten-eaters in your life.

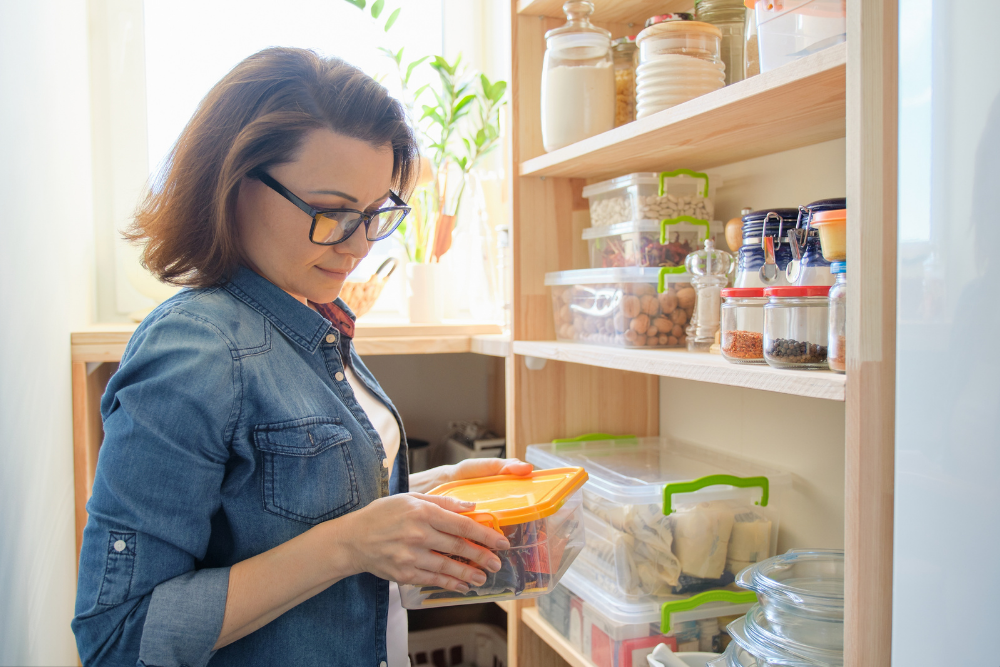
Step #1: Audit Your Pantry and Fridge
Auditing your pantry and fridge can feel like the most challenging step because you’ll have to quickly get up to speed on what is and isn’t gluten-free. You’ll soon learn how confusing and difficult many food labels are to read. However, label reading is the first skill you must master to navigate a gluten-free diet easily.
I recommend sorting all your food in your pantry into three piles:
- Gluten-Free
- Gluten
- Not Sure
You can then research all the “not sure” items at one time and decide what you feel safe keeping and what has to go. If you’re sharing your kitchen with gluten eaters, you’ll save those gluten-y items for them to enjoy. You’ll want to do the same audit in your fridge.
I highly recommend reading What Gluten-Free Labeling Laws and Certifications Really Mean to help you understand how to read food labels and sniff out gluten. You may also want to refer to my article, Is Yeast Extract Gluten Free and 20+ Other Confusing Ingredients, to help you decode food labels.
Remember, never assume something is gluten-free just by looking at it. Licorice “looks” gluten-free, but I assure you, it’s not.
Step #2: Set Up Your Pantry and Fridge
After wiping down all surfaces to remove lingering gluten crumbs in your pantry and fridge, it’s time to set up your pantry and fridge.
Assuming you’re sharing your kitchen with gluten-eaters, you’ll want to designate the top 2-3 shelves as “gluten-free.” Create signage or labels stating, “These shelves are for gluten-free foods only. Do not touch them.”
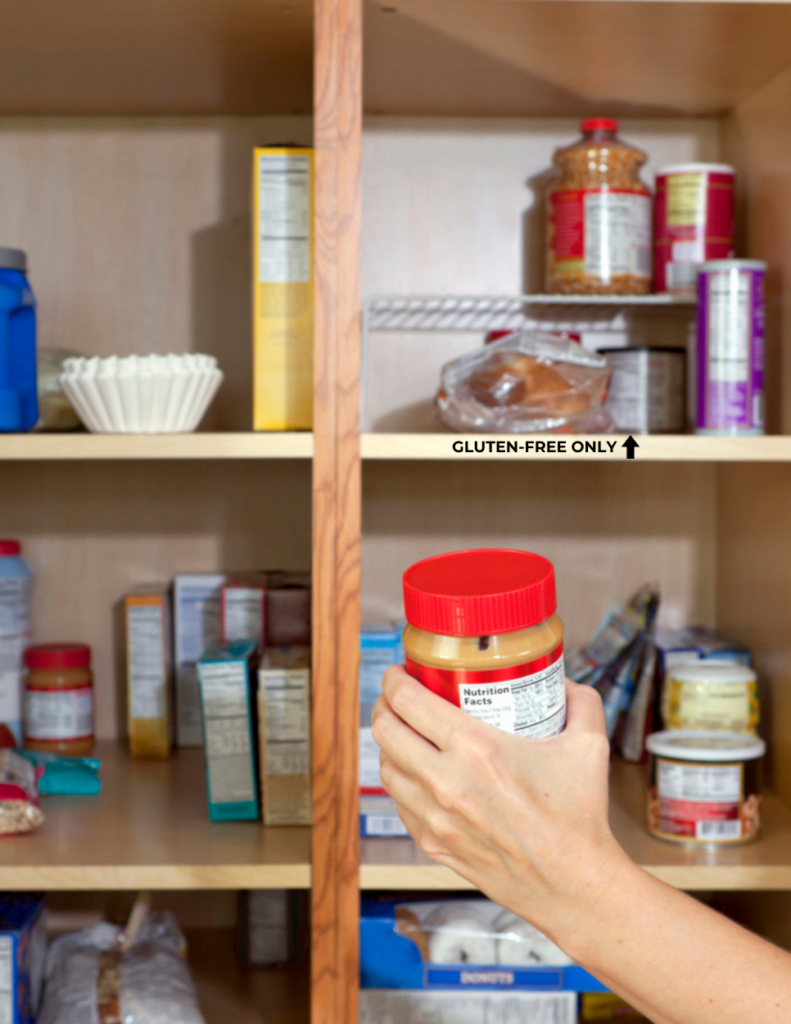
You want the top shelves for two reasons. First, the top shelves are just out of reach for most people, so your roommates or family won’t be tempted to sneak one of your gluten-free Oreo cookies if they can’t see them.
Second, if something spills, like an opened cereal box, it won’t fall onto your gluten-free foods if your foods are on the top shelves.
I also recommend labeling your foods, especially if your roommates don’t have clear boundaries about what they’re allowed to touch and take. You don’t want them putting their gluten-y hands inside your chip bag and contaminating the entire bag.
Step #3: Purchase New Food Items
After setting up your pantry and fridge, you’ll want to replace a few condiments and stock up on gluten-free food items.
The following items should be purchased fresh and used only by you. Label these containers carefully, and ask your family and/or roommates not to use the food items labeled “gluten-free.”
- Sticks and tubs of butter
- Mayonnaise
- Peanut butter
- Jelly
- Sugar, baking soda, baking powder, and other baking items that might get cross-contaminated with flour when baking
- Any other container where you use a knife to spread the item on bread (crumbs can linger and make you sick)

While at the grocery store, you’ll also want to purchase more gluten-free foods. Naturally gluten-free foods, like fruits and vegetables, will always be the safest bets. You can enjoy plenty of gluten-free labeled packaged foods as well.
Here are a few articles to help you figure out what to buy at the grocery store:
- The Best Gluten-Free Products, Brands, and Allergy-Friendly Foods
- 10 Naturally Gluten-Free Foods Every Celiac Should Be Eating
- 200+ Foods You Can Eat on the Gluten-Free Diet
- The Best Gluten-Free Snacks on the Market
- What’s Gluten Free at Walmart?
- Gluten-Free Products Available at Costco
- Testing Trader Joe’s Gluten-Free Products for Hidden Gluten
Remember to keep all your items on the designated gluten-free shelves and clearly label your food to keep gluten-y hands out of your stuff.
Step #4: Replace a Few Kitchen Items
While you’ll want to replace a few kitchen items, tools, and appliances with new items, you don’t need to replace everything. Items washed in the dishwasher, like plates, utensils, and glasses, can be shared among gluten-free and gluten-full people. Knives can be shared and cleaned easily before and after use.
That said, the following items pose the greatest threat to potential cross-contamination and should be dedicated to gluten-free use only. You can shop at HomeGoods, Target, Costco and/or Amazon to find inexpensive replacement items for your kitchen.
What You Need:
Pots: You’ll want a pot for cooking pasta and a skillet pan for making your eggs. If you like cooking with cast iron, you’ll want to get a dedicated gluten-free cast iron pan because cast iron pans are challenging to clean between uses and often have caked-on food from prior uses.
Colander: Bits of gluten can get stuck in the nooks and crannies of a colander used to drain wheat pasta. Invest in a new one and designate it for gluten-free use only.
Spatulas: Purchase a couple of spatulas (spoon and flat), as spatulas often have gluten-y bits stuck on them, even after washing.
Measuring cups and spoons: You’ll likely be baking often, so you’ll want a designated set of cups and spoons for gluten-free use only. You can also thoroughly wash these items between uses and generally experience a low risk of gluten transfer.
Baking sheets: While you can share a baking sheet if you cover it with foil first, I recommend investing in a clean baking sheet for gluten-free cooking only.
Cupcake pan: If you want to make cupcakes and muffins, you’ll need a clean cupcake pan since gluten bits easily become stuck in the grooves of a cupcake pan.
Cutting board: There is a slight risk that gluten could seep into the grooves of a cutting board, regardless of the material. It’s wise to invest in a new one just for you if possible. Read more about the risk in my article, Can Gluten Linger on a Cutting Board?
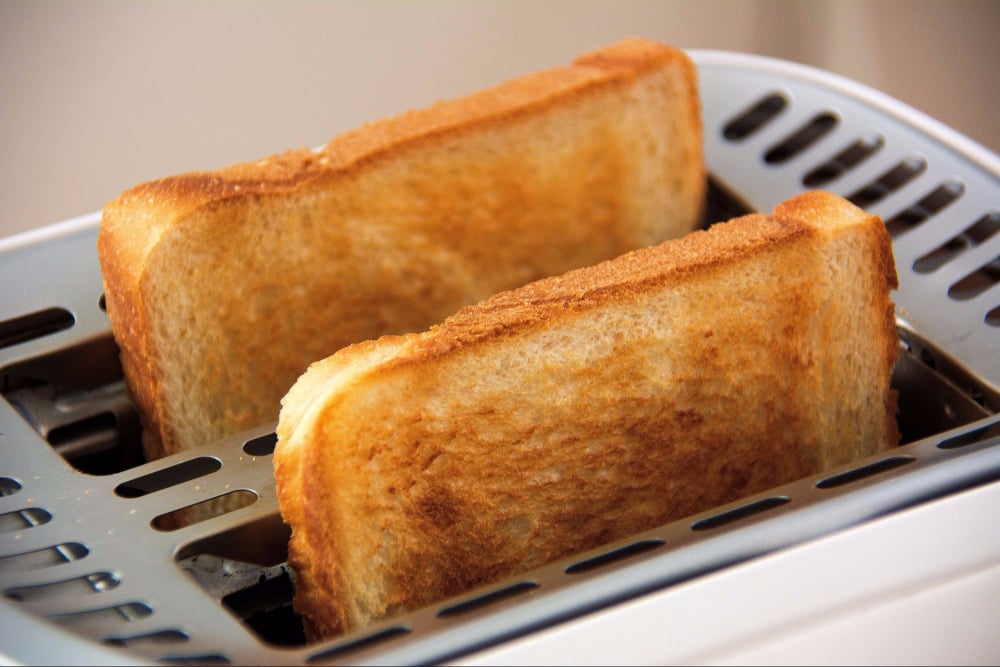
Toaster: A study found that the risk of cross-contamination in a shared toaster is low; however, toasters are notorious for harboring gluten bits. I recommend investing in one of your own and storing it out of sight so others don’t mistakenly use it. Read my article, Do Convection Ovens, Toasters, Microwaves, and/or Air-Fryers Pose a Gluten Cross Contact Risk? to understand better the risks associated with kitchen appliances.
Hand mixer: If you’re baking (and I bet you will), you’ll want to invest in a new hand mixer. Gluten-y bits get stuck in the crevices of a mixer, posing a gluten risk in your baked goods.
Standing mixer: Standing mixers (think Kitchenaid) are expensive, so replacing them isn’t easy when you’re on a tight budget. If you have a standing mixer, run it for a few minutes to knock out any gluten bits and carefully clean it. Use it for gluten-free baking from here on out. If others use this same standing mixer for baking with gluten, consider investing in a dedicated standing mixer.
Food Processor: If you use a food processor (Cuisinart) for making bread or homemade pasta (I do!), you’ll want to clean all the parts in your dishwasher and designate it for gluten-free usage from now on. If others use the food processor, consider purchasing a dedicated one since bits of gluten can become stuck inside the appliance’s nooks and crannies.
Hand towels: Gluten crumbs can linger in kitchen hand towels, so invest in some of your own. Store your hand towels in a separate place.
Sponges: Sponges can easily transfer bits of food and contaminants from one plate to another. You’ll want a dedicated gluten-free sponge for cleaning dishes. You can color code sponges to help everyone know which sponge is for gluten-free cleaning. In my house, pink is for washing gluten-free dishes; blue is for cleaning gluten-full dishes.
Step #5: Invest in a Few New Appliances & Tools
If you have the money, I highly recommend investing in these appliances (if you don’t have them already):
Rice Cooker: Rice is a gluten-free staple you can enjoy in plenty, and I think rice tastes best when cooked in a rice cooker. Invest in a rice cooker – you won’t be sorry.

Slow Cooker: I love making delicious slow-cooked meals in my Crock-Pot, including my famous turkey meatballs and this hearty chicken enchilada soup. While a Crock-Pot doesn’t absorb food allergens, it’s wise to clean your slow cooker well and designate it for gluten-free cooking from here on out. Please read, Does a Crock-Pot Absorb Gluten? for more information about the risks of using a shared slow cooker.
Juicer: I talk a lot about how juicing helped heal my body after my celiac diagnosis. You can read more about the benefits of juicing and find juicing recipes in this article. I highly recommend investing in a juicer if you’re serious about healing and like the taste of green juices.
High-Speed Blender: If you don’t love juicing, invest in a high-speed blender instead. I love my high-speed blender because I can make smoothies, like my Blueberry Banana Spinach Smoothie. It also has a spiralizer feature, so I can make homemade zoodles (zucchini noodles) in seconds.
Immersion Blender: A handheld immersion blender makes it easy to puree soups, blend salad dressings, and chop onions in seconds.
Storage Containers: You may want to invest in a few storage containers to store your gluten-free flour, sugar, and other baking supplies. I recommend these storage containers from Oxo.
Air-Fryer: An air-fryer circulates air around the food and is risky to share with those who cook gluten-containing foods, even if it’s cleaned well between uses. Consider investing in a dedicated gluten-free air-fryer. Learn more in my article, Do Convection Ovens, Toasters, Microwaves, and/or Air-Fryers Pose a Gluten Cross-Contact Risk?
Chef’s Knife: You’re going to be cooking a lot. If you don’t have a good chef’s knife, I highly recommend investing in one. It will make your life as a budding home cook so much easier. I’ve really enjoyed using the Nakano chef’s knife.

Organization Tools: I also recommend investing in other organizational tools and containers to help keep your pantry tidy. You can find storage container options at HomeGoods and The Container Store.
Step #6: Communicate
Finally, after setting up a gluten-free kitchen, you’ll want to call a family/roommates meeting to communicate your new setup and discuss how the entire household can help keep you safe. No one wants you to feel sick in the safety of your own home, do they?
Remind them not to use any items labeled “gluten-free,” including butter and peanut butter jars, due to the potential for cross-contamination.
Remind them to leave your toaster, hand towels, and special appliances and pots alone, as these are designated for your use only. Color-coding and labeling your items, as well as keeping your items in a designated gluten-free area, will help prevent any mishaps or confusion.
Step #7: Don’t Sweat It
Setting up a gluten-free kitchen can feel overwhelming, but remember, the hardest part is behind you once you set everything up.
It will take time for you and your family or roommates to adjust, but with time, it will feel like second nature to everyone.
Here are a few other articles that you might enjoy as you get started on the gluten-free diet:
- Start Here: Introduction to Good For You Gluten Free
- Do Convection Ovens, Toasters, Microwaves, and/or Air-Fryers Pose a Gluten Cross Contact Risk?
- Beginners Guide to Gluten-Free
- Gluten-Free Toothpaste Guide
- Should You Worry about Airborne Gluten?
- 10 Surprising Celiac Disease Myths Debunked
- 12+ Must-Read Books about Celiac Disease and Gluten-Free Living
- Dear Gluten, It’s Not Me, It’s You! (book)