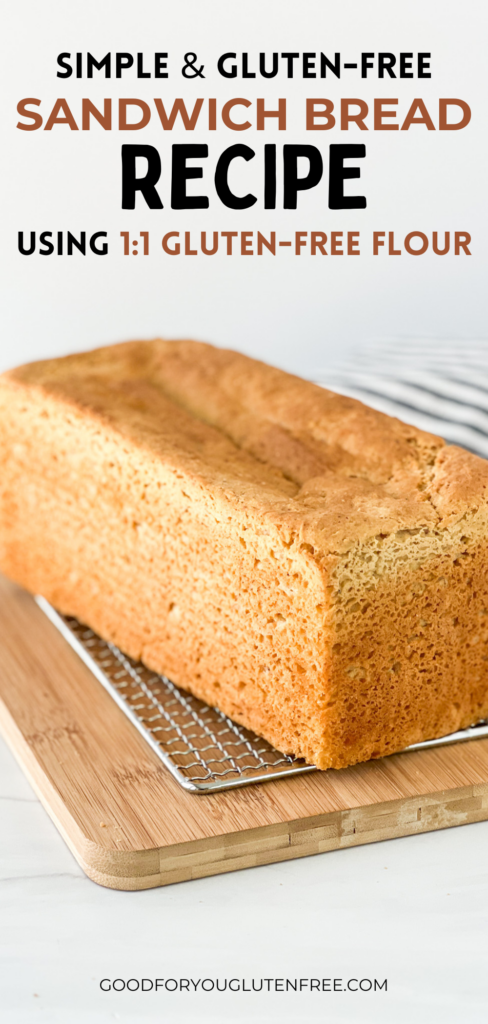
Making gluten-free bread doesn’t have to be a chore, especially if you’re willing to work with a high-quality 1:1 gluten-free flour blend. I created this easy gluten-free bread recipe using a store-bought gluten-free flour blend, and the results are surprisingly good. Please note the original recipe was slightly updated in March 2023 to add more elasticity and rise to the dough and make it dairy-free. This recipe contains affiliate links. Please see my disclosures.
I’ve been working on creating different gluten-free bread recipes, as gluten-free bread recipes are in high demand in the gluten-free community.
As you probably know, baking gluten-free bread is hard.
Gluten is the “glue” that holds bread together. Instead of gluten, gluten-free baking requires a variety of flours and starches, as well as xanthan gum, to mimic the taste and texture of wheat flour.
Baking gluten-free bread from scratch – and one that actually tastes decent and holds together – isn’t for the faint of heart. It’s hard to do. And like you, I’ve tried many bread recipes that resulted in many misses.
On top of being difficult to do, gluten-free bread baking is expensive and time-consuming.
Most gluten-free bread recipes require three or more flours, all adding up cost-wise without guaranteeing success. (Did I mention that gluten-free flours are expensive?!?)
Instead of purchasing bags of brown rice flour, tapioca starch, oat flour, and xanthan gum, I created a gluten-free sandwich bread recipe using one of the many one-to-one gluten-free flour blends commercially available today.
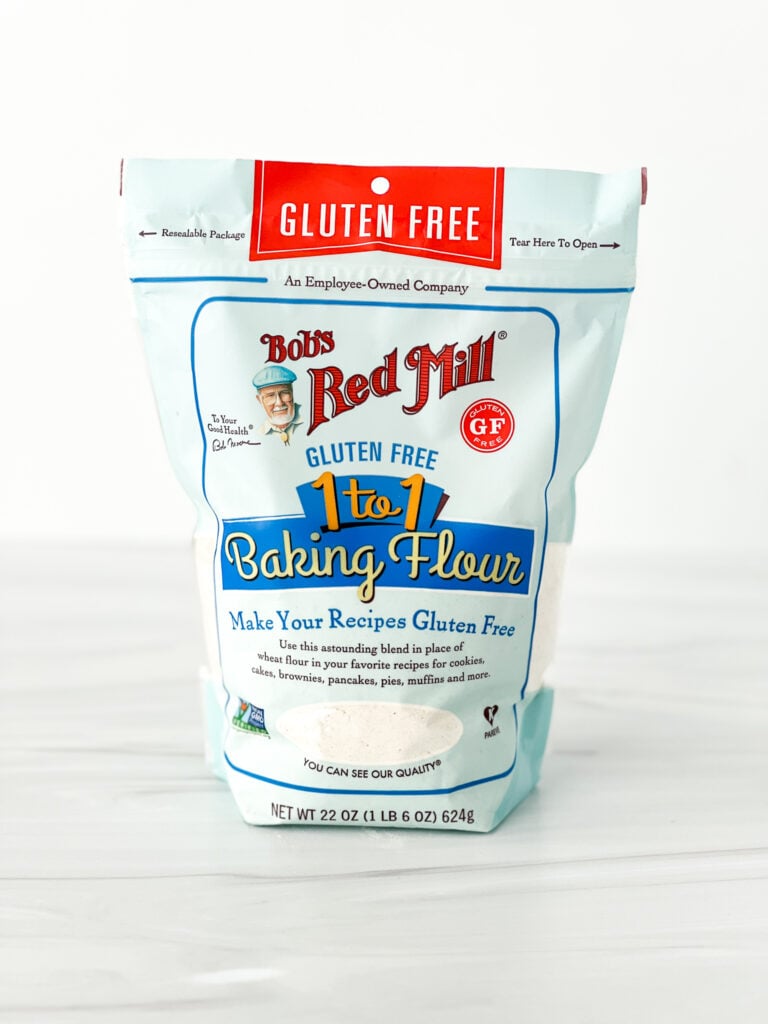
What you’ll find below is an easy, no-fuss gluten-free sandwich bread recipe that uses Bob’s Red Mill 1:1 Gluten-Free Flour Blend and no other flours.
My gluten-free sandwich bread recipe checks all the boxes:
- It’s baked with a store-bought 1:1 gluten-free flour blend.
- It slices well without crumbling.
- It tastes like real bread – soft and doughy – yum!
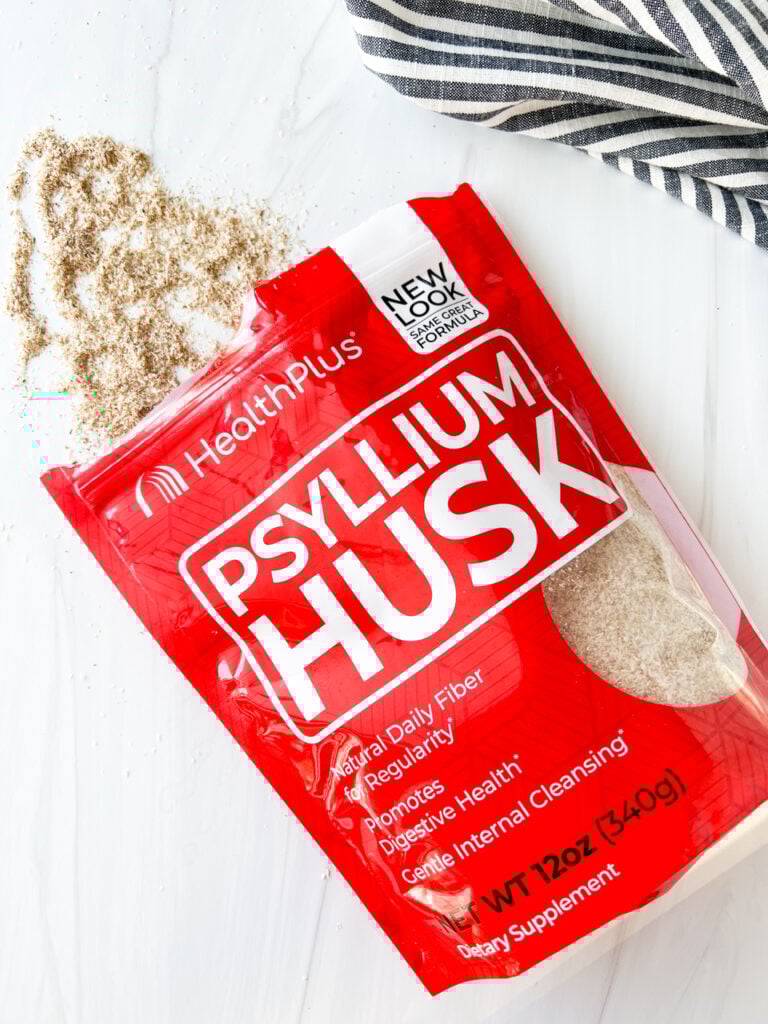
- It’s made with pantry staples (except for adding psyllium husk, which may be a new ingredient to you – more on that later). I dislike shopping for tons of ingredients just to bake a simple bread.
- It looks beautiful with a brown crust and doughy middle.
Yes, my friends, the following sandwich bread recipe is everything I’ve ever wanted in a sandwich bread and more. And now you can make this easy gluten-free sandwich bread recipe at home with little fuss and expense, too!

Ingredients Needed Gluten-Free Sandwich Bread
You’ll need to gather a few basic ingredients to make this recipe. As noted above, I used only pantry staples, so you don’t have to run to the grocery store to buy a million different flours. Here’s what you’ll need:
Gluten-Free Flour: You’ll need three cups, or 444 grams, of Bob’s Red Mill 1:1 Gluten-Free Flour. Look for it in the blue bag.
Please note that I haven’t tested this recipe with any other 1-to-1 gluten-free flour, but if you do, please leave a comment to share what you used and how it turned out.
Psyllium Husk: Psyllium husk adds structure, elasticity, texture, and rise to this recipe, and that’s why I added it to my revised recipe.
I highly recommend investing in a bag of whole psyllium husk if you plan to bake bread from scratch. I use HealthPlus Psyllium Husk (found online and in natural grocery stores) because it’s labeled gluten-free.
You’ll also need light brown sugar, yeast, baking powder, kosher salt, water, honey, dairy-free butter, and eggs. All these ingredients work together to add structure to the gluten-free loaf.
How to Make Gluten-Free Sandwich Bread
To make the bread, combine the flour with brown sugar, yeast, psyllium husk, baking powder, and salt in a large bowl attached to a standing mixer.
Set the mixer to low and add the warm water, honey, softened butter, and apple cider vinegar. Then add the three eggs, one at a time, until they’re each well incorporated.
Once all the eggs are incorporated, set the mixer to medium-high speed and mix the dough for three minutes. Remember, gluten-free dough is sticky and wet, unlike traditional bread dough made with wheat flour.
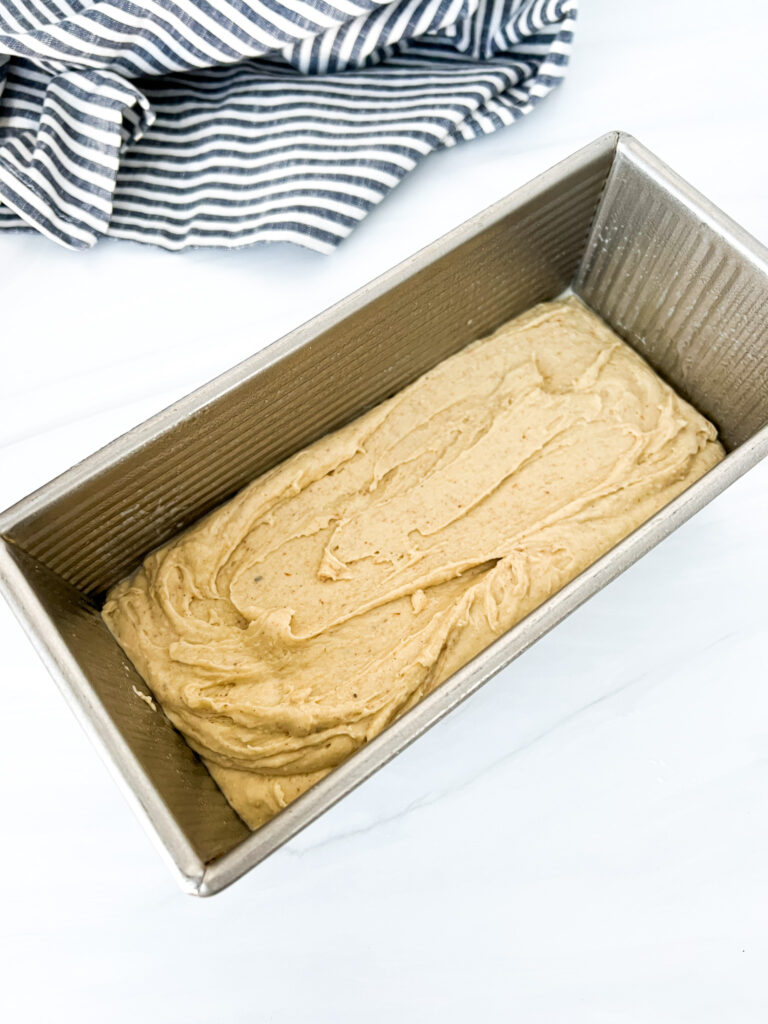
Add the dough to a lightly greased loaf pan. I highly recommend using a loaf pan that measures 9 x 4 x 4 inches. This will ensure your bread gets a good rise and doesn’t balloon over the top of the pan.
Alternatively, you could use a standard 8.5 x 4.5″ loaf pan, although the bread won’t be as tall.
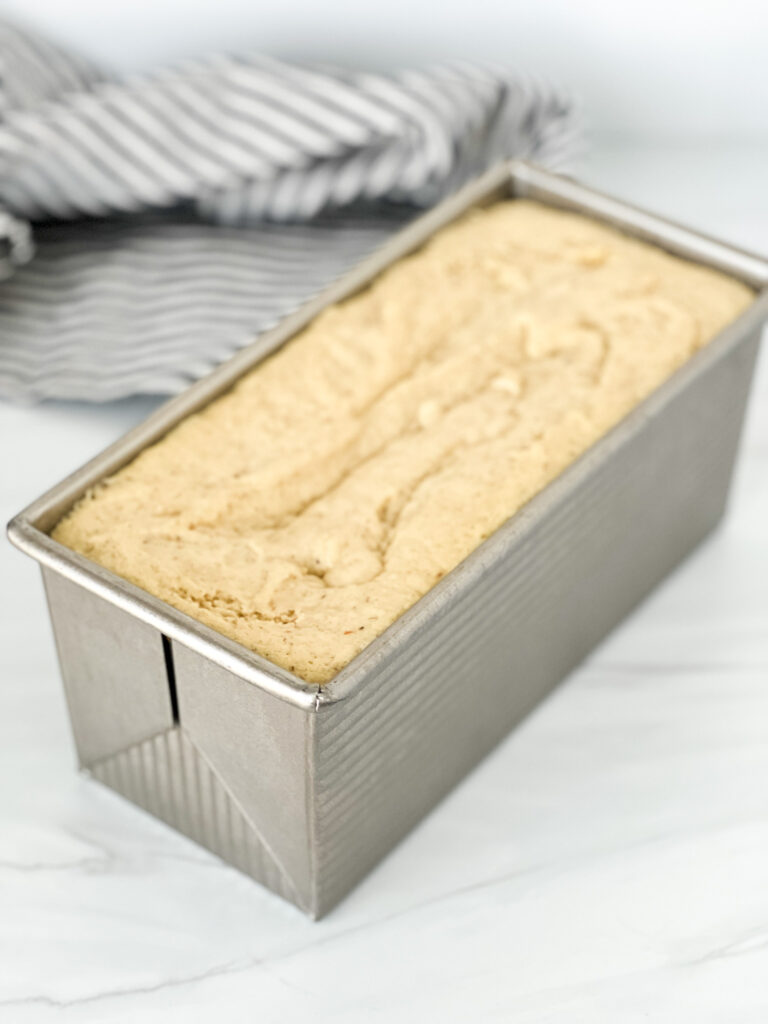
Cover the pan with lightly greased plastic wrap, and place it in a warm place to rise. If you have a proofing setting on your oven, use it as it will provide a warm place for the bread to rise.
The dough will need about one hour to rise in a proofing oven or two hours at room temperature. You want the dough to double in size.
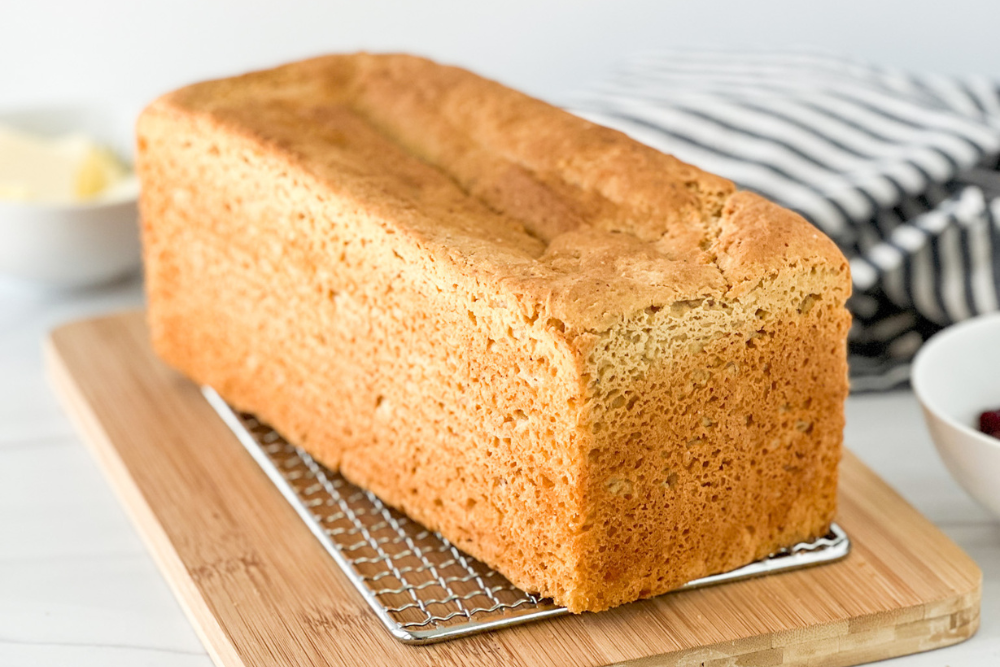
If using a shorter bread pan, beware that the dough may bubble over the top if you don’t watch it carefully. This is why I recommend using a tall 9 x 4 x 4 loaf pan, as pictured below.
As you can see, the dough rose to the top of the tall loaf pan after just one hour of proofing in my oven (proofing setting).
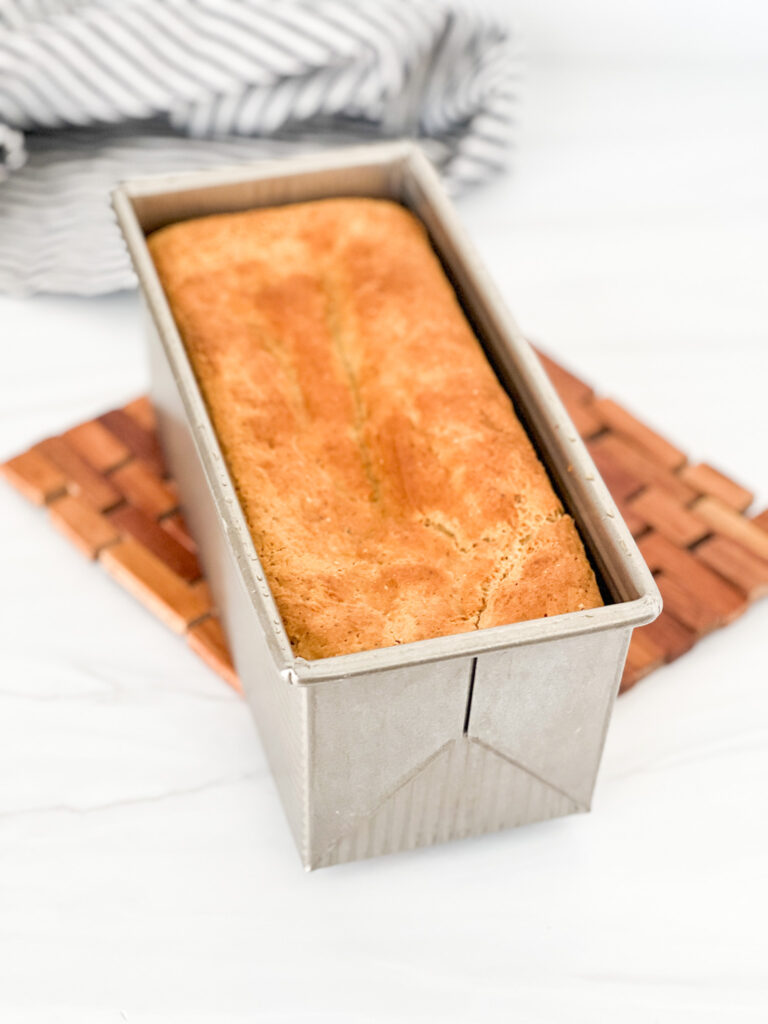
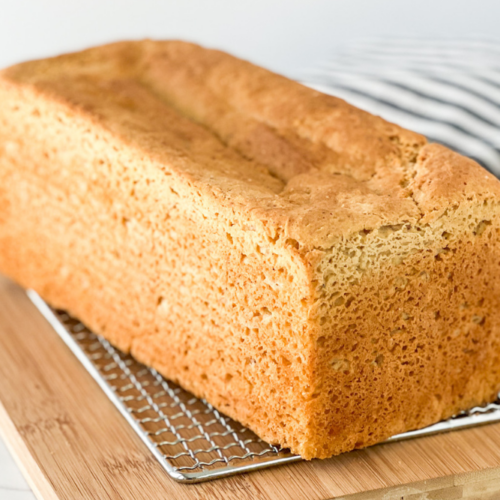
Bake the bread in a 350º F preheated oven for 38-40 minutes until the top is slightly browned. Remove it from the oven and allow it to cool for a few minutes in the loaf pan before removing it and placing it on a wire rack to continue cooling.
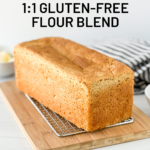
Allow the bread to cool fully (1-2 hours) before slicing it with a serrated knife. I recommend slicing it as needed (vs. pre-slicing the entire loaf) to ensure the bread stays moist for as long as possible.
The bread tastes amazing as-is on day one, but after that, gluten-free bread loses some of its luster.
The good news is that the bread will return to life in your toaster or after a few seconds in the microwave. Gluten-free bread always tastes better warm.
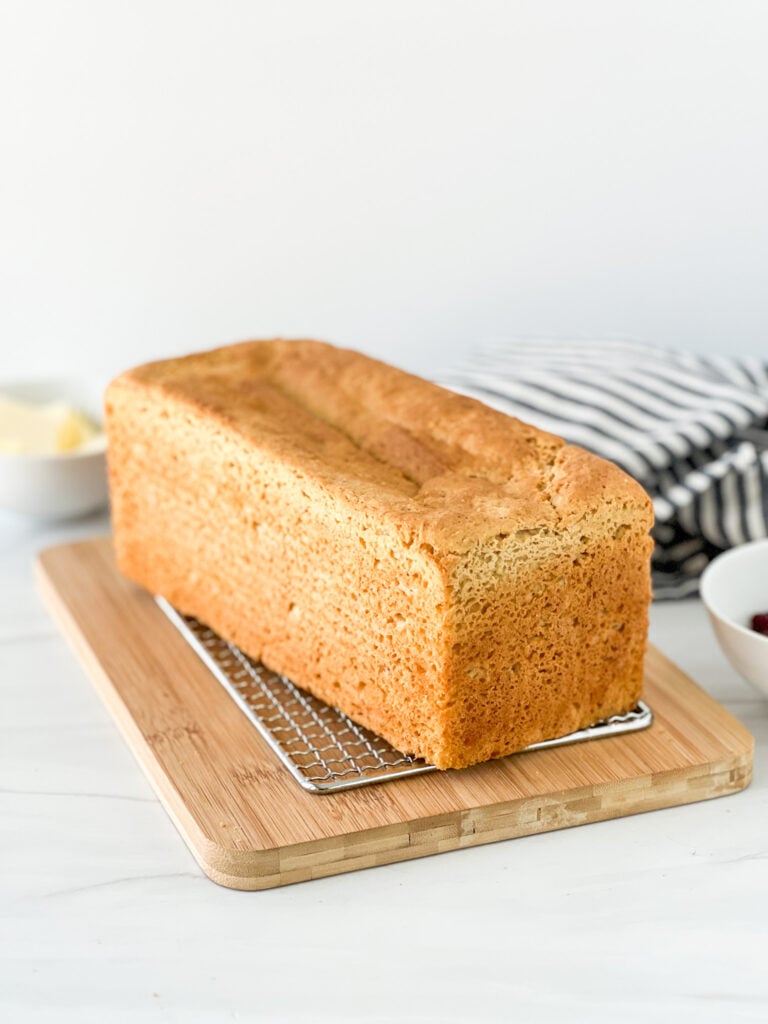
As you can see from the prior picture, the bread rose better with the revised recipe, and it’s a tall and proud loaf. It slightly sunk in the middle, which often happens in gluten-free bread baking.
When I make it next, I may try reducing the oven temperature slightly and baking it for longer to see if it makes a difference. I may also add a little less water. Many factors can cause bread to sink in the middle.
Honestly, after baking several loaves, I’m happy with this final loaf. It tastes incredible and is a recipe I’m proud to share despite the slight imperfection.
Like I said before, gluten-free bread baking is tricky; let’s be proud that we were able to get this far!
Why I Love this Gluten-Free Sandwich Bread
There is a lot to love about this recipe:
The Bread is Soft But Well Structured: I love bread that holds together well but still has a soft center. The bread feels like a well-structured loaf when you slice into it, but it’s got a soft and doughy center that tastes delicious.
It Tastes Homemade: The bread tastes great, much better than anything you can buy. It tastes like warm and cozy homemade bread. And it’s much bigger than store-bought loaves, and you can cut it into thick slices if desired.
It’s Made with 1:1 Flour: While many 1:1 gluten-free flour alternatives don’t recommend their mixes for making bread, this recipe was specially formulated to be made with 1:1 flour. I added psyllium husk to add structure to the bread. Don’t skip it; it helps gluten-free bread rise and improves the texture and taste of the bread.
FAQs
Storing Leftover Bread: Wrap unused bread in a zip-top bag and store it on your countertop. Be sure to heat leftover bread in the toaster or microwave to help it become soft and doughy again. This bread will last for several days wrapped and, again, will always taste best when slightly warmed.
Freezing the Bread: This bread will freeze well, but I recommend slicing it before freezing it and then removing the slices from the freezer as desired.
Where to Buy Psyllium Husk: I used HealthPlus Psyllium Husk, which I found at Natural Grocers. It can also be purchased on Amazon. Be sure the psyllium husk you use is labeled gluten-free.
Gluten-Free Flour: I have yet to test this recipe with other 1-to-1, cup-4-cup, or measure-for-measure gluten-free flours. If you try it with another blend, will you please comment to share what you used and how it turned out?
More Recipes?
Try these other bread recipes from Good for You Gluten Free:
- Easy Gluten-Free Oat Bread
- The BEST Gluten-Free Monkey Bread (Dairy Free Option)
- Gluten-Free Artisan Bread Recipe
- Gluten-Free Sourdough Bread
- Fast Almond Flour Bagel Recipe
- Gluten-Free Challah Recipe
Gluten-Free Bread Made with 1:1 GF Flour
Equipment
- 1 9x4x4 inch loaf pan – see notes
Ingredients
- 3 cups Bob’s Red Mill 1-to-1 Gluten-Free Flour blend 444 grams
- 2 Tbsp brown sugar light
- 2 Tbsp whole psyllium husk see notes
- 2 tsp active dry yeast
- 1 1/2 tsp Kosher salt
- 1 tsp baking powder
- 1 cup water warm
- 2 Tbsp honey
- 4 Tbsp dairy-free butter softened
- 3 eggs large
- 2 tsp apple cider vinegar
Instructions
- Combine the flour, brown sugar, psyllium husk, yeast, salt, and baking powder in the bowl of your standing mixer fitted with the paddle attachment.
- While mixing on low, add the warm water, honey, butter, apple cider vinegar, and eggs, adding 1 egg at a time until incorporated.
- Mix the dough for 3 minutes on medium-high speed until all ingredients are well combined and the batter is sticky and soft.
- Lightly grease a 9x4x4" loaf pan (alternatively, use an 8.5 x 4.5" loaf pan), then add the dough to the pan, smoothing over the top with a spatula. Cover the dough with a piece of lightly-greased plastic wrap and place it in a warm spot to rise. It will need about 60 minutes to rise in a proofing oven or two hours on your countertop. Once the dough has doubled in size, it's done proofing. (If using a smaller loaf pan than recommended, the dough may bubble over the top of the pan. Watch it carefully to avoid making a mess.)
- Preheat the oven to 350º F, then bake the bread for 38-40 minutes until the top is slightly browned and the dough is cooked through. Place the bread on a wire rack to cool for 10 minutes before removing it from the loaf pan and allowing it to cool completely on the wire rack.
- Once cooled, use a serrated bread knife to cut bread into slices. Slice the bread as needed, and store leftover bread in a ziip-top bag at room temperature for 3-4 days. You can also slice and freeze the bread slices. The leftover bread tastes best when toasted or lightly heated before eating.
Hi, Do you have a recipe for a Bread Machine Gluten Free Bread using Robs’s Red Mill. Thank You
Hi! I LOVE this recipe and have made it numerous times with varying results. I have a tall loaf pan and it always rises all the way to the top when proofing, which is great! However, my child was recently given the “okay” to eat dairy in baked goods, so I have started replacing the dairy free butter with real butter. But I’m having the worst time trying to use real butter! When using the dairy free butter my loaf stayed standing tall with only a little shrinkage and small dip in the middle. But every time I’ve tried to use real butter, it falls and shrinks SO much and is more dense! What can I do to make a successful tall loaf using real butter? I’ve tried adding a bit more water and it didn’t help.
I recommend using a tall 9 x 4 x 4 loaf pan. That’s probably why my bread looks taller.
I use the Proof setting in my oven, and while it does rise, it never rises as much as yours appears to. I’m wondering if I should try increasing the recipe 1.5 x. Perhaps more dough will make a larger loaf??
This is so good and so simple! Store bought GF bread is crazy expensive and not that great so I’m glad I found this recipe!
I use a special loaf pan as noted in the article that makes it bake up higher than a typical bread pan. It’s very cold. Perhaps rise it in a warmer spot. I like to use my warming drawer these days.
I’ve made this 4 or 5 times, and while it is a great loaf of gluten free bread, it’s usually not very high, at least nothing like your photo. My yeast is fresh, so that’s not the issue. It dues rise somewhat but never close to overflowing. Should I let it rise longer for first and second rises? Would that make a difference?
Gluten free dough is so sticky, so the standing mixer will make this much easier if you have one.
Can this bread be made without a stand mixer?
I have made 4 loaves with this recipe, with varying results. The first time my loaf pan was not the correct size. Neither was the second. The flavor is like real bread. The texture is quite good. Such a lovely crumb! I can slice it without it falling to pieces. I have psyllium powder on hand so I used it instead. My gluten free human is also sugar free but can have honey. I use prune juice as part of the liquid. It helps the yeast rise, in lieu of sugar. I saw that someone used coconut sugar. I may try that. I have used real butter and non-dairy butter. It didn’t seem to make a difference in texture or baking. I experimented with temperature. On the fourth loaf I used a 7.5×4.5×4.5 bread pan. I baked it at 425 degrees for 15 minutes then dropped the temperature to 350 degrees for 30 minutes. I also used club soda for part of the liquid, as it can help with creating air pockets in combination with the psyllium. I proofed it in the oven, 95 degrees, for 30 minutes. It was risen to the top of the pan. I set it on top of the stove to preheat the oven to proper temp and it raised a little more. There was a little shrinkage, but not much. The loaf did not “fall” like the 3rd loaf did (same pan as the fourth loaf). No creases. It looks like a very nice loaf. I cut into it. It looks great! Still a tiny bit moist in the middle. I will try cooking it a little longer at the lower temperature next time. This is my favorite gluten free recipe so far. Easy to make the adjustments I need for my family and still get a great loaf. So good! Next I will experiment with flax “eggs” instead of real eggs for my gluten free, vegan guests that stop by from time to time. Thank you so much for sharing your recipe!
I made this recipe. I am still experimenting with it but I really like it. It is the best base recipe I have worked with so far. I can slice it without it crumbling! I do make substitutions because my gluten free human is also sugar free. Fortunately they can have honey and other natural sugars. I use prune juice in the water to add sugar for the yeast to rise. It does work. I didn’t have whole psyllium husk on hand so I used the powder I do have on hand. It worked, but I would like to try the whole psyllium to see what the difference is. I read that gluten free bread should be cooked at a hire temperature for the first bit then dropped to a lower temperature for the last bit and to cook it a little longer. I’m going to try that today. My first loaf was amazing. My second loaf was good but not as amazing as it was undercooked and shrank. The first loaf didn’t shrink. I don’t know what I did differently. I think I used real butter the first time, but I don’t know if that really makes a difference? Today I am going to make two loaves. One with real butter and one with non-dairy. I also have a fancy new oven that bakes with convection and will bake without convection. So far I have been using convection and it tends to make the crust softer, which is nice for gluten free bread. Well, here goes on try number 3!
The butter and milk 1-to-1 swap should not be an issue. Good luck!
If I want to use real butter, would I use the same quantity as you list for dairy free butter?
Also, I want to use milk not water, would that be the same quantity as what is listed for water?
Thanks.
I’m not sure. It’s a bit dense bc it’s gluten-free. I would definitely recommend experimenting with the rise time bc some homes are cold and bread takes longer to rise. A warm environment is best. And make sure you measure the flour because even an extra 2-4 tbsp can change the consistency. Good luck!
Hello! I tried following this recipe, and have to admit it turned out really well, especially for my first attempt at baking gluten free bread! I do have a question if you have time, the loaf is a bit heavy, more like a banana bread than anything. I followed the recipe instructions (no substitutions at all), use a 9.5 by 5.5 inch pan. After 55 minutes of rising in a warm oven the bread was over the top of the pan, so I baked it. It seems to have shrunk a bit, and as I stated is a bit dense. Could more raising have fixed this? Any other suggestions?
In any event, nice bread! I’ll keep trying to improve!
Made yesterday and it is so good. I didn’t have the psyllium, but I threw in flax seeds and toasted this morning. I’ll make again for sure. I usually buy Ana’s mix in the bag, but that’s $10 for just one bag! I’ll experiment with other GF flour blends for fun.
I have tried making many loaves of bread in the last couple of months , I made yours today and it smelt amazing cooking and once I took it out I couldn’t wait for it to cool down and I had a slice. To say I’m in heaven is a understatement it is delicious. Once cooled I sliced it and put most of it in the freezer . Thank you so much for this wonderful recipe I will be trying more of your recipes for sure
I just baked this loaf and am blown away at how easily it came together!! Thank you for sharing this recipe. I’ve recently been diagnosed with celiac disease and trying to navigate this new world of gluten free!! Not easy to find a nice GF bread loaf !! I think this one is it for me. Thank you!
I’ve made this twice and a third loaf is rising. THANK YOU SO MUCH. Bread, real bread. Since I’m wheat and corn allergic (not gluten, actual allergies) you can imagine how careful I have to be. I have some suspicions about psyllium so I used flaxseed meal, which makes it taste like a good honey wheat bread. I didn’t use a machine at all, just mixed well. This is an easy recipe well within a normal person’s price range. Those tiny, bland wheat free breads are expensive!
Teresa Marie Coleman I used the same amount of corn starch (2 TBSP) for the psyllium husk and it was perfect!
I don’t know since I haven’t tested it.
If I’m replacing psyllium husk with cornstarch, how much cornstarch do I use?
Wow. Just wow. Made this today and I’m blown away. The only changes were corn starch in place of psyllium husk, coconut sugar in place of brown sugar, real salted butter, and the only loaf pan I have is a 9 x 5 x 3, lightly greased with coconut oil. The texture is bread! The taste is bread! Regularly use Bob’s 1:1 GF flour. Will make this again and freeze it to see how it handles.
Yes I think that would work.
I don’t eat honey, could I substitute pure maple syrup for it?
I haven’t tested it with alternative sugars but I would try honey as a 1-1 substitute.
Hi. Is there a substitute for the sugar ? I also am Type 1 Diabetic. Is there a quantity of
honey that I can use. Thanks so much for your great report.
Yes. I do that with some bread recipes. I bloom the yeast first, then add to the dry ingredients. It’ll help you see if your yeast is active or expired. Yeast doesn’t last long so also try a fresh jar.
So I can bloom the yeast with the recommended amount of water and sugar in your recipe and then add that to the dry mixture?
You can check if your yeast is good by combining the yeast, water, and sweetener in a bowl. Mix together and let it sit for 10 minutes. It should foam and bubble at the top. Otherwise you have old yeast.
Sorry. You’re right. I put the yeast in the recipe. Is your yeast expired? It should have mixed in well but it looks like it was clumpy in your recipe so I’m wondering if your yeast is okay. I can’t troubleshoot as well as I want to without knowing what you did.
Could you tell me the directions to bloom the yeast?
I didn’t bloom it, I followed the recipe word for word. How do you bloom it? How much water would you use?
Did you bloom the yeast first before adding it to the recipe?
When I tired the recipe it seemed there was little balls of yeast on top once the bread was cooked. What did I do wrong?
I used King Arthur gluten free measure for measure flour and it was delicious and worked well. Thank you
Dec 15, 2023 I made this bread recipe yesterday and my family wiped it out, made another one, but one cup shy of 1 to 1 so I put 1 cup of spelt flour with the mixture it’s is very delicious 😋
Turned out the best gluten free bread I’ve had! Thanks so so much for this recipe.
I had placed an order for the All Purpose Flour after I realised the 1:1 flour I had wasn’t suitable for bread baking. With this recipe I can get a brioche like loaf with the 1:1 as I’ve still got so much of the flour. Can’t wait to try it toasted or for grilled cheese 🤤
Do you have any bread recipes with the All Purpose Flour?
No biscuit recipe as of now
Love the bread !!! Do you have a biscuit recipe?
Hi Jenny,
I made your recipe earlier. It is such a soft and light bread! It is exactly what I was looking for. I usually buy store bought G.F. But it always tastes so drab. And the loaf is so tiny compared to this recipe.
I want to thank you and also I used regular unsalted butter in place of the dairy free one. And I used oat flour one cup. For I only had 2 c of the 1 to 1 of G.F. Bob’s red mill. I will cut it into slices when I eat lunch.
I changed to gluten free because of my hand’s breaking out in a rash when I eat whole wheat. As everything it seems has w.w. Plus, I gain that wheat belly I don’t like.
Anyways, it will eat fast. The taste is sweet and light. I LOVE it! And it was easy peasy to make Too!
It was designed as a sandwich loaf bread. I haven’t tried it as rolls.
Can you make buns out of this dough?
Either is ok
Do you need to use dairy free butter, or is regular butter ok?
I love hearing this. Glad it worked for you, Wendy. GF bread-making is hard!
Thank you Jenny!! After trying SO many recipes and buying a million ingredients, your one simple GF bread recipe is golden. I am gluten, wheat and dairy intolerant as well as have to follow a pretty strict low fodmap diet. Not easy! My first loaf came out looking exactly like the photo of your bread…which never happens. It cut easily with no mess, froze half of the loaf, toasts great and best of all, tastes great and NO tummy issues! I did use an 8.5″ X 4.5″ pan, which worked out fine. I let the dough rise a half hour longer than stated and baked it about 10 minutes longer. In order to stay with the low fodmap diet, I substituted Agave Nectar in place of honey, used gluten free baking powder and substituted fresh squeezed orange juice in place of the apple cider vinegar. This recipe is easy and you can expect a rewarding outcome!
Thank you so much!
Thanks very much for sharing a easy simple to follow receipe. First time I have tried a receipe for GF bread that I had sucess with it is delicious!!. The key to a successful finish product is using the recommended ingredients and following the instructions. I finally have a proven go to receipe.
Claud M J
Thanks for your response, and the updated recipe! I’ll be making this again today. I’ve tried 3 or 4 recipes and yours is absolutely the best!
I’m sorry about that. I’ve updated the post. I also had been in the middle of retooling the recipe to get a better rise and make it dairy free (lots of requests for that) so the recipe has been slightly updated and retested as well.
Thanks for your recipe, it’s still cooling so I haven’t tried it yet but it seems like it turned out well! I noticed while reading through your entire post, there’s a couple discrepancies between the instructions in the post and the printable directions. Should the dough be mixed for 3 min or 1 min at high speed after the eggs are added? And should it have an initial rise of one hour in the mixing bowl before transferring to the loaf pan, or immediately be transferred and rise for 90 to 120 min? Thanks again.
All the substitutions might have been why it failed. I’m thinking your yeast might be old too. Did you activate it first?
Just tried this and failed. My dough was not sticky and did not rise. I substituted milk with extra creamy almond milk, butter with country crock plant butter, honey with agave, and eggs with ground flaxseed mixed with water.
Thank you for sharing your recipe. We found out a few months ago that my daughter has a gluten allergy. We have not found a bread that she likes till now,🥰. She said mom get some more of her recipes!!! So we will be trying more in the near future.
Seriously a game-changer!
Sure
My stand mixer doesn’t have a paddle attachment. Can I use the spiral dough hook instead?
I haven’t tried it this way so I don’t know.
Hello! Can this be made in a bread machine that has a gluten free button? Would it turn out alright?
It’s hard to say what went wrong. Gf baking is finicky. Glad it still tasted good.
Followed recipe, bread raised evenly but when baked the center sunk a little. It wasn’t uniform. What did I do wrong, it tastes great though.
Right, Bobs 1:1 flour is not great for yeasted breads but this works well for this recipe. What I mean by do not deflate is to not knead and punch it down like you would with gluten dough.
What do you mean by do not “deflate” in the instructions? I’m barely learning how to bake GF bread, cakes, cookies etcetera. I recently bought the Red Mill Gluten Free 1:1 Flour and realize it is used mainly for cakes, pastries and cookies so finding this bread loaf recipe really made me happy.
This is so much better than the standard gluten free breads that just fall apart the second you touch them. Super soft with a little chew and great flavor. New favorite gluten free bread recipe!
This was my first time attempting to make gluten-free bread. The recipe is more like a brioche than a conventional bread and it ended up being richer than and more calorie-dense than typical white bread. The 1:1 flour is closer to cake flour than bread flour, so the recipe turned out drier and coarser than I expected, more like a quick bread. Baking inductions were perfect. All my ingredients were at room temperature. Flavor is good. Toasted pretty well. I only got 12 normal thickness slices from my loaf. Not bad, but I think Bob’s Red Mill GF Baking Flour may be better for this. Thanks for the starter recipe!
Yay glad you loved it. I don’t have a hoagie roll recipe (yet) but great suggestion.
After many times trying different bread recipes I found yours! Mine fell just a little in the middle. I did use my bread machine on GF setting. Turned out perfect soft and not crumbly. Do you have a hoagie roll recipe using 1:1 Bobs red mill flour? My son is missing out when we make Philly cheese steak!
Thanks so much for this great recipe, Jenny! I’ve tried MANY gluten-free bread recipes & this one’s the best I’ve found. I’ve used it (-honey, +almond milk, w/ Earth Balance instead of butter to be low FODMAP & dairy-free) 3X now & am enjoying bread painlessly for the 1st time in years.
Beware when using it for the 1st time, GF flour makes batter so sticky you may get frustrated at just scraping it out of the mixing bowl. If you use plastic wrap over it when proofing, spray the plastic w/ butter spray 1st, otherwise a bunch of batter will come up when you remove it to bake; this makes the loaf fall & even if you add that dough back to the loaf it’s flat now. Next time, I’ll proof uncovered in a warm oven to avoid the hassle.
It’s impossible to grease your loaf pan too much when using this batter. Go nuts. I’ve had success w/ coconut oil & butter spray (which is vegetable oil).
I added ~2 Tbsp of flaxseed meal to the recipe above & it still rose perfectly. Looking forward to a hot slice of it in about 20 minutes. Next time, I’ll split this recipe into 2 loaf pans, this batter rises a lot & breaches the loaf pan sides, making a mess.
Freeze what you haven’t used in 4 days, it can mold overnight. I slice it all the 1st day & freeze half of what I slice immediately so I can ration it out to enjoy something that feels normal for a change, like a half-sized PB&J.
It does come out more crumbly than typical sandwich bread for me, but I chalk that up to not using honey or dairy. Still great mouthfeel & flavor, & if I can get a slice to hold together long enough to be toasted it’s less crumbly.
It doesn’t taste or feel like Wonder bread, but it’s something better – eating something run-of-the-mill w/o worry.
I made your recipe today it is great! Thank you. I searched the internet for a simple recipe and yours came up. I have never made anything gluten free before. I am impressed!
It’s per slice based on approx 18 slices. All nutrition info is approximate.
It holds well together when made as instructed but 1:1 flours are generally a bit more crumbly when used with yeasted recipes. You do want to mix it well not to develop the gluten but to ensure the flour and wet ingredients meld together well.
Ok, so I made grilled cheese with this bread recipe. Proved for 110 minutes and baked for 50 minutes. I feel like I should have baked it for another 10 minutes. I skipped the sugars and did a spoonful of honey. I did not use a stand mixer either, but since there was no gluten to develop I felt comfortable mixing the dough as I usually do with gluten free recipes. The bread was not dry, but at the same time it was noticeably crumbly. I was nervous about making grilled cheese with it but I tried anyways. The edges of the bread broke off but the interior stayed in tact with ginger flipping and good roasting. So it didn’t fail, but I don’t think this recipe could be a full replacement for bread. If your making bread for yourself for toast or sandwiches it will work, but I wouldn’t use this recipe for social events.
Can you please tell me if the nutrition info is for 1 slice or 2 please? It isn’t listed what is considered a sewing size/
Yes slice it up, slather with butter and add cheese. Slices well.
Will this recipe work for grilled cheese? I.e. will it hold together and crisp up? Asking because other recipes I’ve tried work and taste great but are too crumbly to make grilled cheese
Can we get a 1-1 flour recipe for our bread maker machine on gf cycle
I’m not sure but there is a gluten free bread machine cookbook on amazon you should look into.
Hi, I’m hoping to get some instruction on making this recipe in a bread machine instead of oven.. I’ve never made bread of any kind before, but am looking to start making my own GF bread since I can’t find it nearby after moving.
So glad to hear it worked for you too!!
Just made this today and was VERY impressed for a first time baking a yeast loaf. Did not rise as much as expected and looked like a golden brown brick, but the texture and structural integrity is FAR superior to my Mom’s go-to recipe! This actually holds up in a sandwich and tastes like a cross between bread and a buttery biscuit!
I did use King Arthur 1:1 flour instead of Bob’s Red Mill, and subbed Smart Balance margarine instead of butter and unsweetened almond milk instead of eggs, and I suspect it proofed a little too warm (stuck it in the oven on the lowest setting, which was 170). I am at over 4000 feet, so this could be part of it.
Either way, LOVE making bread that doesn’t need a million different flours!
This was my fourth attempt at gluten free bread, and left all the others in the dust. (That’s also what the others tasted like…dust.) Just DELICIOUS and makes for great toast! It looks more like a cake batter when you pour it in the pan. Mine only took one hour to rise over the top of the pan, and as I left it for a full 75 minutes, it actually overflowed a little once I put it in the oven. 😆
You could try flax eggs? 1 Tbsp flaxseed meal + 3 Tbsp water per egg.
Is there anyway I can replace the eggs?
Did you use 1 tsp instead? I’ll test and maybe make that change.
WAY too much salt. other than that, tasted pretty good.
I love hearing this!!
Just made this today and it’s wonderful! Super easy to make with ingredients I had on hand. I didn’t have a stand mixer so I used my hand mixer and it was perfect. Soooo happy to have found this recipe. Due to multiple allergies I cannot have gluten or processed foods (like breads) because of the chemical preservatives. Today was the first time in about 2 years that I had a sandwich with bread!!! 🙂
Not sure. You could definitely try it and see if it works.
Can you cut down on the sugar or leave out?
I haven’t before but I suppose you could try
Can I leave out the salt?
Warm but not hot.
What temperature should the milk be? Thanks!
It’ll work, I think. The recipe is quite forgiving.
i did not read directions as well as I should have hand kneaded it for several minutes will see what happens
I would do that before letting it rise. No kneading because there’s no gluten to develop.
If I were to incorporate dried fruits and seeds for Thanksgiving, when should that be added? After it rises, knead it in?
Oh no! Bob’s red mill makes an egg replacer. And you could try a flax egg.
Is there any replacement for the eggs? I have just been informed that I cannot eat eggs :/
Maybe try an electric hand mixer?
Is there any way to successfully make this without using a stand mixer? I tried today and my dough ended up crumbly and didn’t turn out right. Any suggestions?
I made this yesterday and it came out beautiful.. texture and taste were amazing. BREAD I exclaimed!! I substituted honey for all sugar and used coconut oil. Thanks so very much for sharing your recipe
Fabulous! Thank you!
I haven’t tried it that way. Please let me know if you try it.
Can this recipe be done in a bread machine
I made this and it came out great and rose more than in the photos. I don’t have a stand mixer, so I used my Ninja food processor with the plastic blade meant for dough. I felt that 3 minutes was a little long (and loud) for that device, so I let it go for about 30 seconds. The dough was really thin, like a thick batter. I know gf dough is sticky, but I never had bread dough be this much closer to a batter than a bread dough. I was a little skeptical, but kept going. I didn’t see the point to transferring it into a bowl to proof so I put it in a parchment lined loaf pan of the exact size that was recommended. I let it proof covered with greased plastic wrap in my oven in bread proof mode for about an hour and a half. It rose so much. I then baked it. It didn’t seem quite set at 40 min (but probably was) so I baked it a little longer until it was the same color as in the pictures. It was perfect. I had a few slices nice and warm and sliced the rest once it was cool. I froze what was left the next day.
I have a question about that special bread pan. I just ordered one from sierra.com and i see that its larger than the one you meantioned at 14.” Will this recipe work with a 14″ bread pan? The one you linked was 12″ which is still significantly bigger than 8.5. Is there something magical about bread pans? I ordered a Kaiser Perforated Bread pan 14.” When I search google for the pan, it also lists it as 35cm.
Yay so happy to hear this!!!
Oh my gosh, this bread is soooo good! I just made it and I’m addicted. I used one tbsp of butter and 3 tbsp of coconut oil but that’s the only substitute I made 🙂
I followed the directions thinking “this is too easy” and yet it turned out great! I LOVE that I didn’t have to buy anything that I don’t already keep in stock. Thanks!
Any 1:1 gf flour should work although not tested.
Hi I am living in South Africa so can’t find the flour you suggest to use for this bread. What flour mix should I use. Many thanks Denise.