This post will show you step-by-step how to make a rustic loaf of gluten-free sourdough bread – one that you will make time and time again and no one will know it’s gluten free (it’ll be our little secret). The dough takes just a few minutes to make (once you have your sourdough starter ready), and bakes up beautifully in less than an hour. This post contains affiliate links. Please see my disclosures.
Gluten-free sourdough bread has been on my bucket list of things to figure out how to do for a long time. I’ve always wanted to make it, but in total transparency, I’ve been scared to give it a try.
But that all changed when my mother-in-law gave me this beautiful Dutch oven for my birthday. I’ve seen people bake bread in their Dutch oven, and let me tell you, it’s a game changer!
With my new Dutch oven in hand, along with a gluten-free sourdough starter I’ve been nurturing for several weeks, I was finally ready to enter into the world of gluten-free sourdough bread making.
And after months of trying new recipes, fiddling with old recipes, and eating a lot of bread, I’ve settled in on this wonderful artisan sourdough bread recipe.
I’m sharing all the details with you today so anyone with celiac disease (like me) or gluten sensitivity can enjoy an artisan gluten-free sourdough bread.
How to Make Gluten-Free Sourdough Bread
Making gluten-free bread from scratch isn’t for the faint of heart, and gluten-free sourdough bread takes bread-baking to a whole other level. That said, I have found the process of baking sourdough bread to be fairly straightforward – and dare I say easy – now that I’ve baked a few loaves and know what I’m doing.
Don’t be scared. I will walk you through the process, step-by-step, so you can become a sourdough making machine in no time!
Watch this video to help you get started making gluten-free sourdough bread from scratch!
Step #1: Create Your Sourdough Starter
The first thing you need to do is get your gluten-free sourdough starter in order. You’ll want to make it from scratch using gluten-free flour (brown rice flour or sorghum flour) and water.
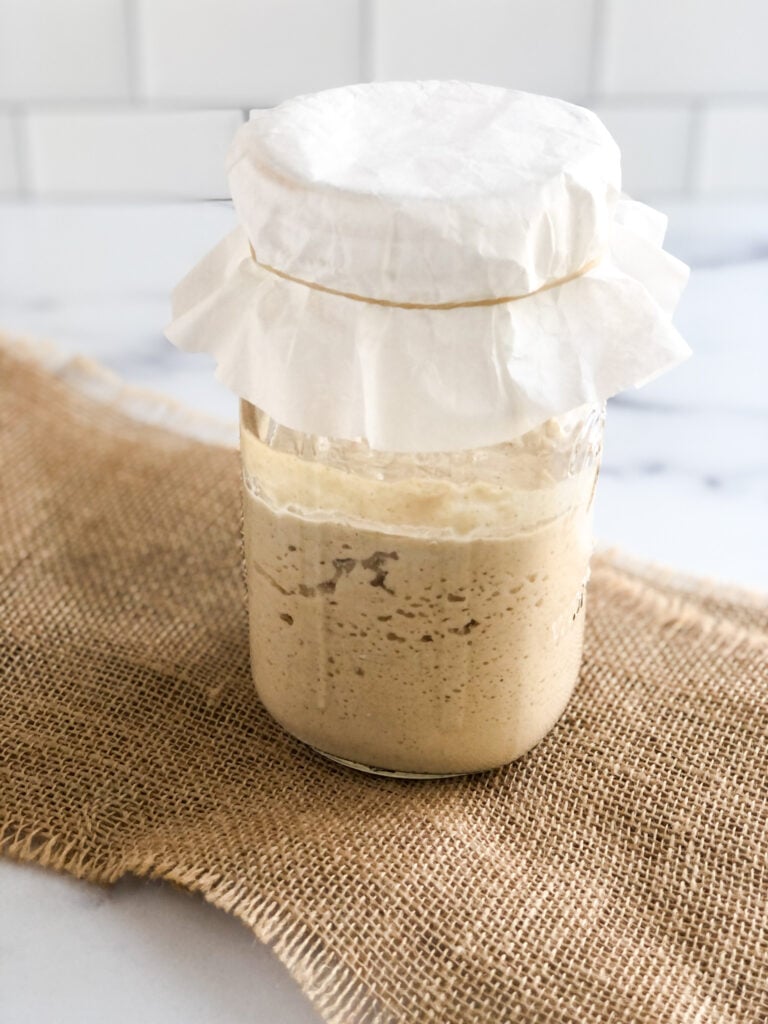
It will take 7-10 days for your starter to begin to ferment. The longer it ferments, the better your bread will be both taste- and texture-wise. If you have the time, allow your sourdough starter two weeks to ferment.
When you make a starter, you are basically making your own wild yeast, from scratch. Most bread bakers use store bought yeast to make their loaves of bread, but you’re making your own yeast by fermenting water and flour. It sounds difficult to do, and a bit strange, but artisan bread makers know there is nothing like a homemade sourdough starter to give rise and taste to an artisan bread recipe.
If you haven’t already made your starter, follow the step-by-step instructions found in my gluten-free sourdough starter article to create your own sourdough yeast.
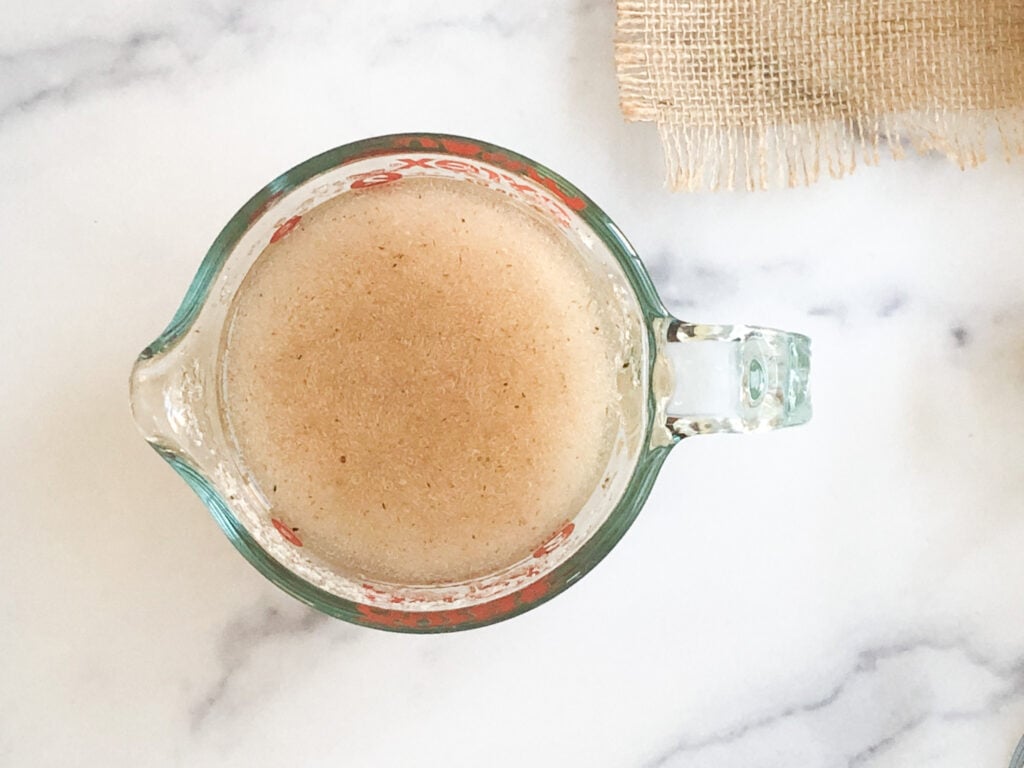
Here is what my sourdough starter looks like after several weeks of nurturing it. Notice those beautiful air bubbles. What you’re seeing is happy yeast ready for sourdough making!
Step #2: Gather Your Ingredients
Once your starter is ready to go, and you have 300 grams of it (just over one cup), you’re ready to create your bread dough.
My recipe is inspired by this recipe and comes after testing and playing with several recipes. I think this recipe stands out both in looks and taste.
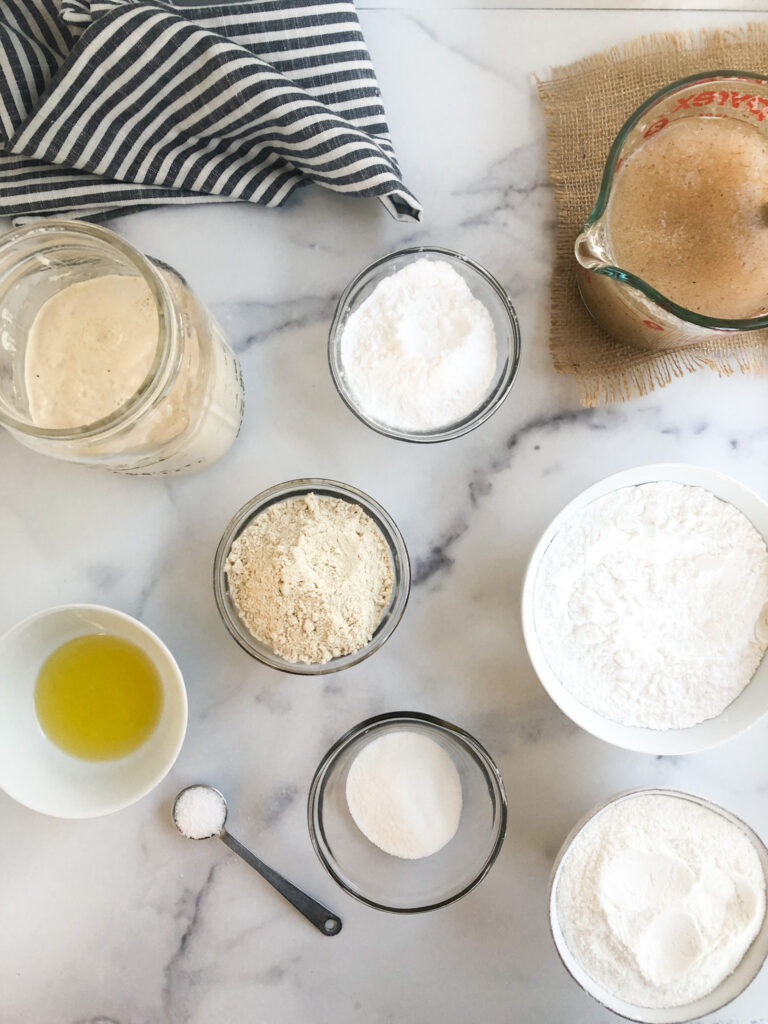
Here’s what you’ll need to make your sourdough bread dough:
- 2 cups of warm water (450 ml)
- 15 grams psyllium husk
- 200 grams brown or white rice flour
- 200 grams tapioca flour
- 100 grams sorghum or oat flour
- 100 grams potato starch (do not use potato flour)
- 1 tsp Kosher salt
- 30 grams sugar
- 300 grams gluten-free sourdough starter
- 15 grams olive oil
- Additional olive oil, Kosher salt and dried thyme for topping (optional)
You might be wondering what psyllium husk is if you’ve never baked with it before. It’s a dietary fiber that is often used to keep the digestive tract healthy and treat digestive issues, most notably constipation.
In gluten-free baking, psyllium husk is used as a binder, similar to xanthan gum or guar gum, to help baked goods maintain moisture, structure and stretch. It’s sold in most natural foods grocery store in the dietary supplement section or you can order it online from Amazon.
When using oat flour, please make sure the package is labeled “gluten free.” Remember, oats are naturally gluten free and perfectly safe to consume on a gluten-free diet only if the oats are labeled “gluten free.” Please read more about the controversy of oats in the gluten-free community in this article. There are some people with celiac disease who cannot tolerate oats. This is known as gluten cross reactivity, which you can learn more about in this article.
Also, please note that you’ll need a kitchen scale for measuring ingredients. Measuring ingredients by weight will give you the most accurate measurements and result in the best bread. You can invest in a digital scale for less than $20.
Step #3: Create Your Dough
Combine your warm water and psyllium husk in a small bowl and allow the psyllium husk to gel in the water for 5-10 minutes. Always use warm water. Cold water can affect and slow the ferment.
In a large bowl attached to your standing mixer, combine your rice flour, tapioca flour, oat or sorghum flour, potato starch, sugar and salt. Whisk it together.
Pour the psyllium husk/water mixture into the dry ingredients and mix on medium speed for 1 minute. Add sourdough starter and olive oil and continue mixing for another minute, scraping down the sides if needed.
Add some flour to your countertop or flat workspace, then add the dough to the workspace and gently incorporate a bit more flour into the dough, kneading it gently until it’s only slightly sticky. Kneading it will add air pockets to the dough. Please note most gluten-free breads don’t require kneading because there is no gluten to develop.
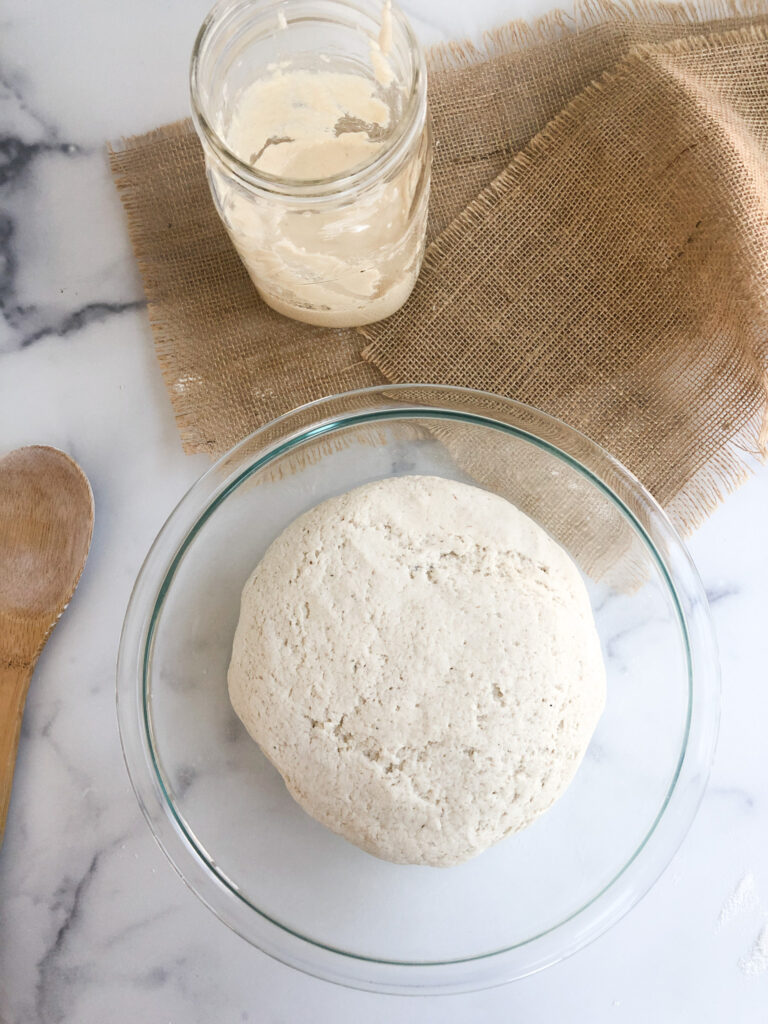
Gently form the dough into a ball and place it in a lightly floured bowl. Cover the bowl with a clean dish towel and place it in a warm spot (or on your warming mat, which I use) to rise.
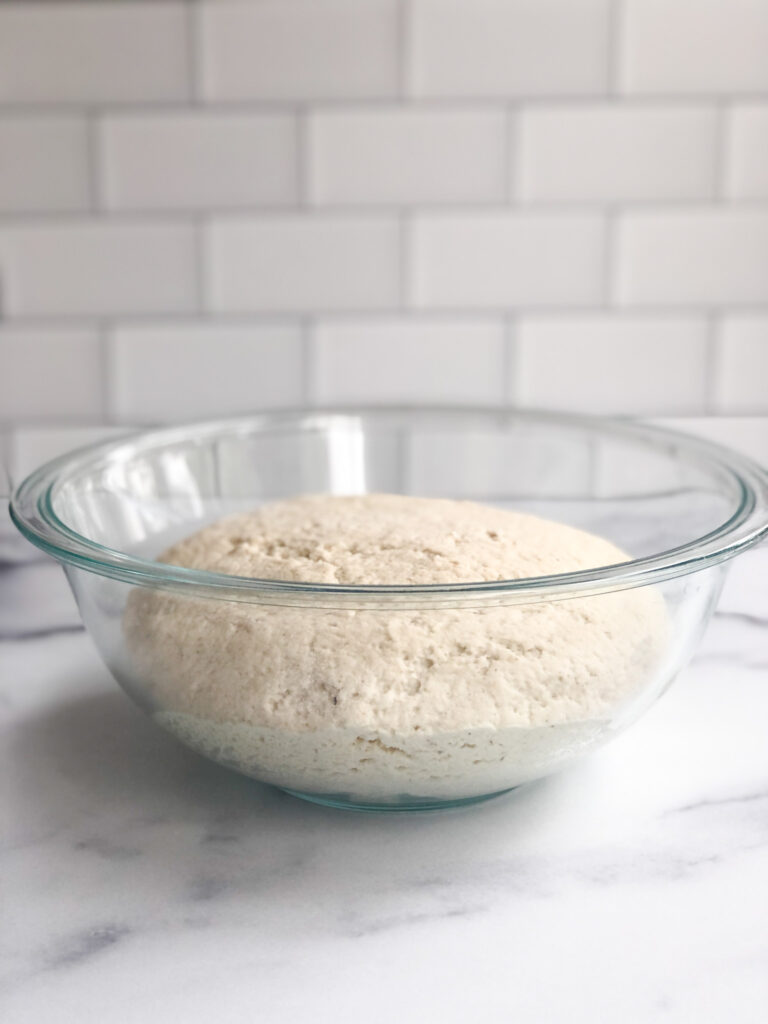
Allow the bread about four hours (or longer if your house is cold) to rise. The dough should bulk up and maybe even double in size. I have seen sourdough bread recipes with much longer rise times, but if you’re working with a healthy sourdough starter, and you have a warm place to proof it, four hours will be more than sufficient. Here is what my dough looked like after a four hour rise in a warm place.
Step #4: Bake
Once the dough has risen, it’s time to bake it. Place your Dutch oven with a tight-fitting lid inside your oven, then set the temperature to 425º F. Allow the Dutch oven to heat up slowly as your oven heats up.
Please note that some Dutch oven manufacturers do not recommend heating an empty Dutch oven due to cracking risk. If this is the case, skip this part or add something inconsequential to the Dutch oven (like leftover bread dough) to heat up.
A Dutch oven is made from cast iron and works by trapping the steam inside the bread, thereby creating an at-home steam-injected oven, an ideal oven for baking artisan breads. The steam transforms the dough into a crusty loaf with a soft and doughy center.
I use an affordable 4-quart round Dutch oven by Tramontina for under $100, but a lot of artisan chefs use fancy Dutch ovens from brands like Le Creuset, which can run you $400+.
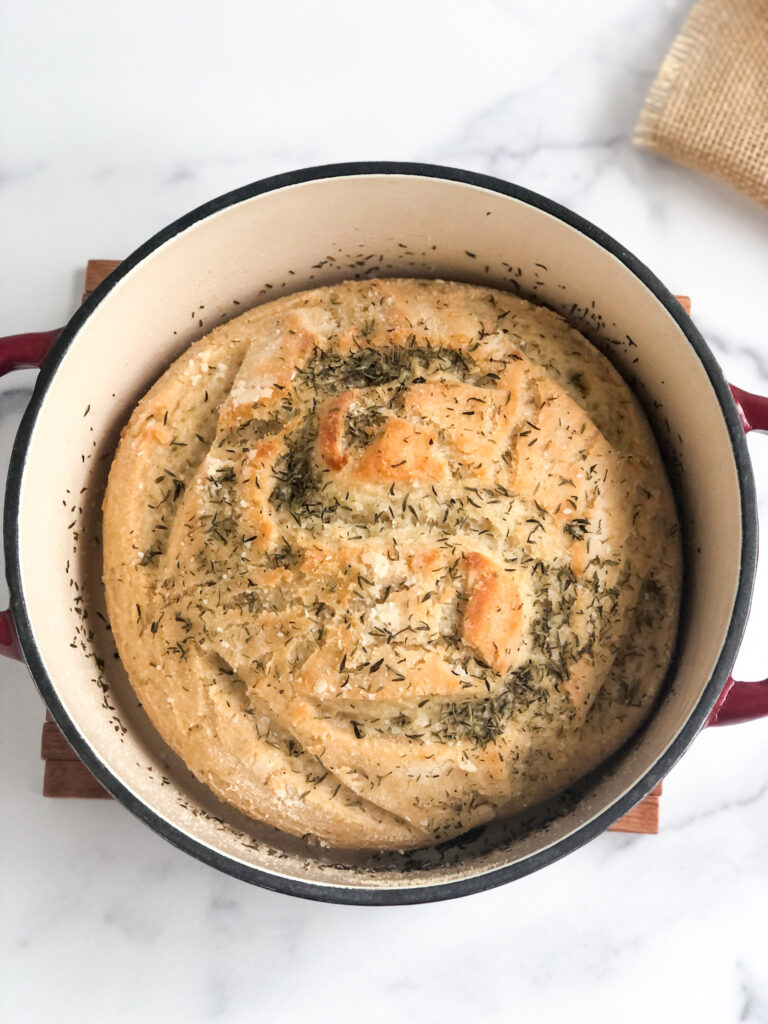
Once the oven comes to temperature, carefully remove your Dutch oven from your oven using oven mitts. Remove the top and gently place the dough into the Dutch oven. I usually have to use a flat spatula to free the edges of the dough from my bowl, then flip over the dough into the Dutch oven. The bottom side is now the top side.
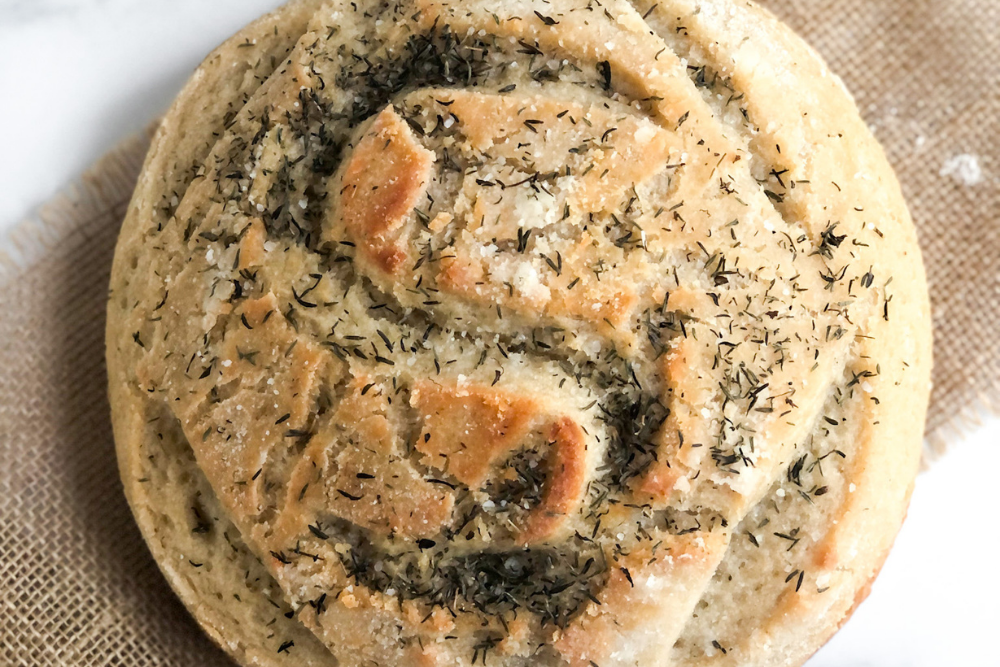
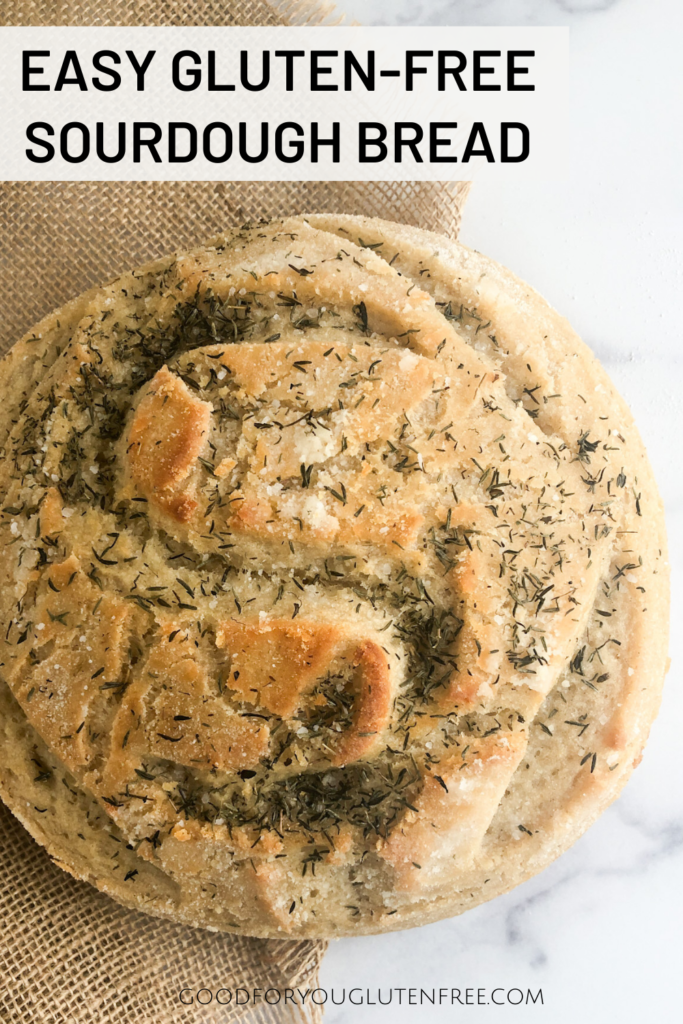
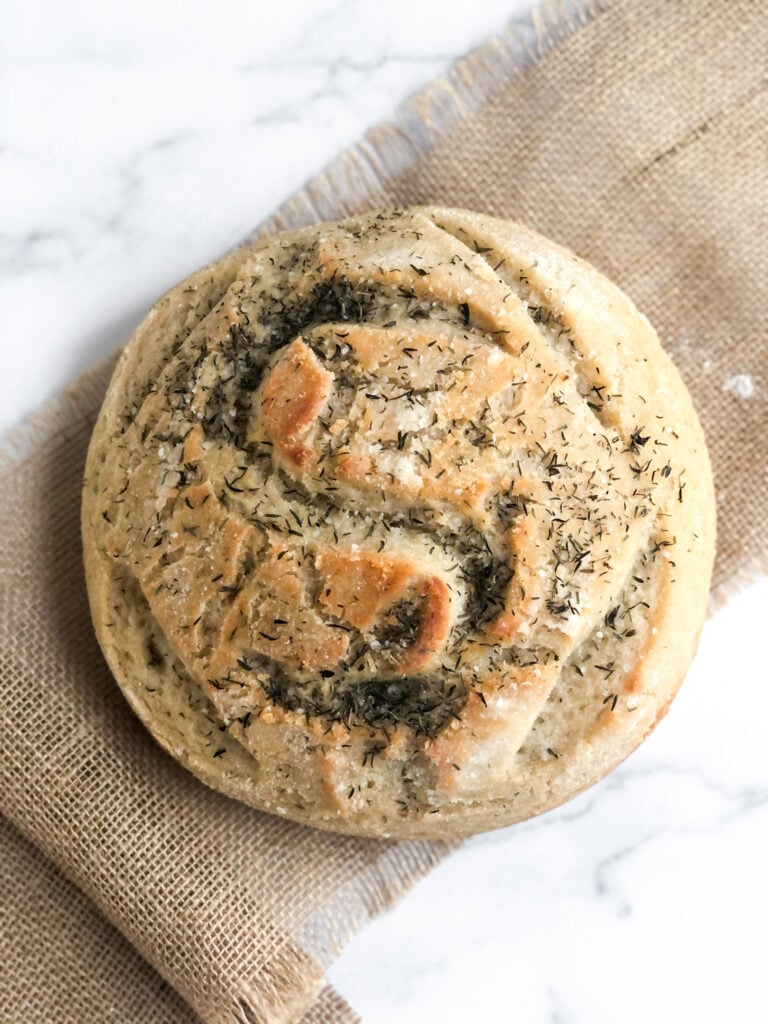
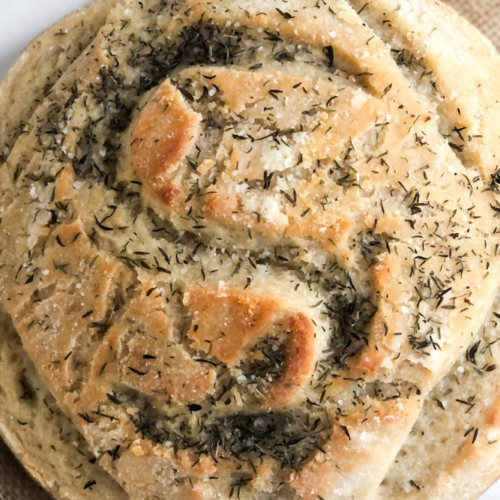
Score the bread with a fun design. This will create fun ridges in the dough and allow the dough to expand. I put an “S” in the top of my sourdough bread so everyone will know its sourdough (the S is for sourdough).
Bake it for 35 minutes, then carefully remove the lid, brush the top with olive oil and sprinkle with Kosher salt and thyme (optional), and bake for another 15 minutes.
Allow the bread to remain in the Dutch oven for 10 minutes until it’s warm but not hot to the touch. Enjoy the bread warm and on the same day you made it. It will stretch and look and feel amazing texture-wise. You are in for a real treat.
Remember, artisan bread like this doesn’t last too long, so eat up and enjoy it while it’s warm and on the same day you made it.
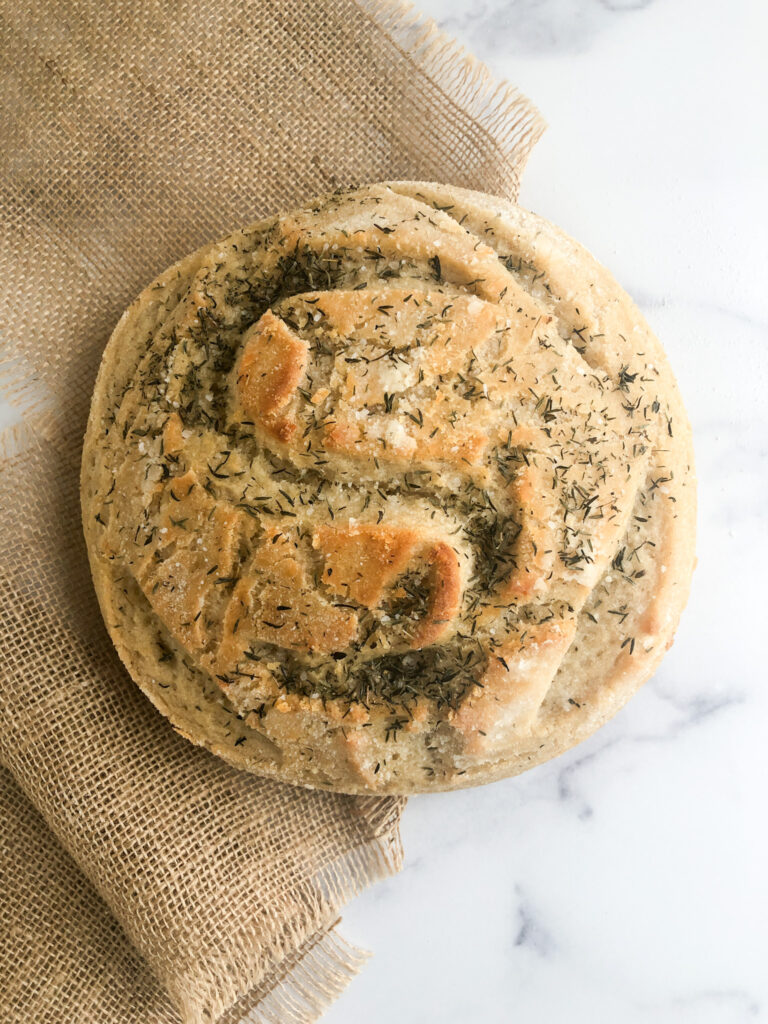
A Beautiful Bread
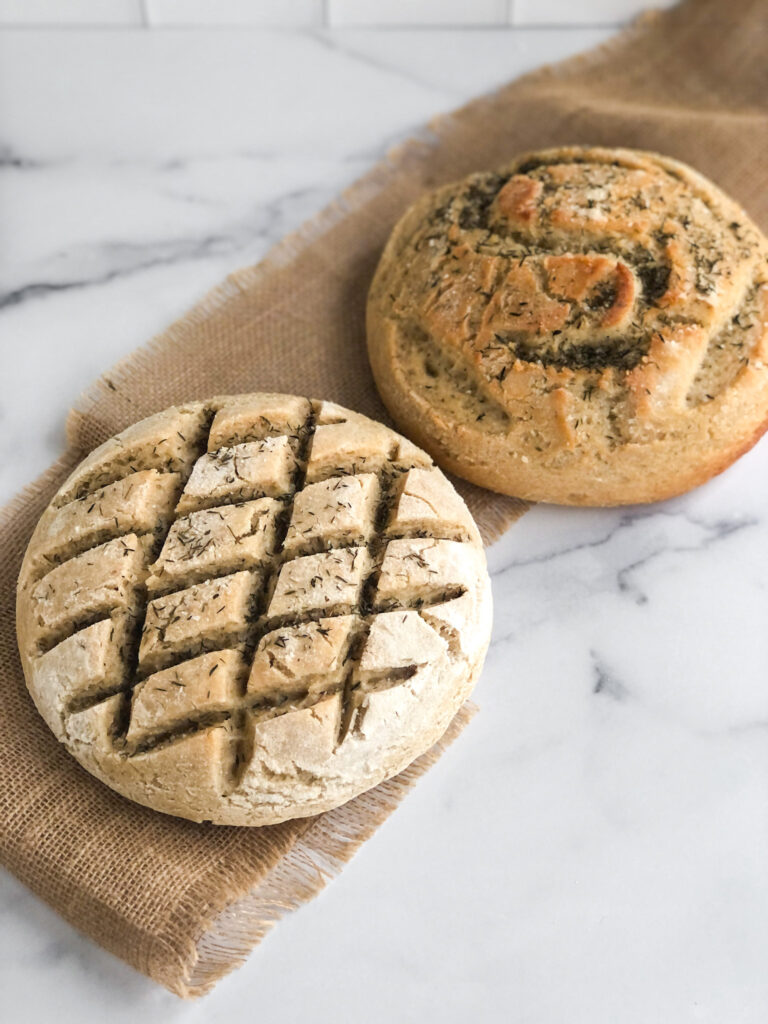
As you can see, this is one gorgeous loaf of bread, one that is reminiscent of bread you’d find in a French bakery. I have made this recipe using yeast (vs. sourdough starter) and did not get as beautiful of rise as this one. Here is what my artisan yeast bread looks like next to my sourdough bread. The sourdough bread rose much higher!
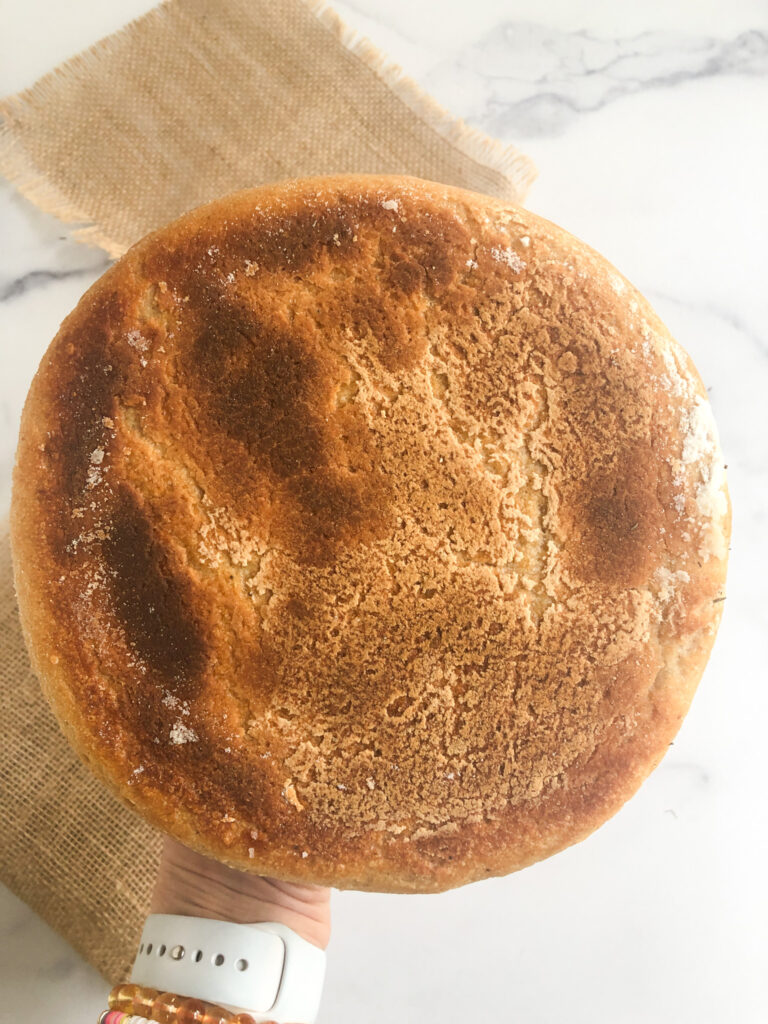
The bottom of the bread will be browned and have a hard shell that you can knock on with your fist. Don’t worry, that crusty exterior eventually gives way to a soft and doughy inside.
The sourdough bread also tastes much more tangy and even a bit softer in texture than my gluten-free artisan bread recipe (made with yeast).
I served this bread at a dinner party along with a variety of these fun dipping oils I also got for my birthday. The bread, along with the oils, were a huge hit!
Troubleshooting
Let’s walk through a few potential pitfalls:
My dough didn’t rise: This means either your sourdough starter is not alive/active, or maybe your house is too cold. Give the dough more time to rise in a warm space. If it doesn’t rise at all in 6-8 hours, it might mean your sourdough yeast is dead. This recipe will work best with a mature sourdough starter, one that is at least 2 weeks old. Give your starter time to develop before putting it to work.
I don’t have a sourdough starter: If you don’t have a sourdough starter, you can make one from scratch, or simply use yeast. It won’t be a sourdough bread, per se, but it will be a delicious artisan bread no doubt. Here is my gluten-free artisan bread recipe made with yeast.
I don’t have a Dutch oven: I’m not sure how to make this bread without a Dutch oven. I do recommend investing in one if you plan to bake sourdough bread in your lifetime. It’s a small investment that will pay off time and time again.
I forgot to score my bread before baking: It’s okay, the bread will form its own scores. The bread will want to expand, so if you score it, you tell it where to expand and add fun designs in the process. But if you forget to do so, the bread will “score” itself. It may not look as pretty, but it won’t affect the taste of the bread.
Don’t Feel Like Baking Sourdough?
If you don’t feel like baking sourdough, and going through the trouble of creating a gluten-free sourdough starter and then gathering all these crazy ingredients, you can simply order gluten-free sourdough from this company. It’s delicious and will definitely scratch that itch for delicious sourdough bread!
Other Bread Recipes
- Easy Gluten-Free Oat Bread
- Gluten-Free Artisan Bread Recipe
- Easy Gluten-Free Bread Recipe Using 1:1 Gluten-Free Flour
- Gluten- and Dairy-Free Paleo Almond Flour Bread Recipe
Gluten-Free Sourdough Bread
Equipment
- Dutch oven
Ingredients
- 2 cups warm water 450 ml
- 15 grams psyllium husk
- 200 grams brown or white rice flour plus extra for dusting surfaces
- 200 grams tapioca flour
- 100 grams sorghum or oat flour
- 100 grams potato starch
- 1 tsp Kosher salt plus extra to sprinkle on top of the bread
- 30 grams sugar
- 300 grams gluten-free sourdough starter
- 15 grams olive oil plus extra to brush over bread
- 1 tsp dried thyme optional
Instructions
- Combine your warm water and psyllium husk in a small bowl and allow the psyllium husk to gel in the water for 5-10 minutes. Always use warm water. Cold water can affect and slow the ferment.
- In a large bowl attached to your standing mixer, combine your rice flour, tapioca flour, oat or sorghum flour, potato starch, sugar and salt. Whisk it together.
- Pour the psyllium husk/water mixture into the dry ingredients and mix on medium speed for 1 minute. Add sourdough starter and olive oil and continue mixing for another minute, scraping down the sides if needed.
- Add some flour to your countertop or flat workspace, then add the dough to the workspace and gently incorporate a bit more flour into the dough, kneading it gently until it’s only slightly sticky. Kneading it will add air pockets into the dough. Please note most gluten-free breads don’t require kneading because there is no gluten to develop.
- Gently form the dough into a ball and place it in a lightly floured bowl. Cover the bowl with a clean dish towel and place it in a warm spot (or on your warming mat, which I use) to rise.
- Allow the bread about four hours (or longer if your house is cold) to rise. The dough should bulk up and maybe even double in size. I have seen sourdough bread recipes with much longer rise times, but if you’re working with a healthy sourdough starter, and you have a warm place to proof it, four hours will be more than sufficient. Here is what my dough looked like after a four hour rise in a warm place.
- Once the dough has risen, it’s time to bake it. Place your Dutch oven with a tight-fitting lid inside your oven, then set the temperature to 425º F. Allow the Dutch oven to heat up slowly as your oven heats up. *Please note that some Dutch oven manufacturers do not recommend heating an empty Dutch oven due to cracking risk. If this is the case, skip this part or add something inconsequential to the Dutch oven (like leftover bread dough) to heat up.
- Once the oven comes to temperature, carefully remove your Dutch oven from your oven using oven mitts. Remove the top and gently place the dough into the Dutch oven. I usually have to use a flat spatula to free the edges of the dough from my bowl, then flip over the dough into the Dutch oven. The bottom side is now the top side.
- Score the bread with a fun design. This will create fun ridges in the dough and allow the dough to expand. I put an “S” in the top of my sourdough bread so everyone will know its sourdough (the S is for sourdough).
- Bake it for 35 minutes, then carefully remove the lid, brush the top with olive oil and sprinkle with Kosher salt and thyme (optional), and bake for another 15 minutes.
Turned out beautifully. My grandson gobbled up two pieces really quick.
Can I use another starch instead of potato
I cannot have white potatoes so using potato flour is out of the question. Is there something else I can use instead?
If you have a bread flour, I recommend using the recipe on the back of the bag. Bread flours often contain psyllium husk too.
Can I use gluten free bread flour rather than a mix of different ones? Also my flours contain xanthium gum already, do I still need to add psyllium husk?
You’ll want to remove some of the starter before you feed it. You can discard only a little if you don’t have a lot, until it grows.
When the recipe says to discard half of starter on day two, am I suppose to keep discarding half the starter before I feed it or am I suppose to remove one tablespoon of starter before I feed it? I didn’t have 200 grams of starter to make my bread, much less have some to feed to keep it going.
I don’t know what happened. I’ve made this recipe many times and haven’t had this issue. I’m so sorry I can’t help further.
Help! I use all the ingredients as listed in the recipe (measured with a scale) and my dough is a runny batter (I’ve tried two times). I’ve tried adding a bit more rice flour prior to turning it out on my surface. Any thoughts? It’s really good- but so hard to work with and doesn’t loosen from the sides of the proofing bowl easily which ruins the rise
I haven’t, but I just got a bread machine. Now need to find the time to figure out how to work it. lol
Have you tried any of your bread recipes in a bread machine?
I honestly don’t know without testing it.
Do you think you could substitute Cassava for the oat or sorghum? I find both of those with a sourdough tend to be kind of off putting taste wise
Knead only until it’s slightly sticky. Gluten-free dough doesn’t need kneading in the traditional sense since there’s no gluten to develop. It probably doesn’t explain why your loaf is so dense. I’m not sure. It could be your starter wasn’t good and didn’t rise maybe? Did you make swaps?
How long do you knead it for? I made Your recipe but my bread is SUPER dense.
Yes I think tapioca starch would work.
Is there a substitute I could use for potato starch?
I think that would work. Great idea! Good luck with your sourdough adventures!
Have you ever let the bread rise on parchment paper (in the bowl) then lifted it into the hot Dutch oven that way? I think it would help to avoid burning your hand as you plopped the dough into the hot pan, and you wouldn’t loose some of the rise by dropping it. My starter is on day 4 of growing and already is doubling every 12 hours. I can’t wait to try this recipe!
I leave the lid on the whole time. You may need to add more cook time. Ovens can vary. So can altitude.
Hi there! Tried the recipe once and it didn’t fully cook in the middle. Just want to check if the lid stays on for the last 15 minutes of baking after adding the oil and thyme? Also should it sit for the 10 minutes with lid on? Maybe this was why mine didn’t bake right through?
Best gluten-free sourdough recipe ever! Not only does it taste good and have a good texture but it makes a realistic loaf of bread. Several other recipes make a loaf that I can rest comfortably on my hand with only a little of the loaf hanging over the sides. This loaf is probably close to the size of a regular, glutened loaf of bread.
Yes psyllium husk is essential as it soaks up water and holds the dough together. This might be why your bread failed. I’ve made it many times without fail.
Help! It’s so watery, can pour onto my counter or it’ll run off onto the floor. Also couldn’t find psyllium husk but did find flaxseed meal. Is that the problem?
It’s really meant for a Dutch oven. You could try an oven safe pot with lid.
What’s the best was to bake this if I don’t own a Dutch oven?