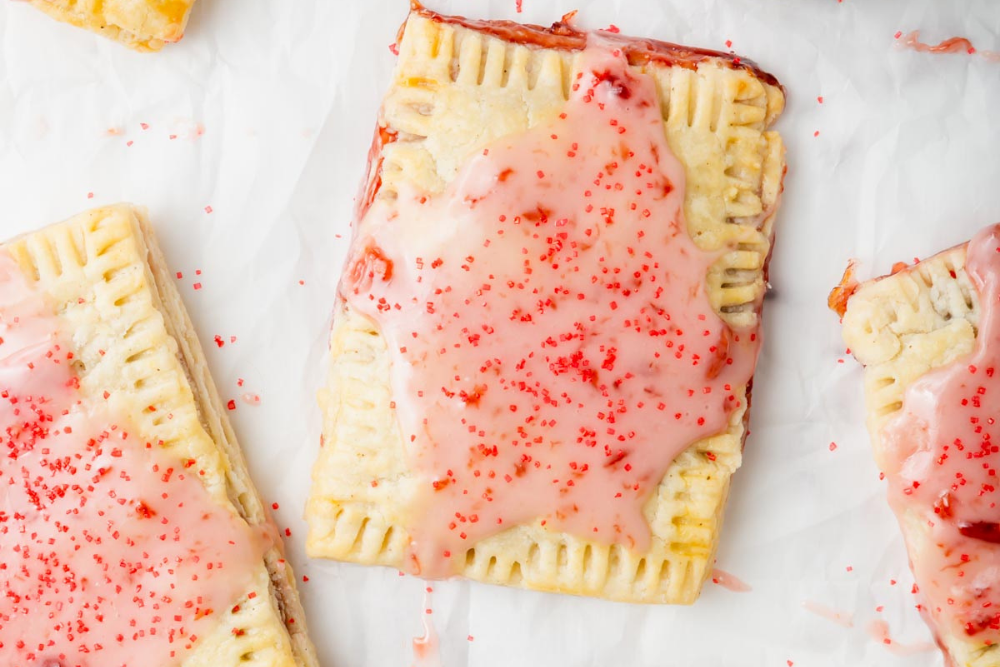

My homemade gluten-free pop tarts have a flaky outer crust and a sweet cherry filling, and they’re covered in a delicious gooey glaze. They taste just like the toaster pastries you remember as a kid. Don’t feel like making gluten-free pop-tarts? I help you find some store-bought options, too. This post contains affiliate links. Please see my disclosures.
Mother’s Day is this weekend, and in honor of the special day, I decided to make a special breakfast treat.
When I started to think about what breakfast foods I ate in my pre-celiac years, one thing that came to mind was Pop-Tarts. I used to love eating a warm, toasted Pop-Tart every morning before school. I know it wasn’t the healthiest food, but I was a child of the 80s, and Pop-Tarts were all the rage.
Instead of missing this classic treat or settling for store-bought creations that fell flat, I created a beautiful copycat gluten-free pop-tart using clean, gluten-free ingredients.
Gluten is a protein found in wheat, rye, and barley. Because I have celiac disease, I can’t eat the sticky protein. People with gluten intolerance, non-celiac gluten sensitivity, and wheat allergies must also avoid gluten.
But don’t feel sorry for me because I can’t eat traditional Pop-Tarts anymore. Instead, be jealous of these beautiful copycat gluten-free pop-tarts I made using my easy recipe, which I share in detail below. These toaster pastries are better than any store-bought pop-tart, and I’m pinching myself because they’re so cute, too!
Below, I’ll share how to make homemade gluten-free pop-tarts from scratch, but before I share my recipe, let’s first discuss the store-bought options available today.
Store-Bought Gluten-Free Pop-Tarts
While my homemade pop-tarts are the best – ever – seriously, I get that you may not feel like making your own. It takes work, and many of us don’t have that kind of time.
If you’re looking for store-bought gluten-free pop-tart options, check out my article, Gluten-Free Pop-Tarts Brands: A Review, to learn more about how Katz, Bobo’s, Flings, and other gluten-free pop-tarts brands fared.
Ingredients for Homemade Pop-Tarts
As you prepare to make homemade gluten-free pop tarts, you’ll want to gather the following ingredients:
Gluten-Free Flour: I used two cups of Bob’s Red Mill 1-to-1 Gluten-Free Baking Flour. You could use another gluten-free flour blend of choice. Make sure it contains xanthan gum; if it doesn’t, add 1/2 teaspoon. I’ve only tested this recipe with Bob’s Red Mill 1-to-1 Gluten-Free Baking Flour.
Sugar: You’ll need one tablespoon of white granulated sugar.
Salt: A pinch (1/2 teaspoon) of salt will do the trick!
Butter: Use 3/4 cup of unsalted butter, and cut into small pieces. The butter should be very cold.
Water: You’ll need 6-7 tablespoons of ice-cold water.
Egg: You’ll need one beaten egg to use to brush the tops of the dough before baking.
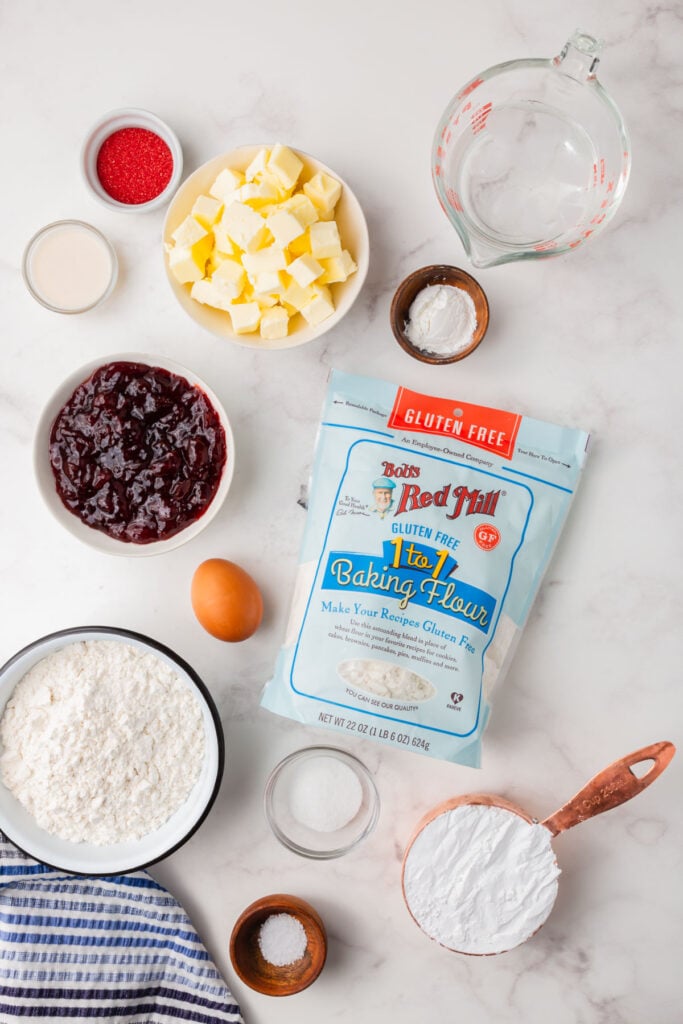
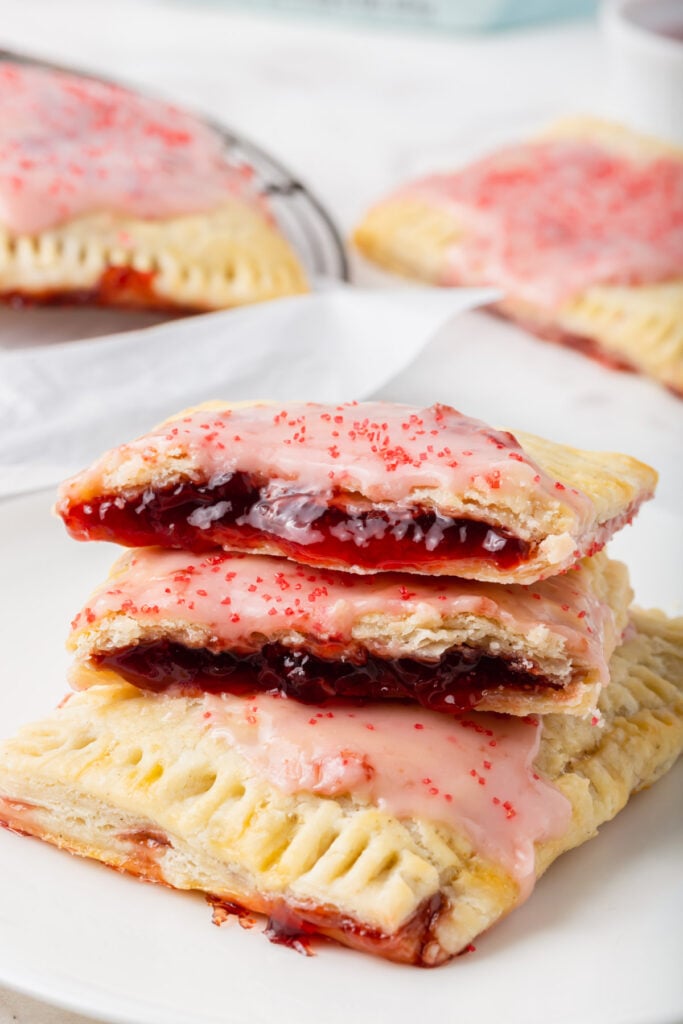
Jam: You could use any flavored jam you like. I used 3/4 cup of cherry jam to make these cherry pop-tarts, plus extra for the topping.
Cornstarch: Just two teaspoons of cornstarch will help hold the jelly together and give it its signature texture.
Powdered Sugar: Powdered sugar is a combination of sugar and cornstarch. You’ll need one cup of it. Sift it if it’s lumpy.
Milk: You’ll need one tablespoon of tablespoon of milk.
Sprinkles: You can decorate your pop-tarts however you like. I used two teaspoons of red sugary sprinkles. You can omit the sprinkles if you like.
As you can see, this recipe is indulgent and sugary, and I love it. It’s meant to be enjoyed as an occasional treat.
How to Make Gluten-Free Pop-Tarts
Making gluten-free pop-tarts from scratch is easier than you think, and playing with the dough is fun. Gather the kids and prepare to make these nostalgic treats again, albeit without gluten.
Step #1: Make the Pastry Dough
To make the pastry dough, combine the flour, sugar, and salt in a food processor and pulse to combine all the ingredients.
Add the cold butter pieces to the food processor and pulse until the butter is the size of peas. It’s okay to have some larger pieces too.

Remove the dough from the food processor and place the flour mixture into a bowl. Add in water. one tablespoon at a time until you can pinch the dough together. You may not use all of the water. Work the dough into a ball until it holds together well and is not crumbly or sticky.
Don’t allow your dough to get too wet. Depending on the weight of your flour and environmental conditions, you may need more or less water.
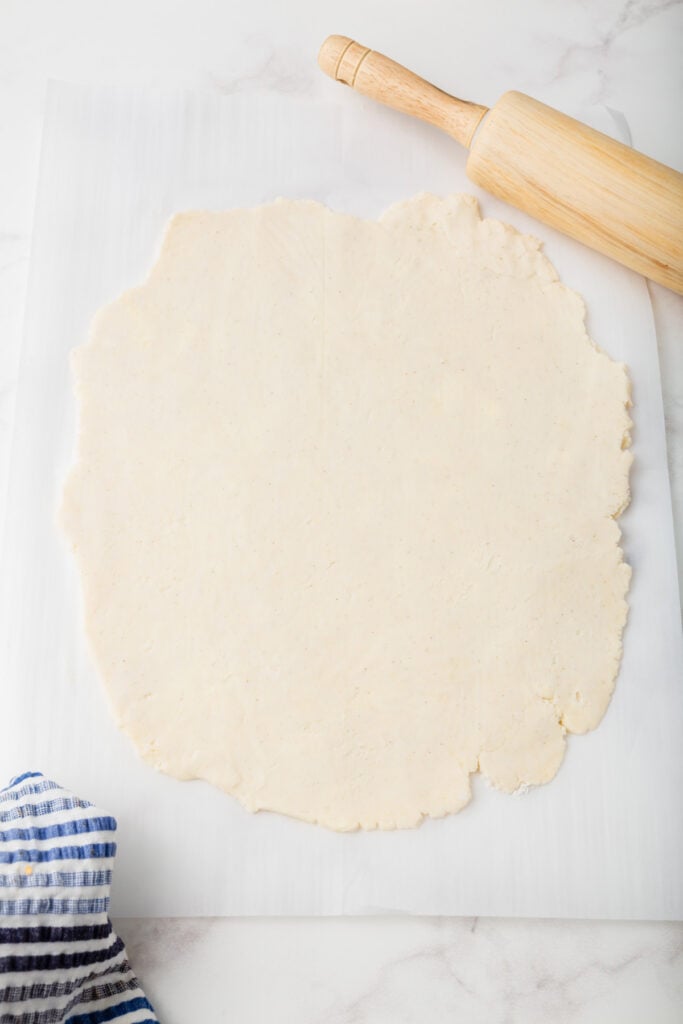
Pat the dough into a flat circle, cover it with parchment paper or plastic wrap, and chill in the refrigerator for about 30 minutes or longer.

Step #2: Make the Filling
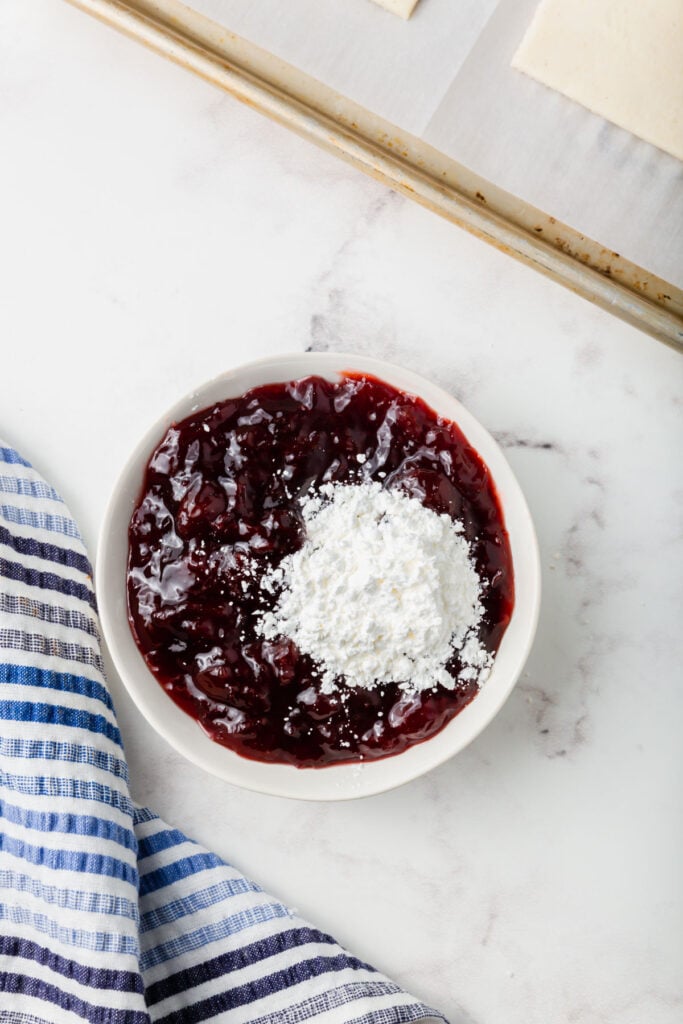
While the dough is chilling, prepare the cherry filling. In a small bowl, mix the cornstarch and cherry jam and stir until no clumps remain.
Step #3: Assemble and Bake Pop-Tarts
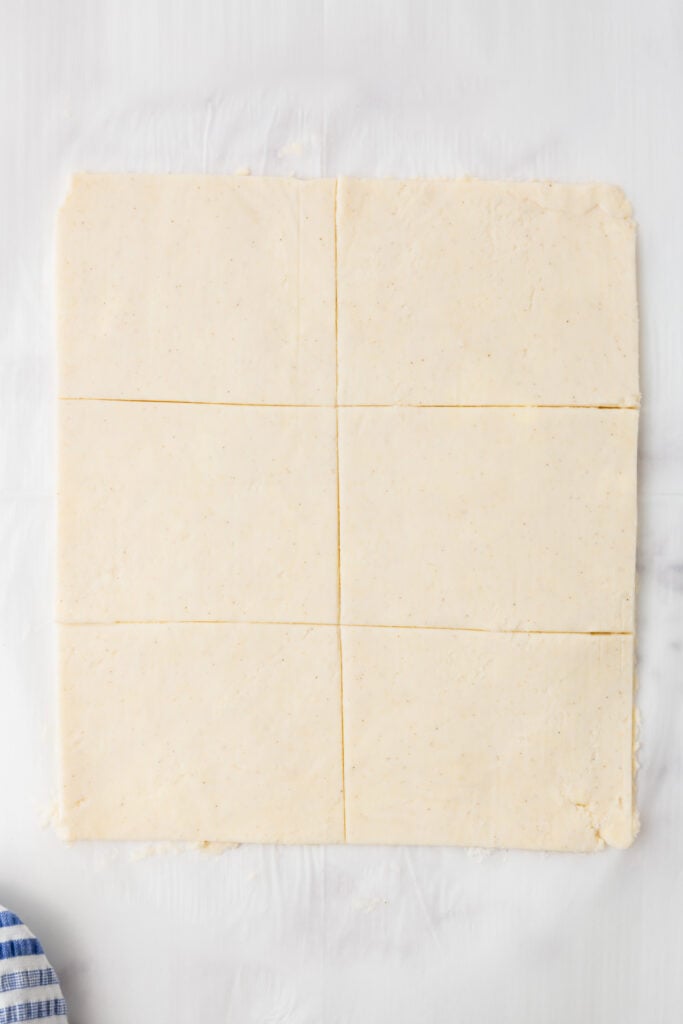
Preheat the oven to 350º F and line a baking sheet with parchment paper. Divide the chilled dough in half. Roll out each half into two equal rectangles about 8×9 inches, about 1/4 inch thick, using a rolling pin.
Cut six rectangles in each of the rolled-out dough pieces using a sharp knife or pizza cutter. They should be about 3×4 inches in size.
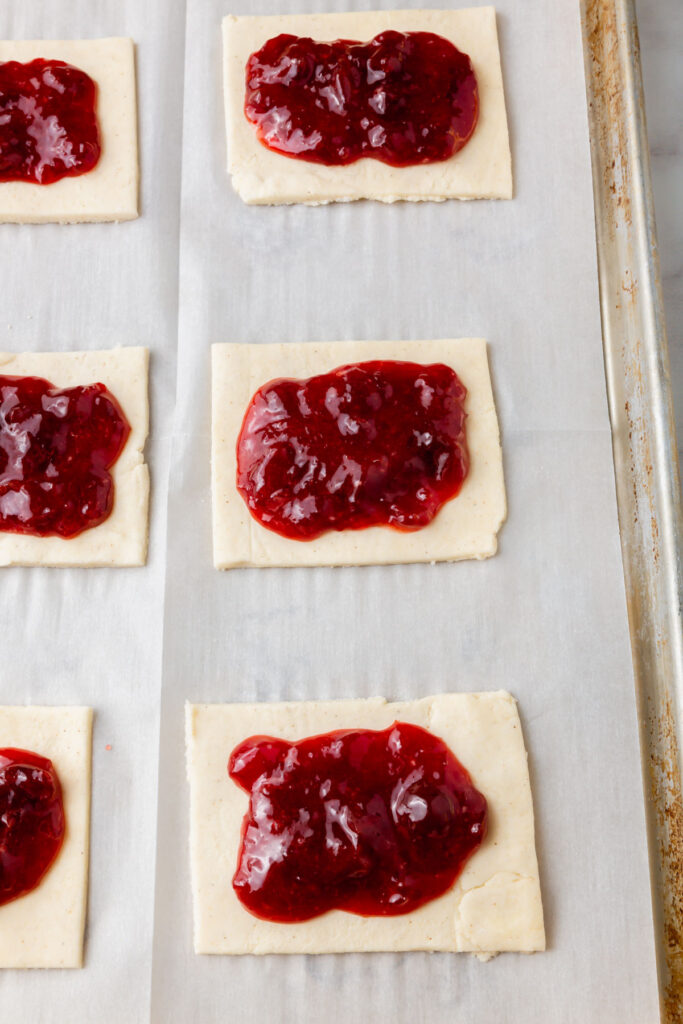
Place six rectangles on the parchment-lined baking sheet and spoon about two tablespoons of cherry jam filling onto each rectangle, leaving a 1/2-inch border around the edge.
Place the remaining rectangles over the top of the jam, and then gently press the edges closed with your fingers. Crimp all the edges with a fork to get nice ridges. Crimping the edges with a fork will help prevent the filling from oozing out the sides (although it’s okay if some jam oozes during baking).
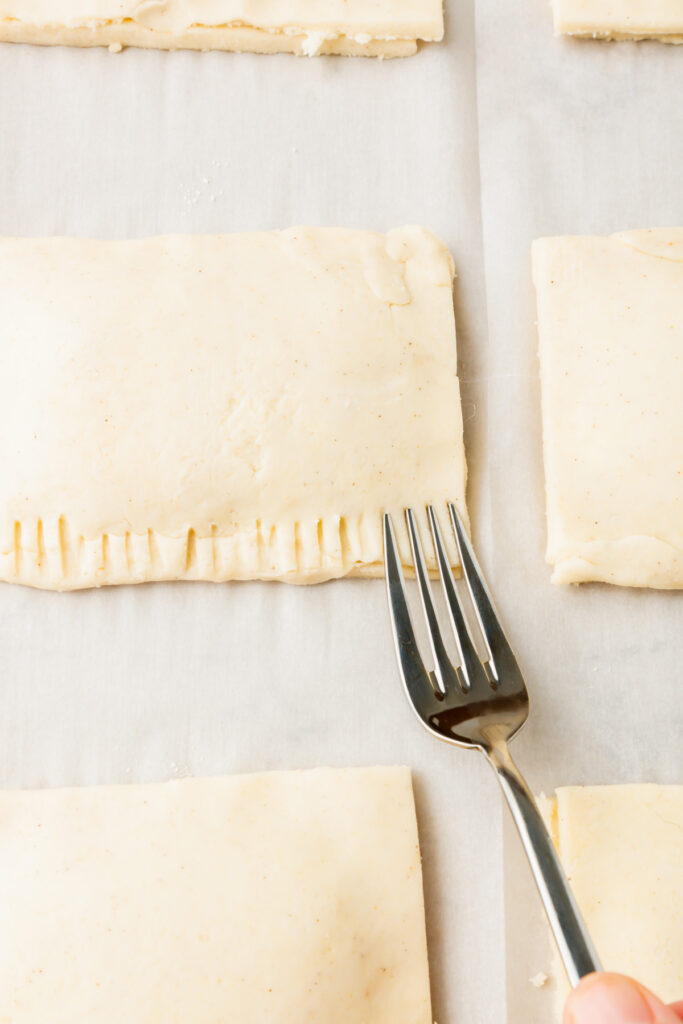
Generously poke holes into the top of the pastry to allow it to breathe when it bakes. This will prevent the filling from leaking out the edges.
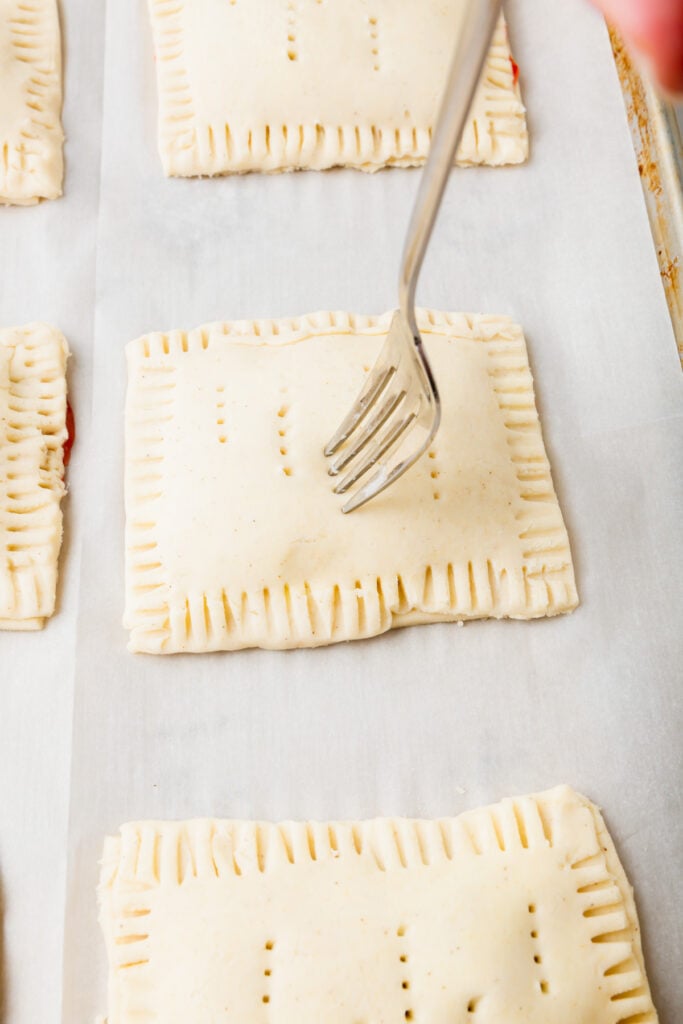
Use a pastry brush to brush the top of each pastry with the beaten egg until lightly coated. The egg wash will give the pop-tarts a beautiful sheen once baked.

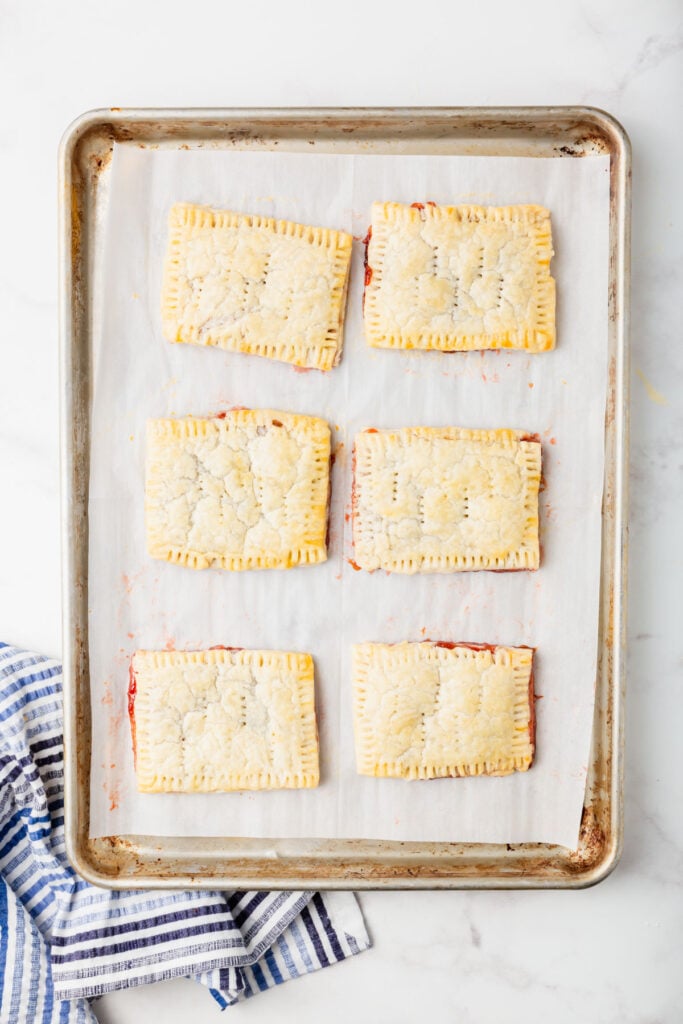
Your pop-tarts are now ready to be baked! Place them in the hot oven and bake for 23-25 minutes or until the crust edges are a light golden brown. Remove from the oven and let the pastries cool completely before glazing.
Step #4: Adding the Glaze
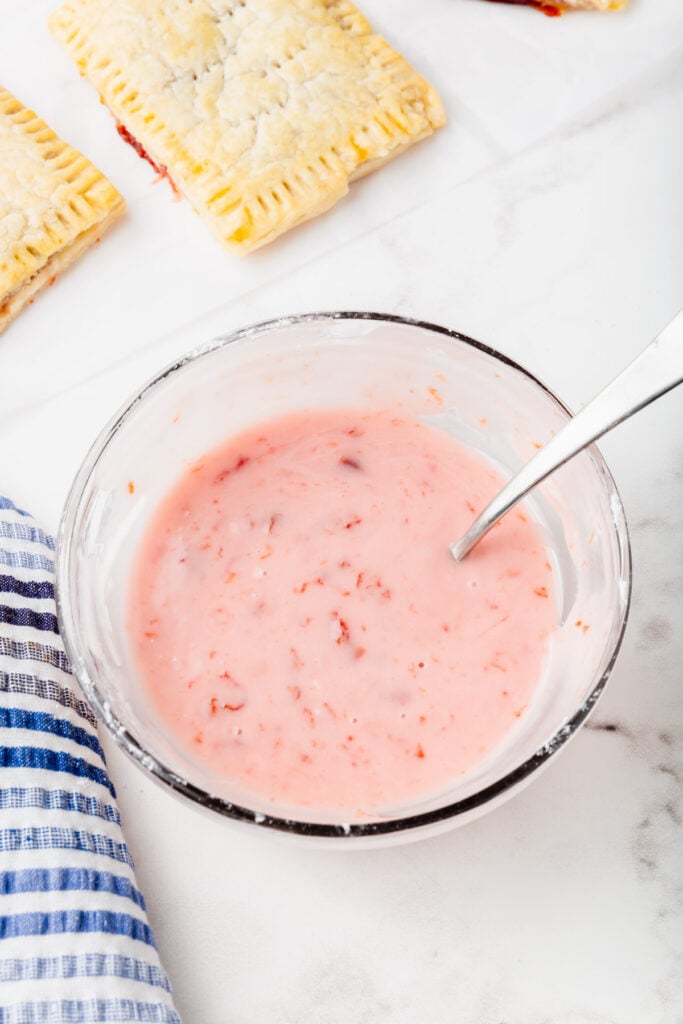
No pop-tart is complete without a sweet, decorative glaze. I recommend making the glaze while your pop-tarts are cooling. Cool them in the pan or transfer them to a cooling rack to speed up the process. Do not glaze a hot or warm pop tart. Wait until they come to room temperature.
To make the glaze, combine the jam and milk in a small bowl until smooth, then add powdered sugar. Whisk all the ingredients together until well combined and no clumps remain. You want the glaze to be thick so it doesn’t run off the pop tart, but it should still be spreadable. Add more powdered sugar or milk to reach the desired thick-but-spreadable consistency.
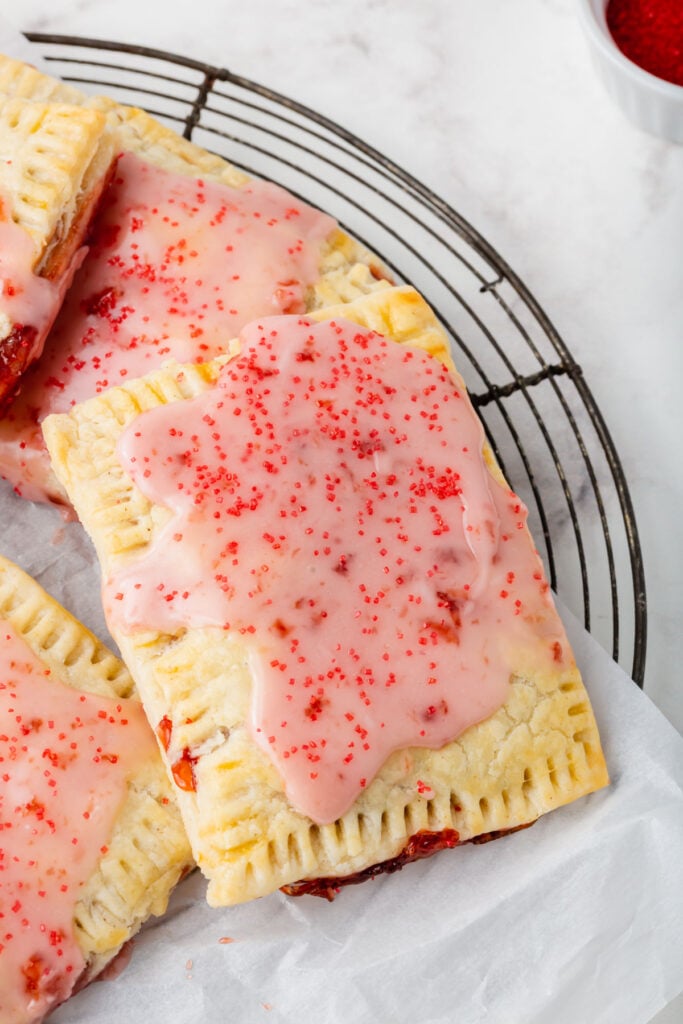
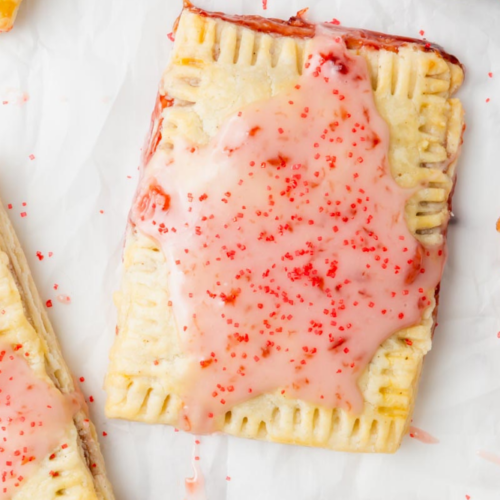
Place the pop-tarts on parchment paper and lightly drizzle the glaze on top with a spoon, as pictured below. It’s okay if the glaze runs off the pop tart.
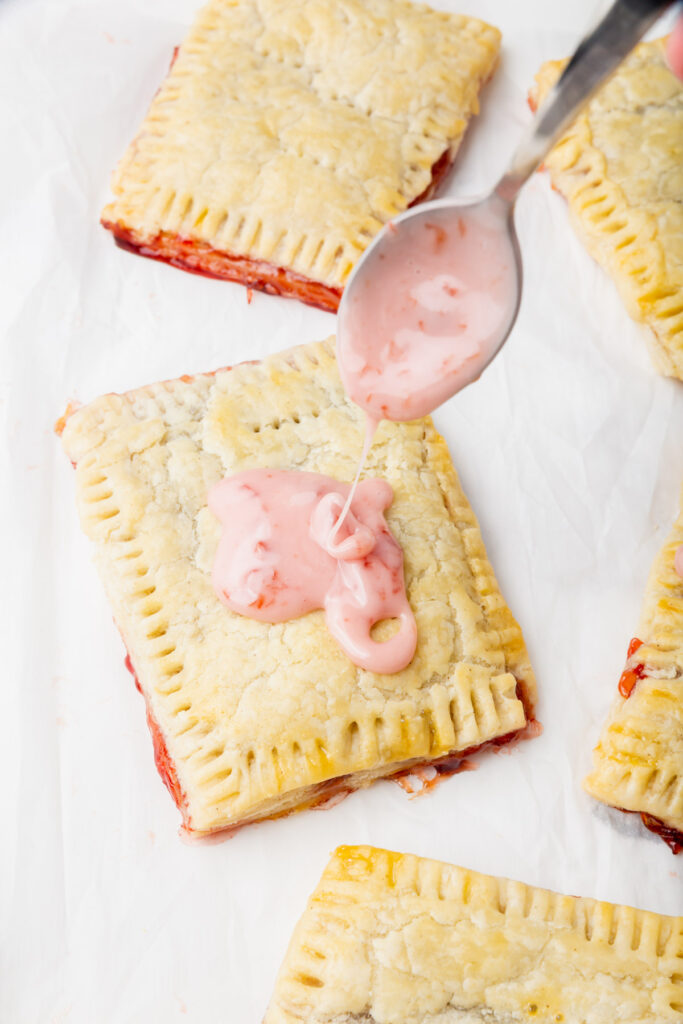
Now sprinkle the top of each pastry with red sanding sugar (aka, red sugar sprinkles). It will stick to the wet glaze as the glaze dries.
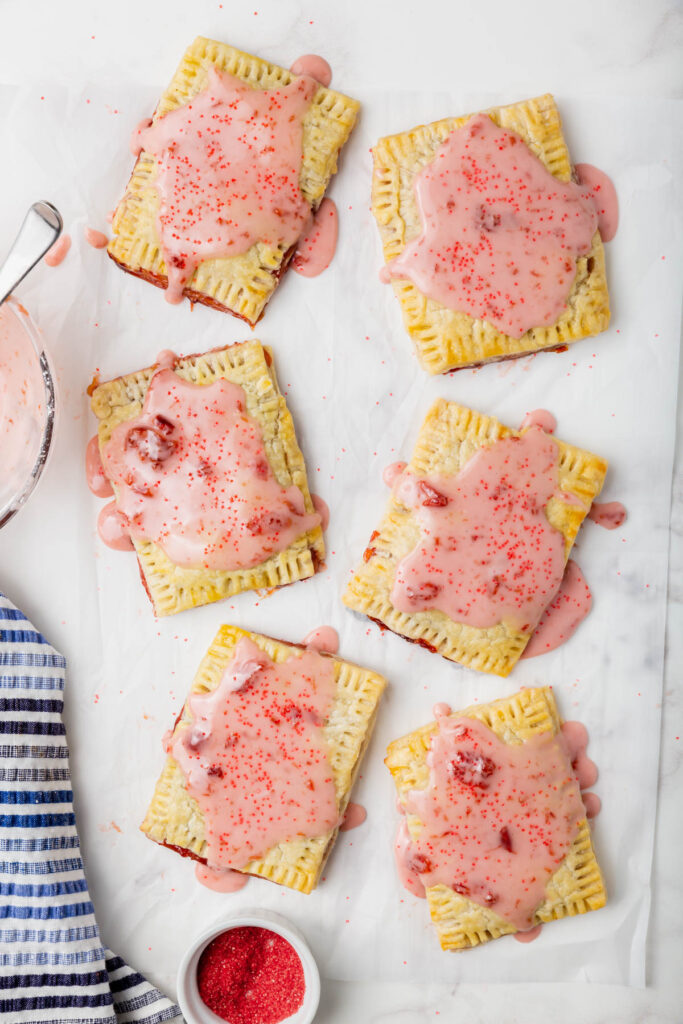
Allow the pastries to dry completely before serving. Once the glaze has hardened, you’re ready to enjoy these delicious pastries for Mother’s Day and year-round!
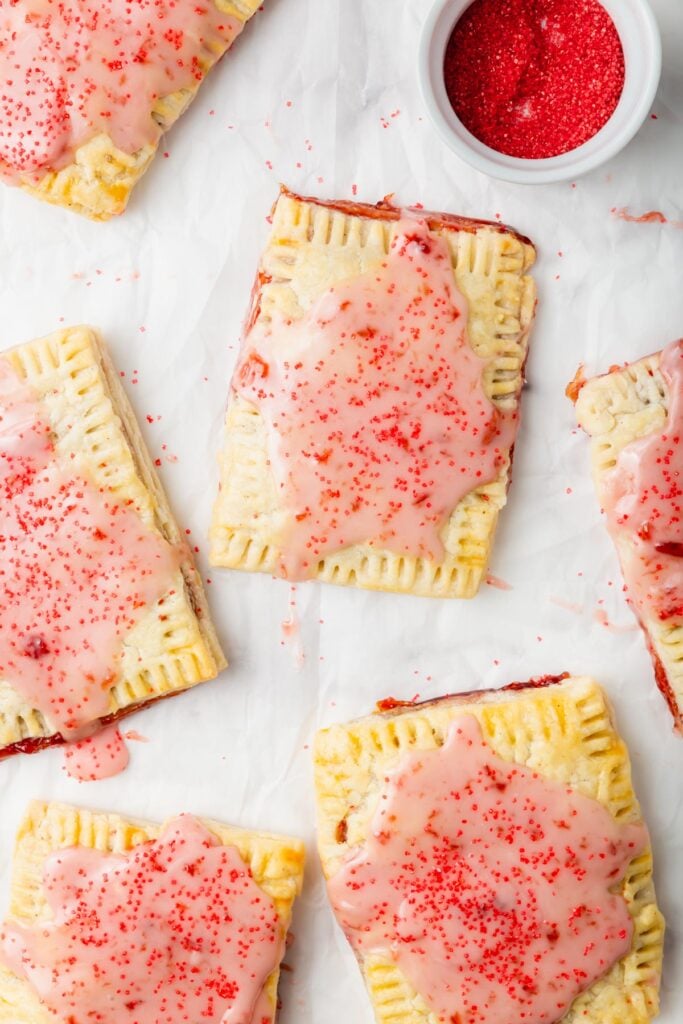
Pop-Tarts are Pretty in Pink
The hardest part is waiting for these beauties to cool. Once cooled, you’re ready to dig in.
These gluten-free pop tarts have a flaky outer crust, a sweet, gooey filling, and that delicious glaze, like the toaster pastries you remember enjoying as a kid.
Unleash your inner child by making and enjoying this kid-friendly, gluten-free treat!
A Few Notes
Here are a few tips, swaps, and substitutions:
Leftovers: Store any leftover gluten-free pop tarts in an airtight container or bag for 1-2 days. Heat them in the toaster oven (or for a few seconds in the microwave) to make them warm and gooey inside.
Dairy-Free Option: To make this recipe dairy-free, substitute the butter with vegan butter and the milk with unsweetened dairy-free milk, such as almond milk, soy milk, cashew milk, gluten-free oat milk, etc.
Vegan Option: To make this recipe vegan, use the dairy-free swaps noted above and brush the tops with almond milk instead of the egg before baking. The almond milk will also give a nice sheen once baked.
Cornstarch Option: You can use tapioca starch or potato starch instead of cornstarch. If you’re avoiding cornstarch, be sure to also look for powdered sugar made with tapioca vs. cornstarch.
Jam Options: You can substitute the cherry jam with your favorite flavor. Think raspberry jam, strawberry jam, grape jam, apricot jam, etc. You could also make chocolate pop-tarts filled (use Nutella), peanut butter pop-tarts, etc.
Cold Butter is Essential! The butter (or vegan butter) must be very cold. This is required if you want a flaky crust.
Flour: This recipe has been developed and tested with Bob’s Red Mill 1-to-1 Gluten-Free Baking Flour. Results cannot be guaranteed with other gluten-free flour blends.
Love this Recipe?
Want to buy vs. make homemade pop-tarts? Check out my article, Gluten-Free Pop-Tarts Brands: A Review, to learn more about store-bought toaster pastry options.
Want more recipes made with Bob’s Red Mill 1-to-1 Gluten-Free Flour? Check out my popular article, 23 Classic Bob’s Red Mill Gluten-Free Flour Recipes.
Want more gluten-free recipes? Try these recipes:
- Easy Gluten-Free Pie Crust Recipe (3 Ingredients!)
- Easy Gluten-Free Protein Waffles (10 Grams of Protein!)
- Easy Gluten-Free French Toast Casserole
- Gluten-Free Blueberry Banana Bread Breakfast Bowls
For more breakfast inspiration, please read 42+ Gluten-Free Breakfast Recipes and Ideas.
Gluten-Free Pop Tarts
Equipment
- Food processor
Ingredients
For the Pastry:
- 2 cups Bob’s Red Mill 1-to-1 Gluten Free Baking Flour
- 1 tbsp granulated sugar
- 1/2 tsp salt
- 3/4 cup unsalted butter cut into small pieces and very cold
- 6-7 tbsp ice cold water
- 1 egg beaten
For the Jam Filling:
- 3/4 cup cherry jam
- 2 tsp cornstarch
For the Icing:
- 1 cup powdered sugar
- 1 tbsp milk
- 1 tbsp cherry jam
- 2 tsp red sugar
Instructions
For the Pastry:
- In a food processor, pulse to combine the flour, sugar, and salt. Add the cold butter pieces to the food processor and pulse until the butter is the size of peas, with some larger pieces.
- Remove from the food processor and place the flour mixture into a bowl. Add in water, one tablespoon at a time, until you can pinch the dough together. You may only end up using some of the water. Work the dough into a ball.
- Pat the dough into a flat circle, cover with parchment paper or plastic wrap and chill in the refrigerator for about 30 minutes.
For the Filling:
- While the dough is chilling, make the cherry filling. In a small bowl, combine the cornstarch and cherry jam and stir until no clumps remain. Set aside.
For the Pastry (continued):
- Preheat oven to 350ºF and line a baking sheet with parchment paper.
- Once the dough is chilled, roll it out into two equal rectangles about 8×9 inches each and about 1/4 inch thick. Cut the dough into 6 smaller rectangles about 3×4 inches in size. Place 6 of the rectangles on the parchment-lined baking sheet. (Reserve the other 6 rectangles for the top of the pop-tart.)
- Spoon about 2 tablespoons of cherry filling onto each rectangle and spread, leaving about a 1/2 inch border.
- Place the reserved rectangles over the jam. Gently press the edges closed with your fingers. Crimp all the way around with a fork. Generously poke holes into the top of the pastry.
- Brush the top of the pastry with the beaten egg just until covered. You will not need to use the whole egg.
- Bake at 350ºF for 23-25 minutes, until the crust edges are lightly browned. Remove from the oven and let the pop-tarts cool completely.
For the glaze:
- While the pop-tart is cooling, make the glaze. In a small bowl, combine the jam and milk until smooth. Then add to powdered sugar. Whisk until combined and no clumps remain. You want the glaze to be spreadable but thick so it doesn't run off the pop-tart. Add more powdered sugar or milk to reach the desired consistency.
- Once the pop-tart has cooled, drizzle the glaze over the top of each pastry using a spoon. Sprinkle red sanding sugar while the glaze is wet. Allow the pop-tarts to dry completely before serving.
Yes you can make it however you like. I don’t have a tested filling recipe at the moment.
Could you use a different filling? My family prefers that brown sugar type filling but I’m not sure how you would make that. Any suggestions
Use pastry / dough cutters or a fork to cut in the butter. Should work well.
Is there a way to make this without a food processor?
I suggest a toaster oven where they can lay flat
So a toaster oven was mentioned to warm the pop tarts. Can a standard toaster be used? Do you have to worry about the frosting burning, if that is the case how can that be prevented?
I had to make these after you mentioned them in your newsletter. So so tasty and easy to make!! I will definitely make these again.
Yes, you can freeze the dough. I’m so glad you enjoyed them!
It’s so hard finding gluten free recipes that my whole family can enjoy, but I made these for my family yesterday morning and everyone loved them! My family had eaten all of them by the time I went for seconds, which never happens when I bake gluten free! I’m going to make them again today or tomorrow, and was wondering if I made a double batch if I could freeze some of the batter? These are definitely a new family favorite. Thank you!
This was wonderful….I’m already making more… thank you so much for sharing ☺️😘
I thought these would be alright. They are delish, the crust is flakey, the inside is gooey. These are a make again.
I’m not sure either Lisa. I’ve made them many times with much success. You didn’t add the glaze or jam filling to the batter by mistake?
I made these exact to recipe. The dough spread out to at least double the pre-baked size. The were not flaky, but gooey. I left them overnight on a cooling rack, which helped them dry to a leads gooey consistency. They were edible. Wondering what went wrong? I am not a novice baker, so this surprised me.
It may be too sweet. I’m posting a puff pastry recipe shortly though. That would work.
Could I use this recipe to make hot pockets or pizza rolls