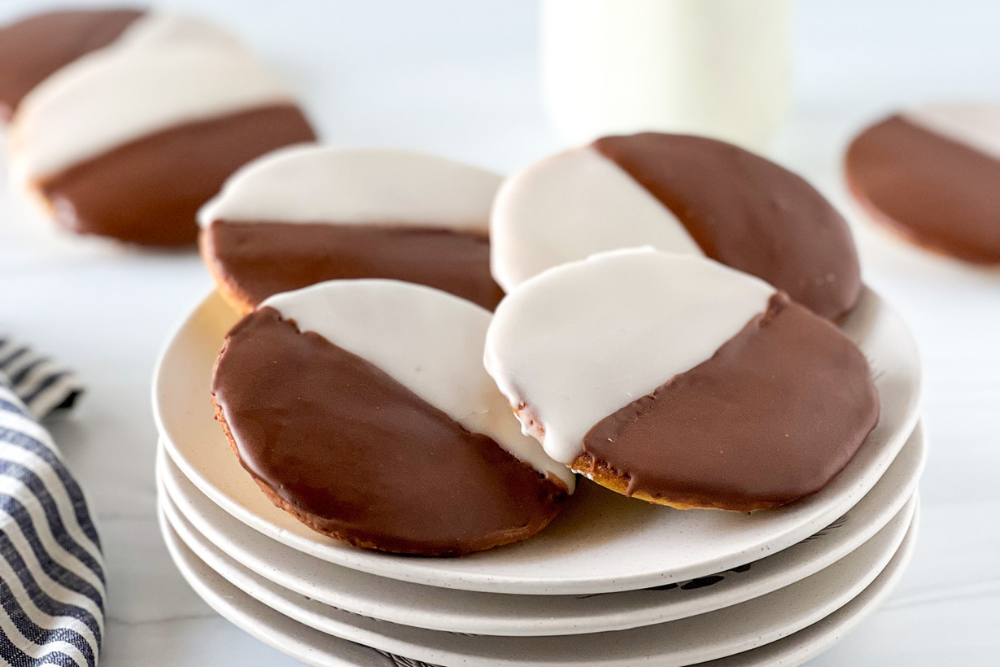
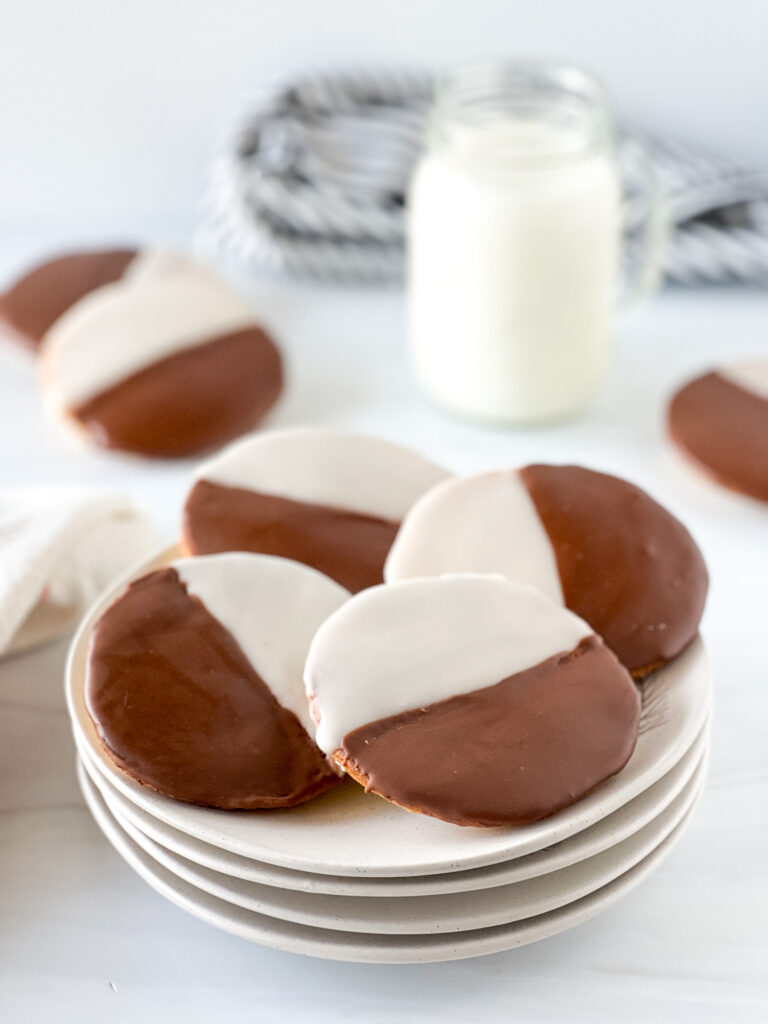
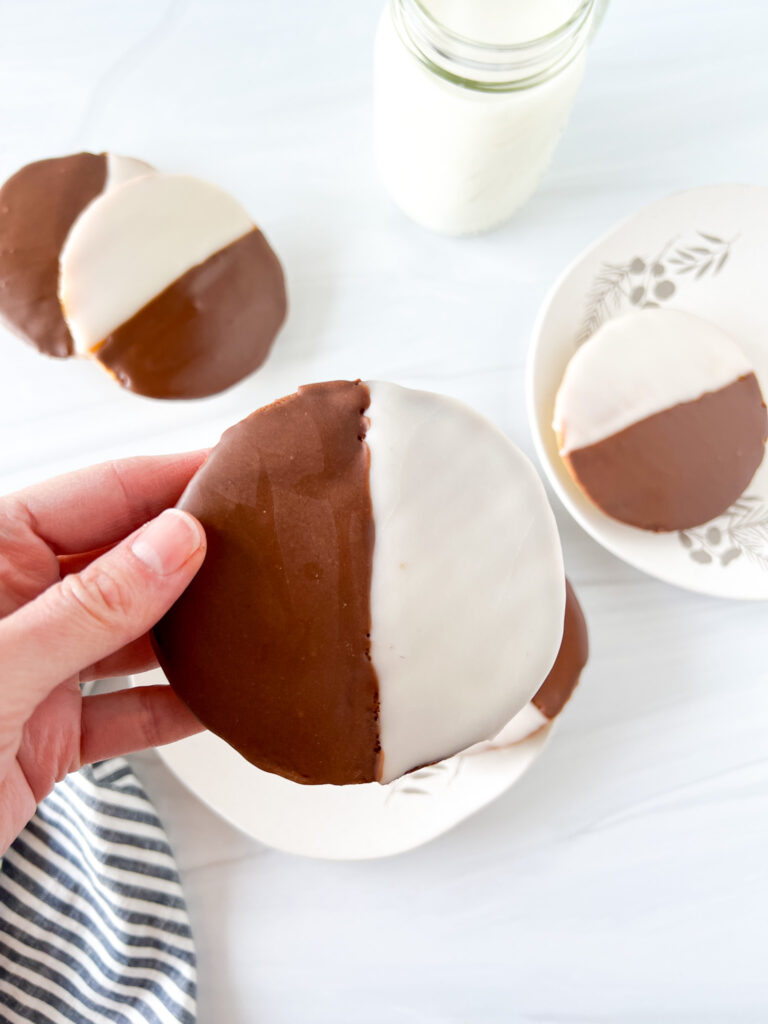
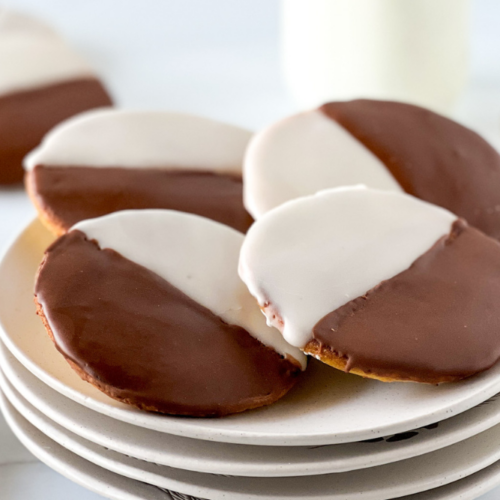
These gluten-free black and white cookies (also known as half-moon cookies) are topped with half chocolate and half vanilla icing, so you don’t have to decide which flavor you like best. Many consider black and white cookies to be the quintessential New York dessert and a cookie of unity. They’re surprisingly easy to master and are guaranteed to be the talk of any [gluten-free] cookie-exchange parties. This post contains affiliate links. Please see my disclosures.
My father loves black and white cookies and with good reason. He’s from New York and grew up eating this nostalgic New York treat. Almost every New York bakery and deli makes a version of this cake-like cookie, and my father is always eager to sample a black and white cookie anytime he spots one.
Not only are black and white cookies the quintessential New York City dessert, but they’re also a dessert entrenched in Jewish culture. Most Jewish bakeries in New York make their version of black-and-white cookies, which are sometimes called half-moon cookies.
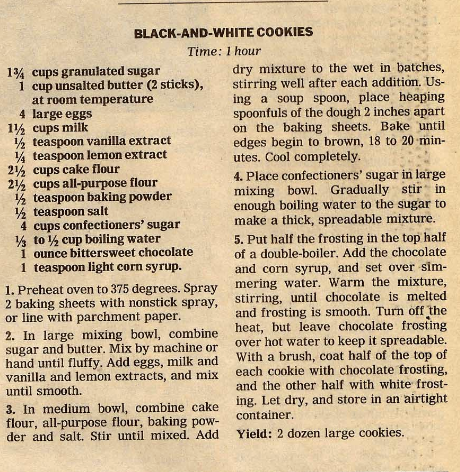
As legend has it, the oversized cookie can trace its origins to Glaser Bake Shop in Manhattan, which has been making the cookies for well over 100 years. Glaser once published its recipe, but as you can see, it’s made with all-purpose flour and cake flour, both of which are off-limits to those who cannot eat gluten, a protein found in wheat, rye, barley, and sometimes oats.
The black and white cookie became famous thanks to a Seinfeld episode where Jerry eats a black and white cookie and ruminates about how the cookie offers an elegant way to promote racial harmony.
Of course, when eating a black-and-white cookie, you don’t have to decide if you like chocolate or vanilla better because you’ll get to enjoy the best of both worlds in one iconic dessert.
I can’t remember what a black-and-white cookie tastes like because I’ve been on a gluten-free diet for so long, so I decided to try my hand at making one.
I analyzed various recipes online to see what goes into making a black-and-white cookie. I tried a few recipes with different gluten-free flours and used a recipe from The Preppy Kitchen as my inspiration.
I substituted wheat flour with Bob’s Red Mill 1-to-1 Gluten-Free Flour, made a few other tweaks, and voila, this is a gluten-free black-and-white cookie worth eating time and time again!
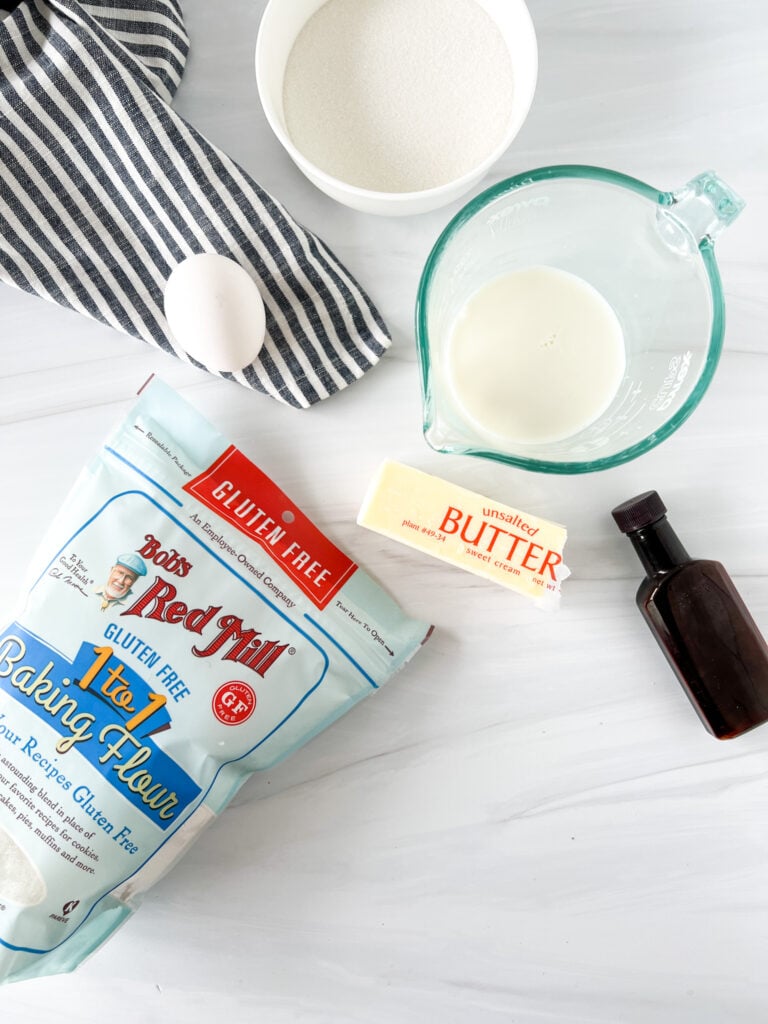
Ingredients for the Black and White Cookie
Making a black and white cookie is surprisingly simple, but you’ll need to prep a few ingredients ahead of time first. Here’s what you’ll need:
Gluten-Free Flour: You’ll want to use 160 grams of Bob’s Red Mill Gluten-Free Flour Blend. I highly recommend using a kitchen scale to measure precisely 160 grams. If measuring by volume, it’s approximately 1 cup + 1 Tbsp.
I tested this recipe with two other gluten-free flour blends (Better Batter and Hand + Heart All-Purpose Flour) and found that the recipe was too doughy and didn’t spread into the cookie’s signature mounded shape. I generally don’t like using Bob’s Red Mill Gluten-Free Flour Blend for cookies because it spreads, but in the case of this recipe, the spreading is welcome.
If using a different gluten-free flour blend, you WILL get different results. Also, make sure your flour blend contains xanthan gum, or add 1/4 tsp if not. Bob’s Red Mill Gluten-Free Flour Blend contains xanthan gum.
Baking Soda: The baking soda is essential to this recipe because it will react with the buttermilk to give the cookies rise. If your baking soda is old or expired, throw it out and use a fresh one.
Salt: Even though you only need 1/2 tsp of salt, it will go a long way in enhancing the flavor of these cookies.
Butter: You’ll need six tablespoons of unsalted butter brought to room temperature. This is important! The ingredients will mix better when all the ingredients are at room temperature. Do not heat the butter in the microwave, as it will melt and cause the cookies to spread. Take the butter out of the fridge and let it sit at room temperature for one hour.
A trick to soften butter more quickly is to fill a glass bowl with hot water or any container that fits over your butter. After the boiling water sits in the bowl for one minute, pour it out, then place the bowl over your butter to cover it. The heat from the bowl will help quickly soften your butter.
Sugar: This recipe calls for only 1/2 cup of granulated sugar. You’ll notice the cookie itself isn’t overly sweet. However, the icing on the cookie adds sweetness and moisture.
Egg: You’ll also need 1 large egg for this recipe. Again, the egg will blend better with the other ingredients if it’s at room temperature. To quickly bring an egg to room temperature, place it in a bowl of hot water for 5-10 minutes.
Buttermilk: I have yet to find buttermilk at the grocery store, and instead recommend making your own. Combine 1/3 cup of whole milk with 1 tsp of fresh lemon juice, and let the mixture sit at room temperature for 5-10 minutes. The milk will begin to curd a bit, and now you have buttermilk. Buttermilk not only adds a tangy taste to the cookies but also reacts with the baking soda to create gas bubbles that help the cookies rise.
Vanilla Extract: Some black-and-white cookie recipes call for almond or lemon extract. One of the recipes calls for Fiori di Sicilia, which offers a combination of vanilla and citrus flavors. However, most of you – including me – are home chefs and cannot find this unique extract at the grocery store. (I looked but didn’t find it.) And online, the ingredient is expensive. It’s $14 on Amazon for a tiny bottle!
Instead, I’m opting for simple vanilla, which is delicious and perfect for this recipe. I also don’t add lemon extract, but you’ll see that I add lemon to the icing to bring forward the black-and-white cookie’s subtle tangy flavor.
How to Make Black and White Cookies
Here’s how to make black and white cookies:
(1) Preheat the oven to 350º F and line two cookie sheets with parchment paper or silicone baking mats. Set them aside.
(2) Whisk the flour, baking soda, and salt in a medium bowl. Set it aside.
(3) In the large bowl attached to your standing mixer fitted with the paddle attachment, add the butter and sugar and mix on medium-high for about 1 minute until the mixture is fluffy.
(4) Scape down the sides, add the egg and vanilla and continue mixing for another minute until well combined.
(5) Add half of the flour mixture and half of the buttermilk mixture and mix on medium speed until combined, then add the other half of the flour mixture and buttermilk mixture and mix well until combined, about 1 minute. Scape down the sides as needed.
(6) Use a medium-sized cookie scoop to drop balls of the batter onto the lined baking sheets. Use a greased ice cream scoop if you don’t have a cookie scoop. You’ll have enough batter to make about 8 large rounded scoops of batter. The batter is too sticky to handle by hand.
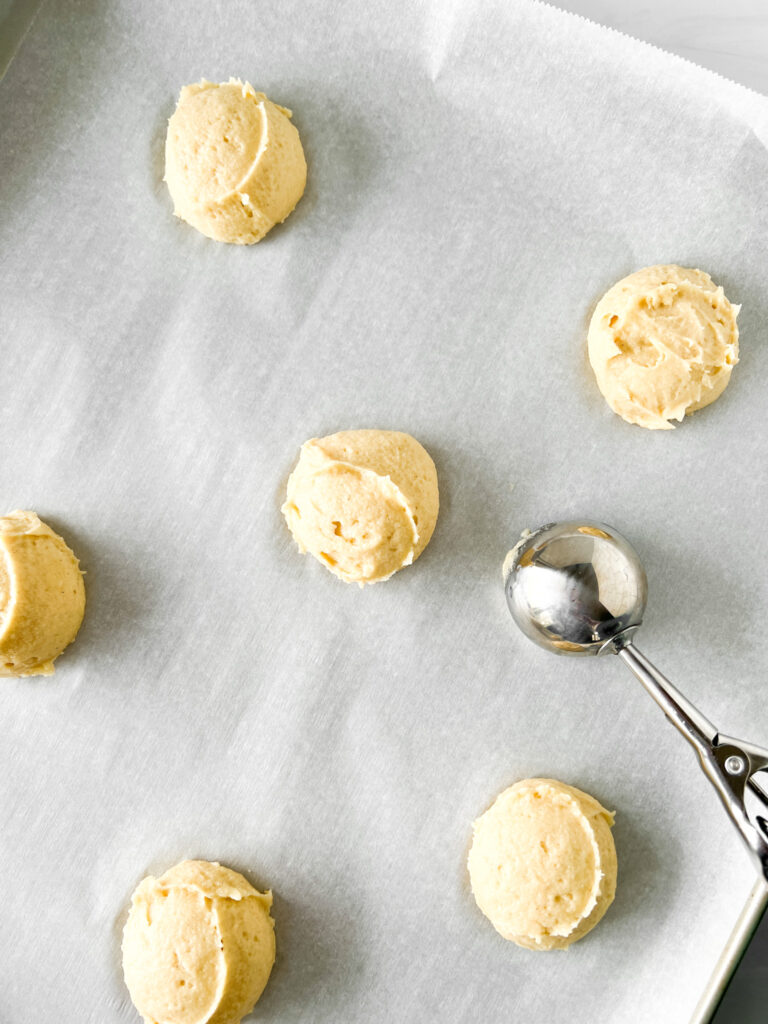
(7) Place scoops of the batter on one of the baking sheets, spacing them apart to allow plenty of room to spread.
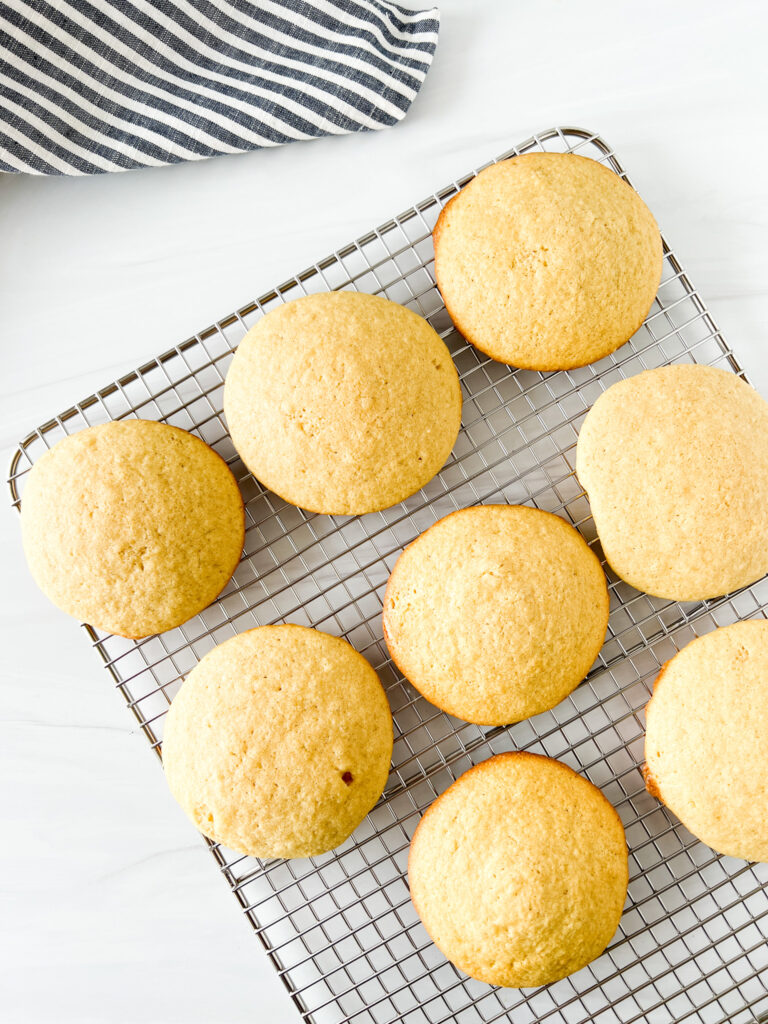
(8) Bake in batches for 12-13 minutes or until the bottoms begin to brown. Remove them from the oven and allow them to cool for 2-3 minutes before transferring them to a wire rack to cool completely.
Icing the Cookies
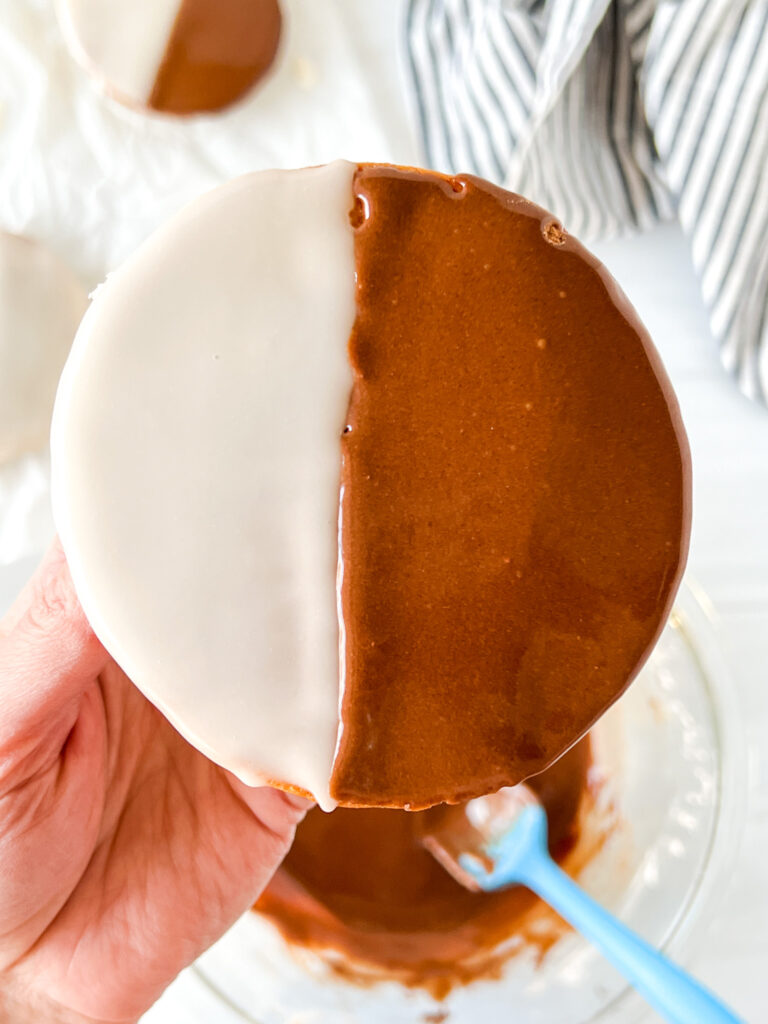
When icing the black and white cookies, I suggest first adding the vanilla glaze. Once the vanilla icing sets on the cookies, you can make and add the chocolate glaze to give these cookies their iconic look.
Vanilla Glaze:
- 1 cup powdered sugar (120 grams)
- 1 tsp lemon juice, fresh
- 1 Tbsp boiling water, plus more if needed
- 1/2 Tbsp corn syrup*
- 1/4 tsp vanilla extract
Mix the ingredients well in a bowl, adding more hot water to get the just-right consistency. You want it to be thick but spreadable. Air on the side of it being more thick than watery, adjusting the amount of water and powdered sugar to get a spreadable, thick mixture.
Flip the cookie over to ice the bottom of the cookie. Use a spatula to spread the vanilla icing over half of the cookie. Allow the icing to set in place for about 20-30 minutes before adding the chocolate icing.
Corn Syrup: Do not skip the corn syrup. It gives the icing a shiny coating and makes your cookies look bakery-style vs. dull. If you don’t have or want to use corn syrup, you can use glucose syrup instead.
Chocolate Glaze:
- 1 cup powdered sugar (120 grams)
- 3 Tbsp cocoa powder*
- 1 tsp lemon juice, fresh
- 2 Tbsp boiling water, plus more if needed
- 1 Tbsp corn syrup
- 1/4 tsp vanilla extract
Mix the ingredients until well combined, and the consistency is thick but spreadable. Carefully add the chocolate icing to the other half of the cookie to form a neat line down the middle. Allow the icing to set before enjoying.
*If you want a darker chocolate color, use Dutch-processed cocoa powder.
Storing the Cookies
Once the icing is set, I recommend placing the cookies in your fridge for 1-2 hours to fully allow the icing to harden on the cookie. Store them in an airtight container or cover them with plastic wrap. You can also individually wrap each cookie with plastic wrap like they do in New York.
The cookies will keep in the fridge for 4-5 days. They freeze well, too. I personally recommend eating them within 1-2 days for the best taste and texture.
How Do They Taste?
Because my father is an “expert” on eating black and white cookies, I asked him to taste them. He first told me it was a delicious cookie and that he wouldn’t change anything. He was impressed with the mounded shape and thought the taste and texture were good. It wasn’t exactly like the gluten-y black-and-white cookies he’s used to, but he said they’re close.
He said, however, that many of the cookies in New York have a crunchier topping. I experimented with adding chocolate to the icing but ultimately decided to ice the cookies. This way was more accessible and prettier, and the taste was good. But if you like a crunchy icing topping, I might consider adding real white and dark chocolate.
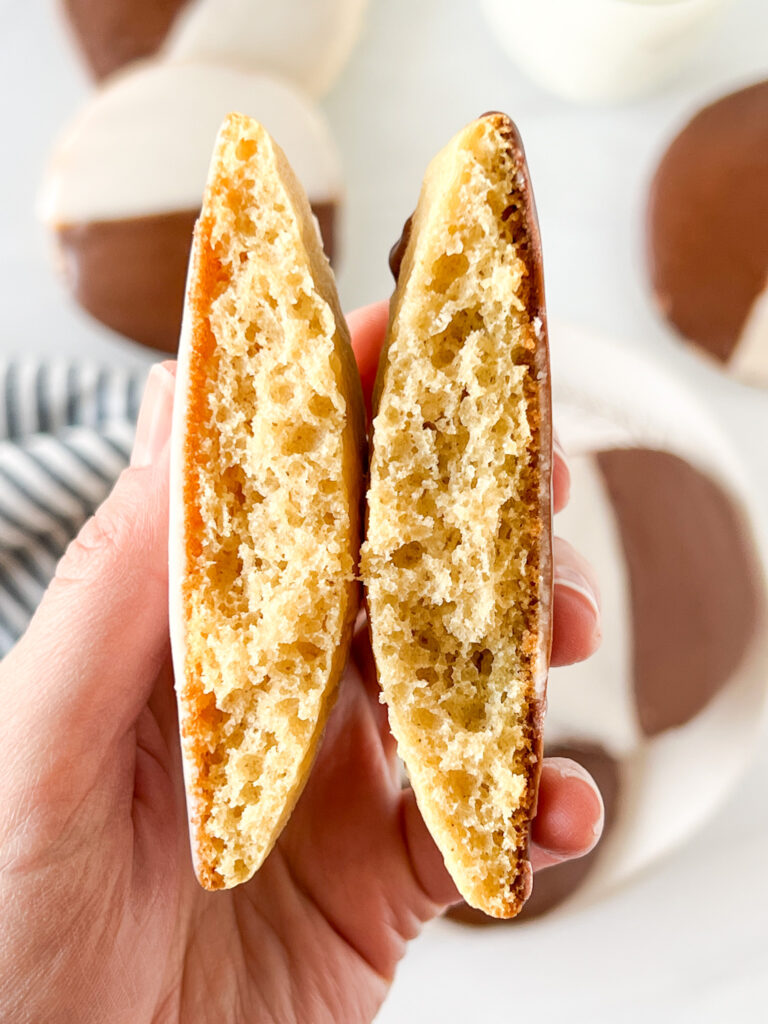
You’ll find a tender, moist, mounded cookie topped with deliciously sweet icing. This gluten-free black and white cookie may not taste exactly like the black and white cookies of your childhood, but they’re a close replica and one I’m very proud to share today.
Tips, Troubleshooting, and FAQs
Use Room Temperature Ingredients: Make sure you take the butter and egg out of the fridge to come to room temperature for 1-2 hours before making this recipe. Please see above for my tips for bringing butter and eggs to room temperature quickly.
Ice the Bottom of the Cookie: Make sure you ice the bottom (flat side) of the cookie, not the mounded part.

Gluten-Free Flour: Some brands of gluten-free flour will work well in the recipe. I tested it with Bob’s Red Mill 1-to-1 Gluten-Free Flour blend and found the cookies spread as desired and had a nice flaky-but-cakey texture. I also used Lorraine’s All-Purpose Gluten-Free Flour and found the cookies didn’t spread properly and were more doughy. Remember, results can vary from flour to flour.
Measuring Flour: Always use a kitchen scale to measure flour. If you don’t, use the spoon and level method but spoon the flour into the measuring cup vs. scooping it with your measuring cup. Do not pack the flour into the measuring cup.
That’s a Big Cookie! A traditional black-and-white cookie is larger than your average cookie. These cookies, once baked, measure about 3.5-4 inches in diameter.
Keep them Cool: The icing will soften if kept at room temperature, especially in warm climates. Keep the cookies in the fridge until you’re ready to enjoy them.
Dairy-Free: I have not tested this recipe without dairy. Many articles online say you can use plant-based milk combined with lemon juice to make dairy-free buttermilk. You can also use dairy-free butter, such as these buttery sticks from Earth Balance.
Egg-Free: I haven’t tested this recipe without eggs.
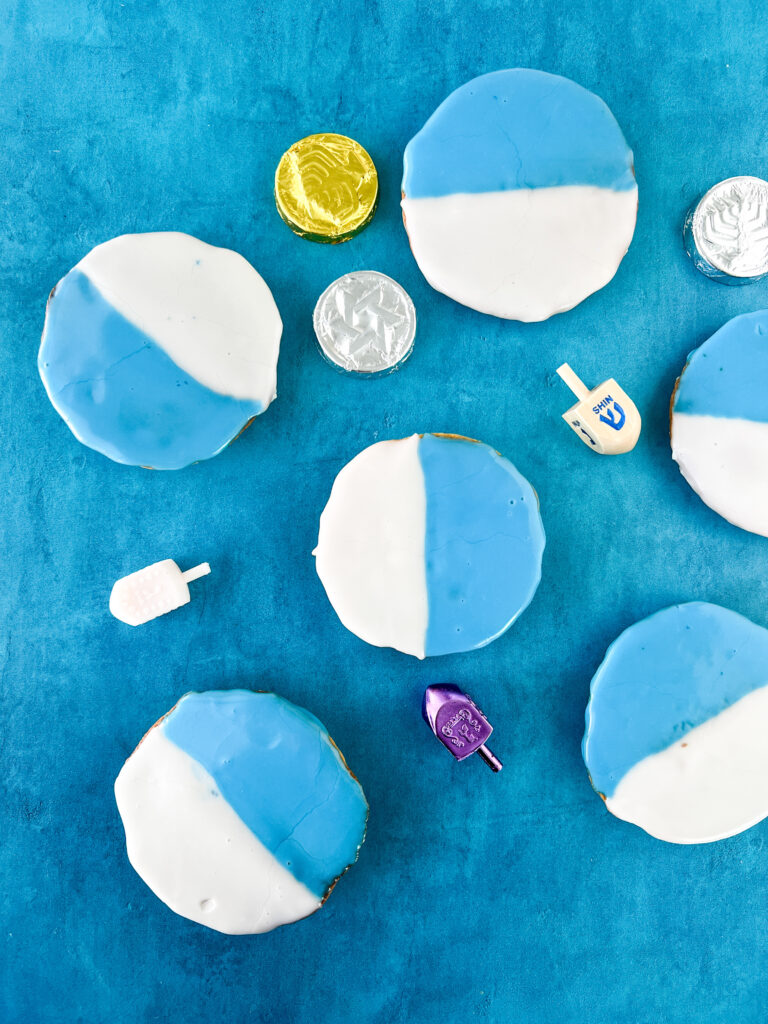
Hanukkah Blue & White Cookies
Instead of black and white cookies, I made blue and white cookies for Hanukkah. To do this, I made double white icing and iced the white half of the cookies. I then added blue food dye to the rest of the icing and iced the second half of the cookie.
The cookies were moist, tender, and delicious – and perfect for your Hanukkah celebrations.
Be sure to read my article, 18 Gluten-Free Recipes for Celebrating Hanukkah to find these cookies and more recipes to celebrate the Jewish festival of lights.
Additional Recipes
Try these gluten-free cookie recipes, too:
- Classic Gluten-Free Chocolate Chip Cookies
- Gluten-Free Frosted Sugar Cookies
- Chewy Gluten-Free Molasses Cookies
- Gluten-Free Pumpkin Scones
Gluten-Free Black and White Cookies
Equipment
- 1 Standing mixer fitted with paddle attachment
- 1 Cookie scooper medium
- 2 baking sheets
- 2 silicone baking mats or parchment paper
Ingredients
For the Cookie Batter:
- 1/3 cup whole milk
- 1 tsp lemon juice
- 160 grams Bob’s Red Mill 1-to-1 Gluten-Free Flour Blend approximately 1 cup + 1 tbsp of flour, spooned and leveled – SEE NOTES if using another flour blend
- 1/2 tsp baking soda
- 1/2 tsp salt
- 6 Tbsp unsalted butter softened
- 100 grams granulated sugar 1/2 cup
- 1 large egg room temperature
- 2 tsp vanilla extract
For the Vanilla Glaze:
- 120 grams powdered sugar 1 cup
- 1 tsp lemon juice fresh
- 1/2 Tbsp corn syrup see notes
- 1/4 tsp vanilla extract
- 1 Tbsp boiling water more if needed
For the Chocolate Glaze:
- 120 grams powdered sugar 1 cup
- 3 Tbsp cocoa powder see notes
- 1 tsp lemon juice fresh
- 1 Tbsp corn syrup see notes
- 1/4 tsp vanilla extract
- 2 Tbsp boiling water more if needed
Instructions
For the Cookie Batter:
- Preheat the oven to 350º F and line two baking sheets with parchment paper or silicone baking mats. Set them aside.
- Combine the milk and lemon juice in a cup for 5-10 minutes to form buttermilk. Set it aside.
- Whisk together the flour, baking soda, and salt in a medium bowl. Set it aside.
- In the bowl attached to your standing mixer fitted with the paddle attachment, add the softened butter and sugar and mix on medium-high, about 1 minute, until the mixture is fluffy.
- Scape down the sides, add the egg and vanilla, and continue mixing for another minute until well combined.
- Add half of the flour mixture and half of the buttermilk mixture to your standing mixer and mix on medium speed until combined. Add the other half of the flour mixture and buttermilk mixture and mix well until combined, about 1 minute. Scape down the sides as needed.
- Use a medium-sized cookie scoop to drop balls of the sticky batter onto the lined baking sheets. Use a greased ice cream scoop if you don't have a cookie scoop as the batter is too sticky to scoop by hand. You'll have enough batter to make 8 large rounded scoops of batter, 4 per baking sheet. Leave plenty of space between the cookies.
- Bake in batches for 12-13 minutes or until the bottoms begin to brown. Remove them from the oven and allow them to cool for 2-3 minutes before transferring them to a wire rack to cool completely.
For the Vanilla Icing:
- Mix the vanilla icing ingredients in a bowl, adding hot water as needed to get the just-right consistency. You want it to be thick but spreadable. Air on the side of it being more thick than watery, adjusting the amount of water and powdered sugar to get a spreadable, thick mixture.
- Flip the cookie over to ice the bottom (flat side) of the cookie. Use a spatula to spread the vanilla icing over half of the cookie. Allow the icing to set in place for about 20-30 minutes before adding the chocolate icing.
For the Chocolate Icing:
- Mix the chocolate icing ingredients in a bowl until well combined and the consistency is thick but spreadable. Carefully add the chocolate icing to the other half of the cookie to form a neat line down the middle. Allow the icing to set before eating.
Bobs can be a bit more gritty. Once you ice it, let it sit for a few hours. The cookies get more moist with time.
I followed the recipe EXACTLY, even used the scale and the Bob Mills. The cookies were delicious but tasted grainy.
Is that what you’re getting, too?
I used King Arthurs 1:1 Gluten Free flour. The cookies came great ! They had that “cakey” texture. The cookie by itself tasted great. Then I applied the icing. Thank you Jenny !
Yay I love hearing this! Thank you.
I made the black and white cookies using King Arthur’s 1:1 Gluten Flour. They came out great. The cookie was “cakey” as I remember. The recipe was easy to follow, TY Jenny ! I was also able to find buttermilk at local Walmart. Cannot wait to make these again !!
The gluten-free flour makes a HUGE difference. They all work differently. I tried it with a different blend and it didn’t work. Please share your flour recipe so others can enjoy it too.
Hi, I had to use more than double the amount of flour for these, otherwise they came out super liquidy and thin and way too flimsy. Real Black and Whites should be cakey so I had to use a lot more flour to get it to be that texture. I didn’t use the GF flour blend, I blended my own so maybe that was it? But I can’t imagine a cup of flour would be enough regardless of what kind you’re using.