
No Jewish holiday is complete without a beef brisket on the table. In this post, I’ll show you how to make a simple, savory beef brisket recipe that is slow cooked to perfection and tender to the touch. As my mother would say in Yiddish, it’s gedempt (well cooked, fall off the bone good). This post contains affiliate links. Please read my disclosures.
For as long as I can remember, every Passover, Purim, Rosh Hashanah and Hanukkah celebration includes some sort of beef brisket. It’s standard Jewish fare and served at all our important celebrations.
I always wondered why Jews served beef brisket at everything, so I looked online to see if I could find the answers.
It’s important to know that brisket is a cut of meat from the breast or lower chest of a cow. The meat contains a lot of tough connective tissue, so it must be cooked properly (low and slow) in order for the meat to be tender. Beef brisket is typically cooked like a pot roast.
Many believe the brisket cut of beef is so popular among Jews for several reasons. One, the cut is always kosher whereas some hind cuts are not. Two, it used to be one of the cheapest cuts of beef, making it a solid choice for Jews looking for a more affordable but nice meat dish. (Today beef brisket is expensive due to its popularity and rising beef prices.)

A Savory Beef Brisket Recipe
It can be intimidating to make a beef brisket on your own, but I promise you, it’s not as hard as it seems. You just need a solid roasting pan, an oven, and a little patience.
This is the exact roasting pan I use, but my mother-in-law swears by her simple and cheap black-speckled roasting pan.
Here’s how to make my savory beef brisket recipe, perfect for Jewish holidays, Shabbat and year round.
Step #1: Gather Ingredients
You’ll need the following ingredients to make this easy beef brisket:
- 5 lbs of brisket, untrimmed (it looks like a lot, but it shrinks)
- 1-2 tsp salt (adjust if using Kosher brisket as it is pre-salted – see recipe Notes)
- Fresh ground pepper
- 1 tbsp avocado oil, or vegetable oil of choice
- 6 cups of onions, chopped (about 2 large onions or 4 medium onions)
- 1.5 cups carrots, chopped
- 5 celery stalks, chopped
- 10 garlic cloves, smushed with the side of your knife
- 4 cups beef or chicken broth (1 quart)
- 3-4 rosemary sprigs
- 2 bay leaves
- 1 tbsp potato starch or cornstarch
You can also add other spices and seasonings to the brisket. I sometimes add 1/4 cup tamari, 1 tbsp garlic-ginger sauce, 1 tbsp red wine vinegar, and 2 tbsp of brown sugar for a more spicy result. Experiment with seasonings, to taste.
Step #2: Season and Sear Beef Brisket
Pat dry your brisket and rub salt and pepper on both sides of it. Set aside.
Heat oil in a large pan over medium-high heat, then add the brisket to your pan and sear it on one side for about 3-4 minutes, then flip and sear on the other side for another 3-4 minutes.
Remove brisket from the pan and set it aside.

Step #3: Par-Cook Vegetables
In the same pan used to sear the beef, add onions, carrots and celery and cook the mixture for another four minutes until the vegetables become slightly softened. Add vegetables to a bowl and set it aside.

Add broth to the same pan and use a wooden spoon or spatula to scrape the bottom and sides to get any leftover brown bits. Turn off heat and set the broth aside.
Step #4: Layer Ingredients in Roasting Pan
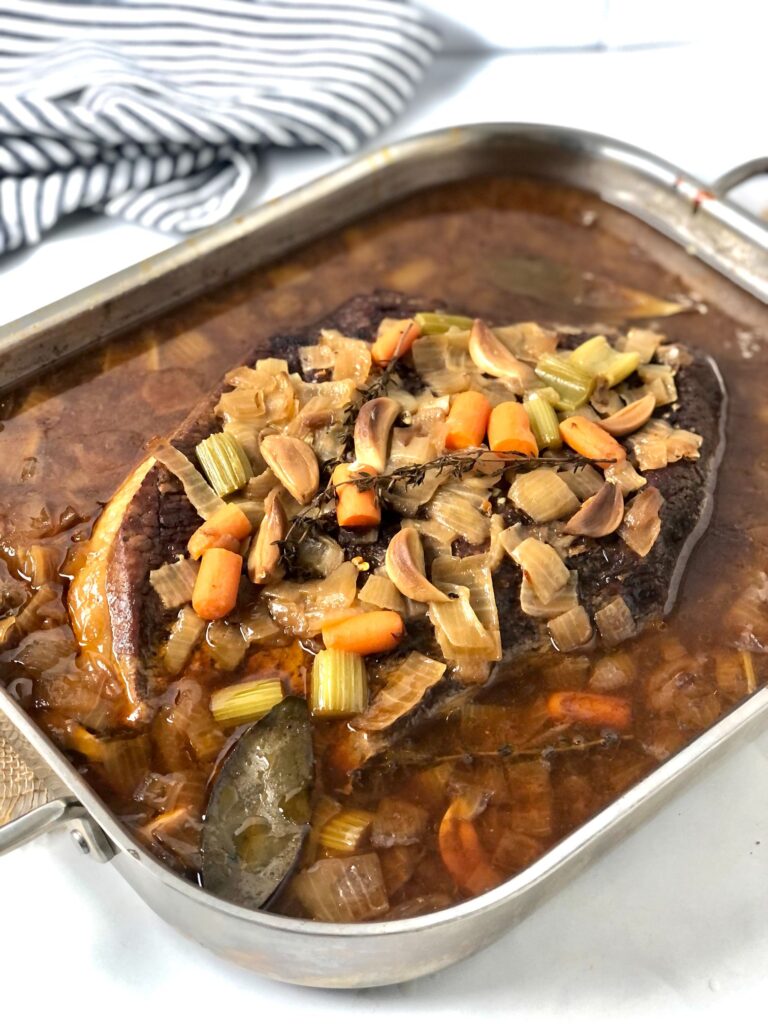
Layer your ingredients in your heavy-bottomed roasting pan.
Add half of the vegetable mixture, then the seared brisket (fat side down), then top the beef with the remaining vegetable mixture. Pour the broth around the brisket.
Add smashed garlic, rosemary springs and bay leaves to the brisket, along with any other seasonings or ingredients you enjoy (remember, I like to add a soy sauce mixture to spice it up, on occasion).

Cover the brisket first with a layer of parchment paper and then with a layer of heavy duty foil, as pictured.

Step #5: Cook the Beef Brisket
Cook brisket in a 300º F preheated oven for about 7 hours. Do not disturb the brisket while it cooks.
As a general rule of thumb, cook the brisket for 1 hour per pound of brisket. I personally like to cook mine a little longer to ensure it’s ultra-tender.
Once the brisket is done cooking, remove it from the oven, uncover it, and allow it rest for 20 minutes at room temperature. You’ll notice the brisket shrinks quite a bit during the cooking process.
Step #6: Slicing the Brisket
Before slicing the brisket, be sure to remove the fat from the bottom. Discard the fat in the trash. You can see the fat, and you’ll notice that it peels off from the brisket quite easily.

You can cut the slightly cooled brisket into slices, or, even better, make the brisket ahead of time and cool it completely in your fridge. The brisket is much easier to cut when it’s cold, and I think it tastes better (and even more tender) after it’s had a day to settle.
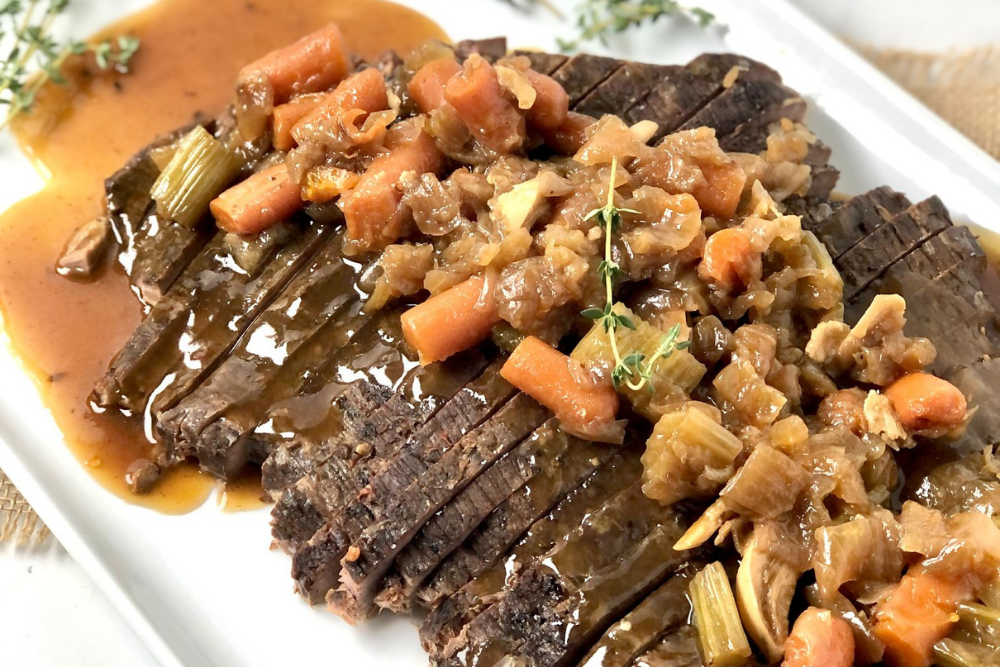
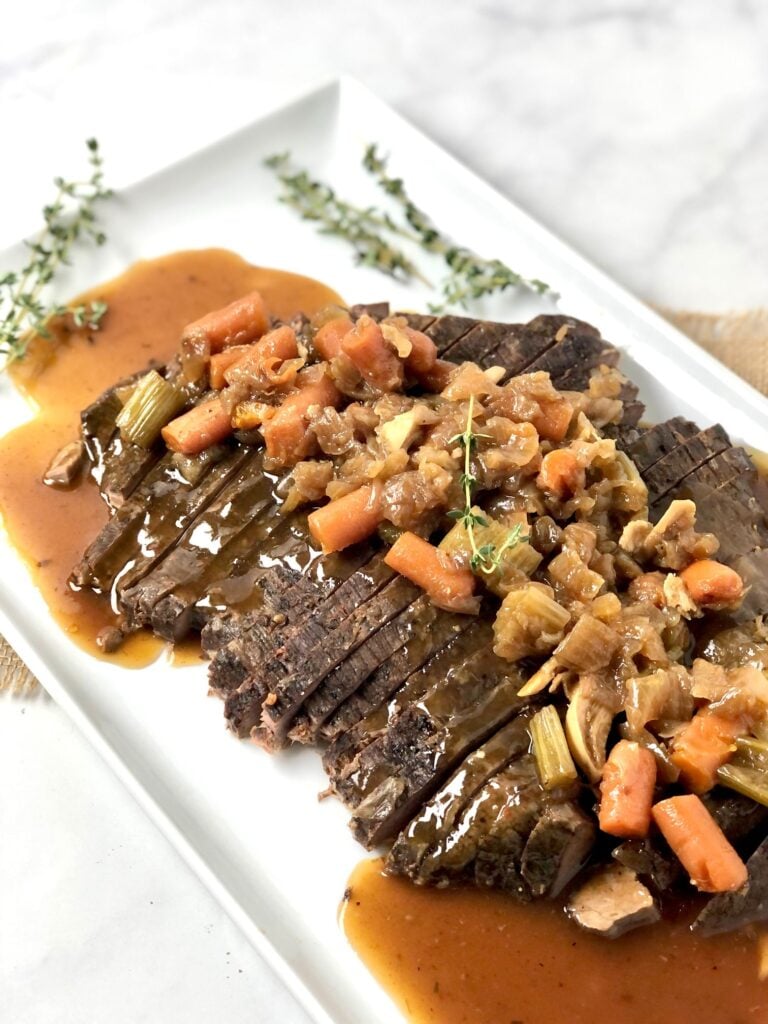
Regardless of when you slice it, be sure to cut opposite of the grain to ensure the beef brisket is tender for your guests. Add sliced brisket to a serving dish and top with vegetables and gravy (see “How to Thicken Gravy” below) before serving.
Step #7: Thicken the Gravy
First you’ll want to strain the drippings (gravy/broth) from the vegetables. After the gravy has cooled, skim off the top part (fat) with a spoon and discard the fat in your trash. If you cool the gravy overnight in your fridge, the fat will harden at the top and it be easier to skim and dispose of.
In a pot over medium-high heat, add gravy with 1 tbsp potato starch or cornstarch (do not use cornstarch for Passover). Whisk the mixture as you bring it to a boil. Mixture will thicken.
If the mixture doesn’t thicken to your liking, add a cornstarch slurry (1 tsp of cornstarch + 3 tbsp cold water) to the mixture and continue to add more slurry until mixture thickens to desired texture. Heat will help the gravy thicken and whisking it will prevent it from becoming lumpy.
Pour half of the gravy over the sliced brisket and vegetables. Reserve half of the gravy to serve on the side so guests can pour more atop their brisket as they desire.

Make Ahead Tips
If you’re making the beef brisket ahead of time, store the brisket, vegetables and gravy in separate dishes, covered, in your fridge. You’ll need to strain the drippings (reserve for gravy) from the vegetables before refrigerating.
The next day, slice the brisket (it will cut easily when it’s cold) and top with thicken gravy (see below) and the cooked vegetables.
To reheat the brisket, place the brisket on your counter for 20 minutes to bring it slightly closer to room temperature. Cover, and place in a 300º F oven for about 20 minutes. Remove the cover, turn heat to 350º F, and heat for another 10-20 minutes until warmed through.
Dig In and Enjoy!
Whew! You worked hard to make this classic Jewish main dish. It’s worth it right? Chag Sameach!
Looking for more Jewish holiday recipes?
- Gluten-Free Challah
- Gluten-Free Potato Latkes
- Gluten-Free Cholent
- Gluten-Free Hamantaschen
- Gluten-Free Matzo Ball Soup
- Gluten-Free Oat Matzah (from scratch)
- Passover Charoset
- 5-Ingredient Gluten-Free Bagels
- Festive Gluten-Free Carrot Ring
Brisket recipe inspired by Tori Avery.

Easy and Savory Beef Brisket
Equipment
- Heavy-bottomed roasting pan
Ingredients
- 5-6 lbs brisket untrimmed
- 1-2 tsp Kosher salt (use 1 tsp if using Kosher brisket as it is pre-salted, use 2 or more tsp of salt if using non-Kosher brisket)
- fresh ground pepper
- 1 tbsp avocado oil or vegetable oil of choice
- 6 cups onions chopped (about 2 large onions or 4 medium onions)
- 1.5 cups carrots chopped
- 5 celery stalks chopped
- 10 garlic cloves smushed
- 4 cups beef or chicken broth 1 quart
- 3-4 rosemary sprigs
- 2 bay leaves
- 1 tbsp potato starch or cornstarch
Instructions
- Preheat your oven to 300º F.
- Pat dry your brisket and rub salt and pepper on both sides of it. Set aside.
- Heat oil in a large pan over medium-high heat. Add brisket to your pan and sear it on one side for about 3-4 minutes, then flip and sear on the other side for another 3-4 minutes. Remove brisket from the pan and set it aside.
- In the same pan used to sear the beef, add onions, carrots and celery and cook the mixture for about 4 minutes until the vegetables become slightly softened. Add vegetables to a bowl and set them aside.
- Add broth to the same pan and use a wooden spoon or spatula to scrape the bottom and sides to get any leftover brown bits. Turn off heat and set the broth aside.
- Layer your ingredients in your heavy-bottomed roasting pan. Add half of the vegetable mixture, then the beef brisket (fat side down), then add the remaining vegetable mixture. Pour the broth around the brisket.
- Add smashed garlic, rosemary springs and bay leaves to the brisket, along with any other seasonings or ingredients you enjoy (see notes). Cover the brisket with parchment paper and heavy duty foil as pictured.
- Cook brisket for about 7 hours. Do not disturb the brisket while it cooks. As a general rule of thumb, cook the brisket for 1 hour per pound of brisket or longer.
- Remove brisket from the oven, uncover it, and allow it rest for 20 minutes at room temperature.
- Before slicing the brisket, remove the fat from the bottom. Discard the fat in the trash.
- You can cut the slightly cooled brisket into thin slices, or, even better, make the brisket ahead of time and cool it completely in your fridge. The brisket is much easier to cut when it's cold. Regardless of when you slice it, be sure to cut against the grain (slicing opposite of the grain) to ensure the beef brisket is tender for your guests.
- To thicken the gravy: First you'll want to strain the drippings (gravy/broth) from the vegetables. In a pot over medium-high heat, add gravy with 1 tbsp potato starch or cornstarch (do not use cornstarch for Passover). Whisk the mixture as you bring it to a boil. Mixture will thicken. If the mixture doesn't thicken enough, add more cornstarch slurry (1 tsp of cornstarch + 3 tbsp cold water) to the mixture and continue to add more slurry until mixture thickens. Heat will help the gravy thicken and whisking it will prevent it from becoming lumpy.
- Pour half of the gravy over the sliced brisket and vegetables. Reserve half of the gravy to serve on the side so guests can pour more atop their brisket as they desire.
Leave a Comment