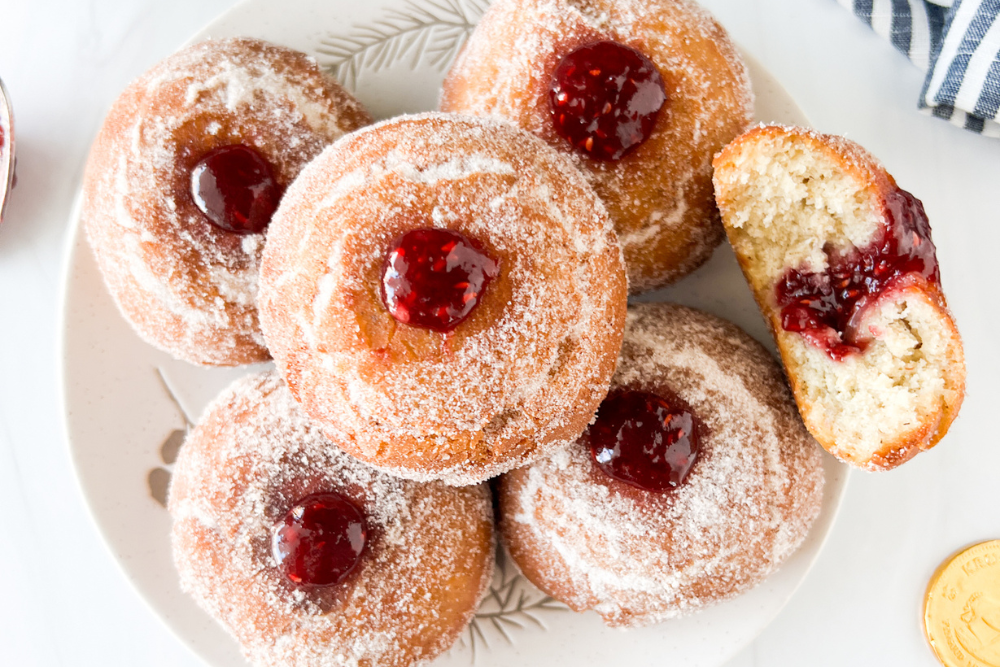

Enjoy these golden pillowy gluten-free jelly donuts that are oozing with sweet jelly and coated in a delightful cinnamon-sugar mixture. Make these donuts for Hanukkah or any time of the year. This recipe was updated in December 2022 to improve the taste and texture and contains affiliate links. Please see my disclosures.
If you’ve been on a gluten-free diet long enough, you know it’s extremely hard – if not impossible – to find a decent yeast-risen jelly donut. That’s because gluten, a protein found in wheat, rye, barley, and sometimes oats, gives yeast donuts their stretch and elasticity.
That means if you want to enjoy a gluten-free jelly donut, you will have to make your own using a variety of flours and starches that mimic the taste and texture of gluten.
This is no easy feat, and after much trial and error, I have improved my gluten-free jelly donut recipe, so they are now pillowy, soft, and have a texture that rivals any jelly donut around.
Of course, I don’t want to oversell it. These are not exactly like wheat-flour-based jelly donuts. That said, they taste delicious and are similar to how you remember a jelly donut tasting.
Jelly Donuts for Hanukkah
Did you know that Jews around the world eat jelly donuts for Hanukkah? They’re called sufganiyot, which comes from the Hebrew root word “sponge,” which is fitting because the donuts soak up oil (like a sponge) when they’re fried.
Jews eat foods cooked in oil to celebrate the Hanukkah story. The holiday celebrates the victory of the Maccabees, a small group of Jewish warriors, over the ruling Syrian army. The Syrians had destroyed the Jewish temple in Jerusalem to ensure Jews did not practice their religion.
The Maccabees revolted and won, reclaiming the Temple in Jerusalem and re-dedicating it to God. The rededication required the Maccabees to relight the menorah, which needed olive oil as fuel. The amount of usable oil they found (which wasn’t destroyed by the Syrians) should have only lasted for one night, but as the story of Hanukkah goes, the oil lasted for eight nights.
To celebrate the “miracle of the oil,” Jews eat fried potato latkes, jelly donuts, and anything cooked in oil.
How to Make Gluten-Free Jelly Donuts
Below you’ll find my NEW and IMPROVED gluten-free jelly donut recipe, updated as of December 2022.
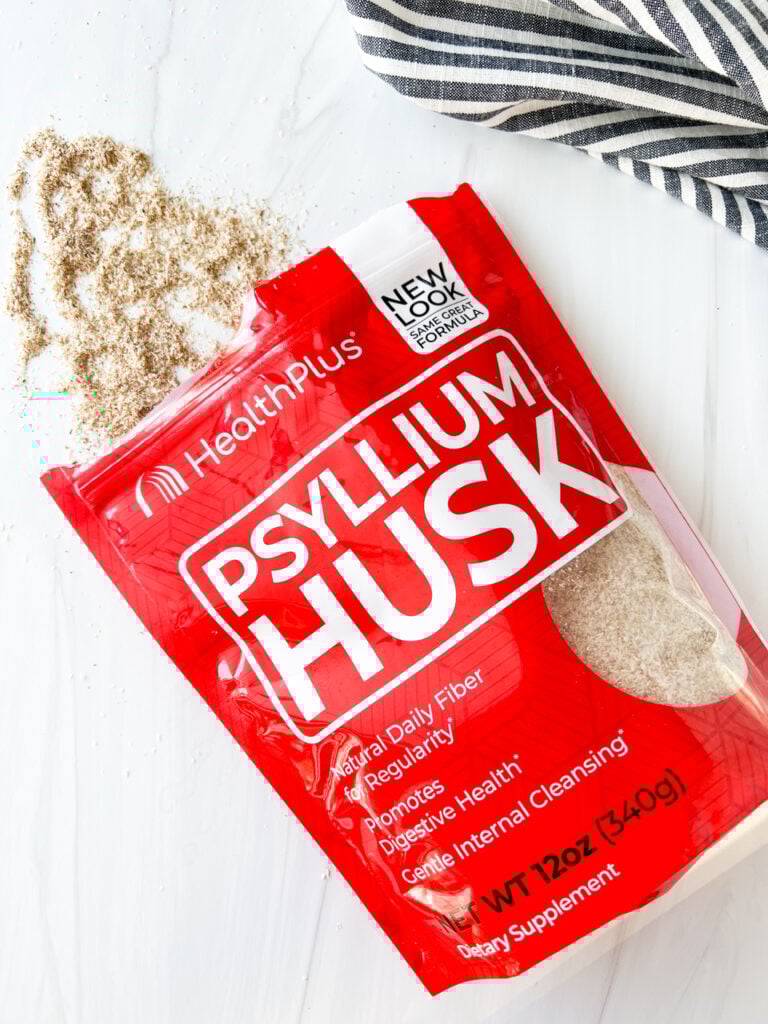
This new and improved recipe includes a new ingredient called psyllium husk, which I’ll talk about in a bit. It also includes a few new techniques that help the donuts keep their plump shape.
To make the donut batter, you’ll want to do the following prep work:
(1) Activate the Yeast: Combine 1 tbsp of active dried yeast with 1/3 cup warm milk in a small bowl. Add 1 tbsp of sugar too. Mix the ingredients and set the bowl aside for five minutes until the yeast starts to froth on top. If the mixture doesn’t foam or bubble on top, your yeast is old and no longer working.
(2) Create a Psyllium Husk Gel: To create a psyllium husk gel, combine 2 tbsp of psyllium husk with 1/2 cup of cold tap water. Stir the mixture together and set it aside. In about five minutes, the mixture will turn into a gel.
Do not skip the psyllium husk. It’s an essential ingredient for adding structure to gluten-free yeast bread. Without it, the dough will be difficult to knead and shape, and the dough will lack bounce and elasticity.
I’ve been using psyllium husk a lot in yeast-risen bread and have found it to be a wonder ingredient in gluten-free baking.
Be sure the psyllium husk brand you use is gluten free. HealthPlus psyllium husk is labeled gluten free on the back of the packaging. I found it at Natural Grocers in Denver, CO. It’s stashed in the supplements (vs. baking) section.
As your yeast is activating and your psyllium husk is gelling, it’s time to prepare your other ingredients.
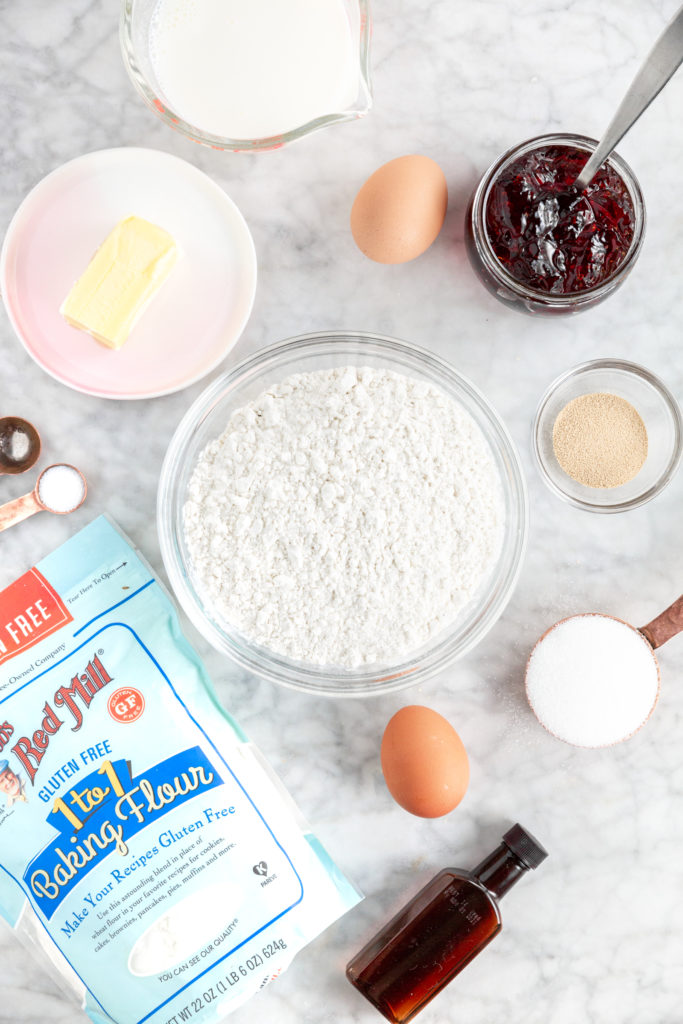
Create the Dough: In the bowl of your standing mixer fitted with the dough hook, combine the following ingredients:
- 2 cups (296 grams) Bob’s Red Mill 1-to-1 Gluten-Free Flour Blend
- 1/4 cup sugar
- 2 tsp baking powder
- 1 tsp salt
This recipe requires a lot of mixing, so I highly recommend using a standing mixer with the dough hook. If mixing it by hand, give yourself ample time to knead the dough.
Give the dry ingredients a swirl and form a well in the middle of the flour. Add 1 large egg, the yeast mixture, and the psyllium husk gel.
Mix the ingredients until everything is well combined, scraping the sides every so often to ensure the flour becomes incorporated into the wet ingredients, about 2 minutes on medium-high speed. The dough will still look somewhat dry.
Add 3 tbsp of softened butter to the mixture and continue to blend on medium-high speed for another 2 minutes, scraping the sides as needed. A sticky ball will form, or you should be able to scrape the dough together to form a sticky ball.
Chill the Dough: Add the sticky dough ball to a lightly greased glass bowl, cover it with plastic wrap, and place the bowl in your fridge for about 2 hours to chill.
Chilling the dough will make it less sticky and easier to handle, so you can knead it and shape it into donuts. Plus, the time in the fridge allows the dry ingredients ample time to fully absorb the wet ingredients. Don’t skip this step!
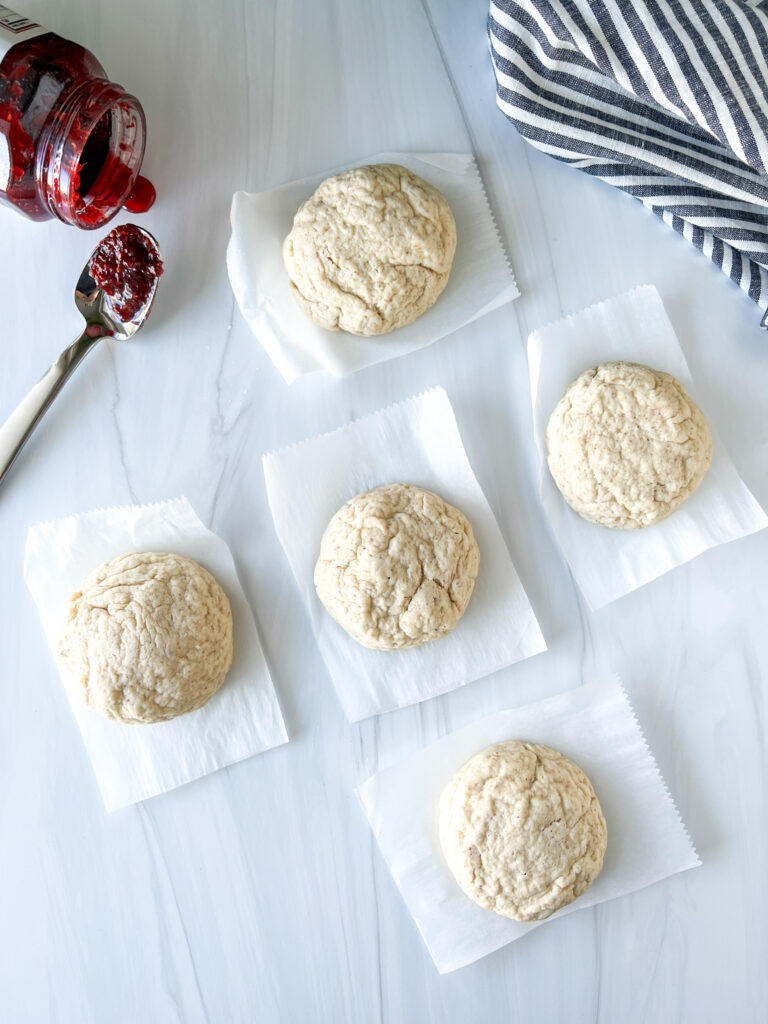
Form and Proof the Donuts: After the dough has sufficiently chilled, add it to a lightly floured surface, and knead it for a few minutes before rolling it into a fat log. Cut the log into 8 evenly-sized portions. Use a kitchen scale to make the portions as equal as possible. Each piece will be approximately 80-85 grams.
Roll each portion into a ball with your hands and try to remove any cracks along the way. Some of the dough will have cracks, and that’s fine. It’s par for the course when working with gluten-free dough.
Place each dough ball on a square piece of parchment paper, then place it on a baking sheet or another tray. Repeat until you’ve formed eight donuts. Cover the donuts with plastic wrap and put them in a warm place to rise.
Editors Note: My old recipe required rolling out the dough and then cutting them into shape. I found this flattened the dough too much and didn’t allow for a fluffy donut. The hand-shaping method is a significant improvement and is based on a technique I learned from the Baked to Perfection cookbook.
If your home is cold, you can turn on your oven to the lowest possible temperature before you start shaping the donuts, then turn off the oven and place your donuts inside the oven to rise (proof).
Fry the Donuts: When the donuts have doubled in size and look poofy, it’s time to fry them up! Heat a neutral vegetable oil (I use avocado oil) in a heavy-bottom pan filled at least two inches from the bottom. Heat the oil until the temperature reaches 320-330º F. Use a deep-fry thermometer to help you manage the temperature.
Please note that 320-330º F works well for gluten-free donuts because it’s hot enough to cook the center of the donuts without browning the outside too quickly.

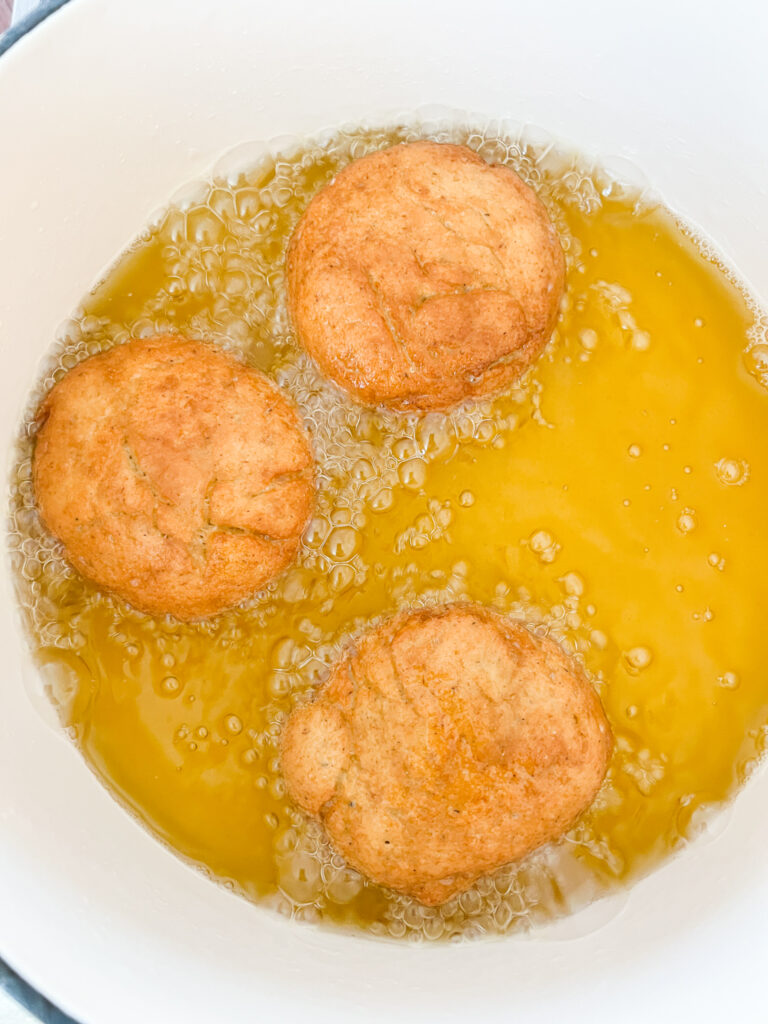
Cook the donuts in batches, 2-4 at a time depending on the size of your pot. You can place them in the oil on top of the parchment square, then use tongs to remove the parchment paper within the first 30 seconds of frying. This will help the donuts keep their shape as you transfer them from the baking sheet to the hot oil. (This is another technique I learned from the Baked to Perfection cookbook.)
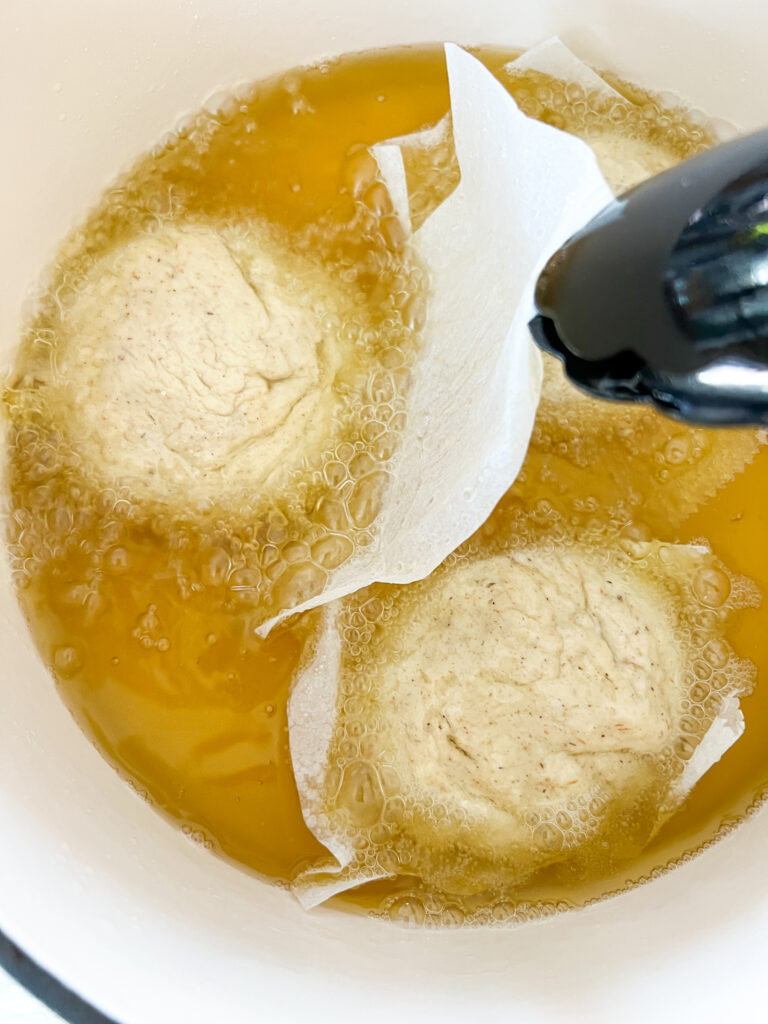
Cook the donuts for about 2 1/2 minutes on each side, using a slotted spoon to turn the donuts over. Remove the donuts from the oil using your slotted spoon, and place them on a cooling rack to allow any excess oil to drip off.
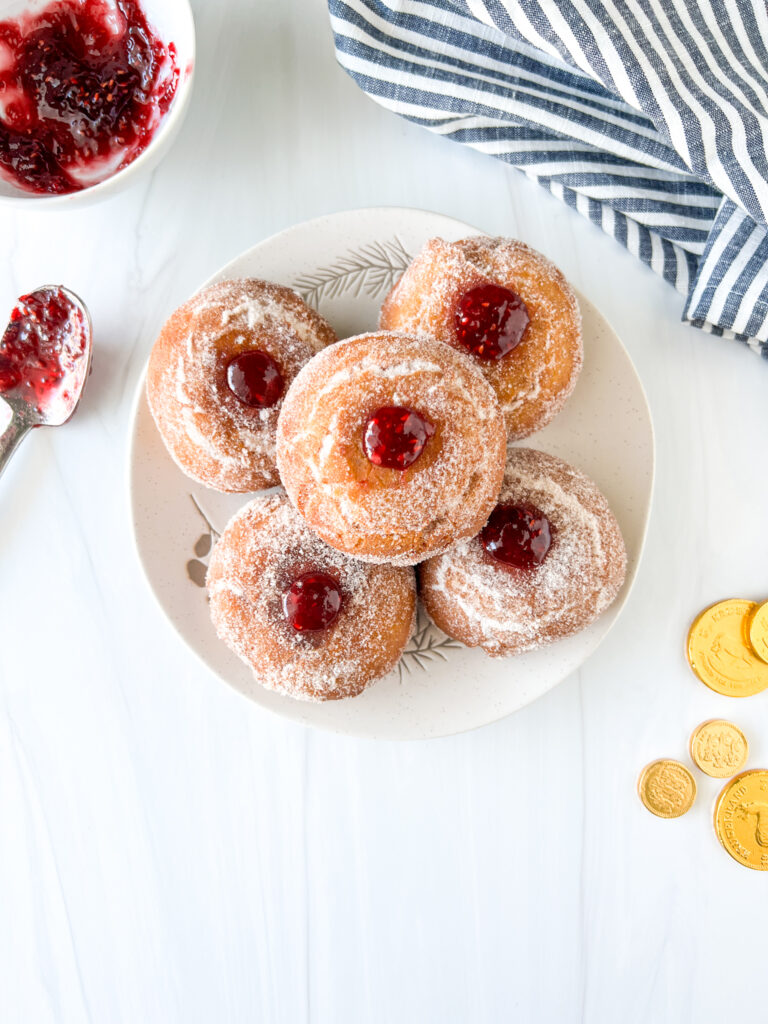
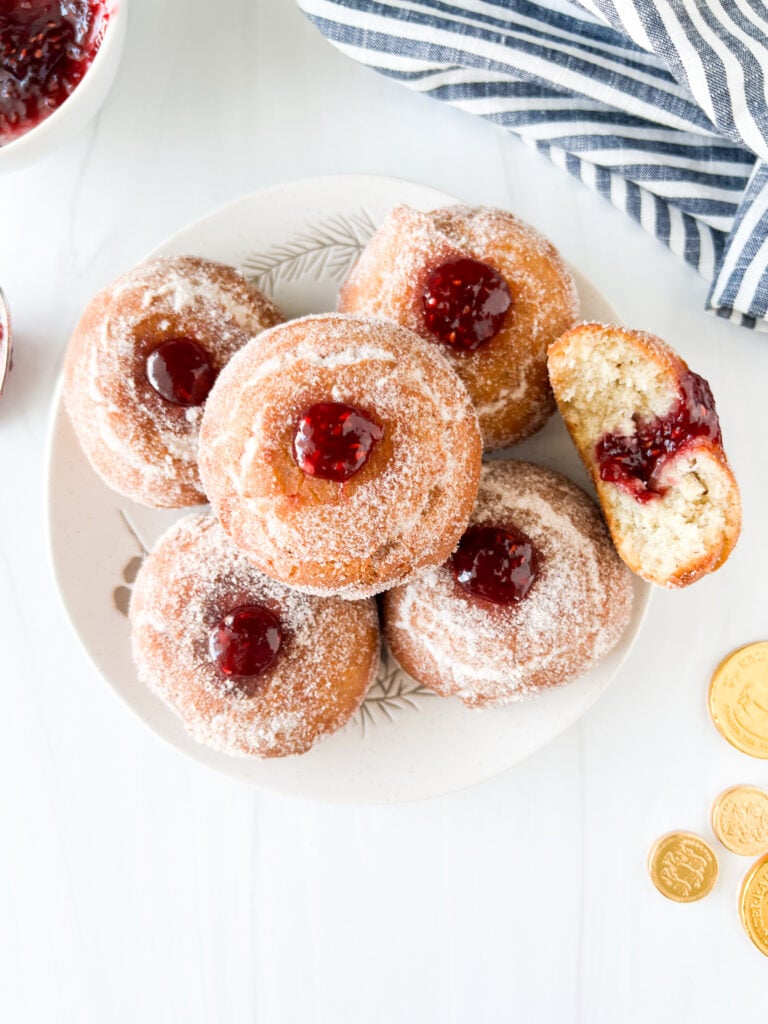
Roll in Cinnamon-Sugar: As soon as the donuts are cool enough to handle, roll them in a bowl filled with 1/2 cup sugar and 1 tsp of cinnamon. Coat all sides, then place the warm donut back on the cooling rack to finish cooling. You want to roll them in the cinnamon-sugar mixture while they’re still warm.
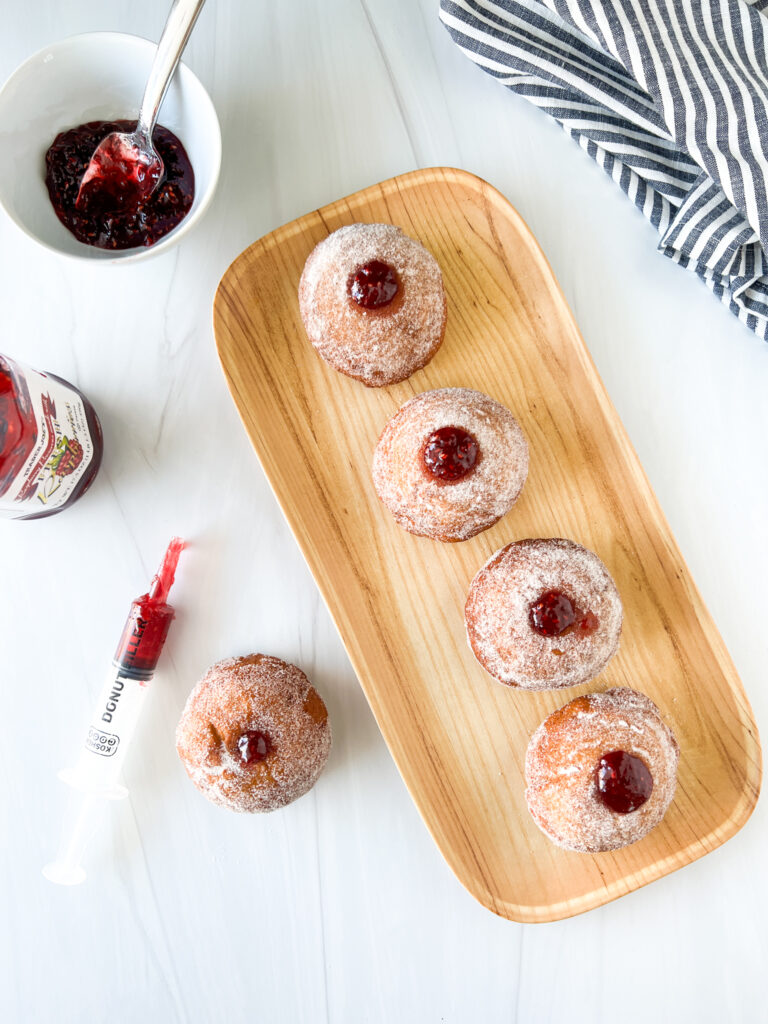
Fill with Jelly: Last by not least, it’s time to fill these fluffy golden donuts with jelly. You can fill them when they’re warm or slightly cooled but not hot.
I bought this awesome jelly donut injector (it’s basically a syringe) to get the job done. If you don’t have one, you could also use a piping bag fitted with a piping tip (ideally, a Bismark piping tip).
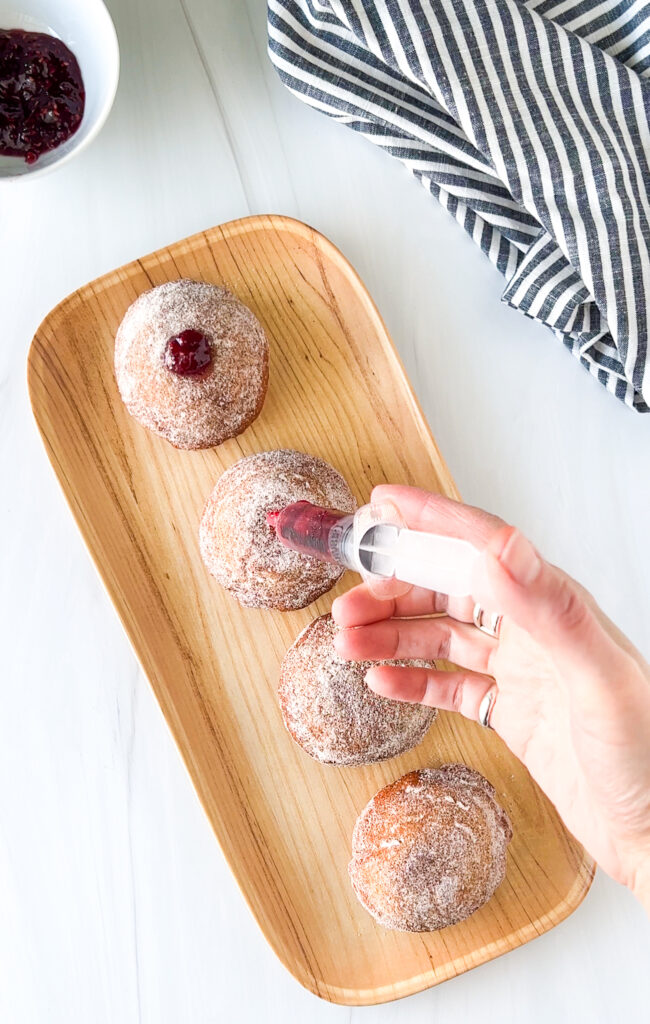
Before injecting the jelly into the donuts, use a straw to puncture a small hole on the top or side of the donut, and then wiggle it around to carve out some space for the jelly.
Fill the donuts with as much jelly as will fit because everyone loves extra jelly inside their donuts. I used raspberry jelly, but you could use any jelly you like.
Why We Love Jelly Donuts
Here are some of the many reasons we love these donuts at my house:
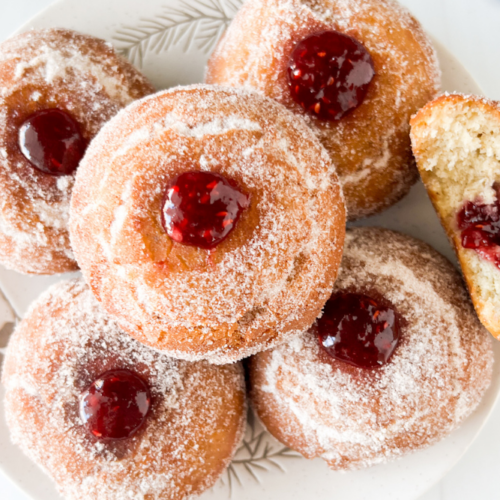
The Texture: If you follow this recipe and my techniques to a T, you’ll end up with fluffy golden donuts with great taste and texture.
The Jelly: I love when a jelly donut oozes jelly, and you’ll have plenty of room to fill these fluffy jelly donuts with your favorite jam.
‘Tis the Season: You can finally join in on the jelly donut fun for Hanukkah this year. But of course, you could enjoy these delicious gluten-free jelly donuts year round!
FAQs, Substitutions, and Troubleshooting
Flour: I have tested this recipe with my own combination of flours and Bob’s Red Mill 1-to-1 Gluten-Free Flour. My family taste tested each jelly donut and found them indistinguishable, so I decided to use Bob’s Red Mill 1-to-1 Gluten-Free Flour because it’s easy to use and available in most grocery stores nationwide. If you want to make a blend of gluten-free flours, use the following measurements in place of Bob’s Red Mill 1-to-1 Gluten-Free Flour:
- 160 grams tapioca starch
- 130 grams brown rice flour
- 25 grams gluten-free oat or sorghum flour
- 1 tsp xanthan gum
Egg-Free: I have not tested this recipe with an egg substitution.
Dairy-Free: I have not tested this recipe without dairy, but if you do, swap the whole milk for dairy-free milk and the butter for dairy-free butter like Earth Balance.
Frying the Perfect Donut: Make sure you cook the donuts between 320-330º F. If your oil is too hot, it will brown the outside too fast without allowing the inside dough to cook through fully. If the temperature is too low, it’ll soak up too much oil and become soggy. Use a meat or candy thermometer to help you maintain the right temperature.
Making Ahead Method: If you want to make this recipe ahead of time, I recommend making the dough the day prior but still proofing and frying it the day you want to serve it.
More Recipes
Try these excellent gluten-free latkes and my gluten-free challah.
Also, try my gluten-free chocolate donuts or gluten-free pumpkin donuts instead. These are both cake donuts vs. yeast/fried donuts.
I also made copycat gluten-free Krispy Kreme donuts using Hand + Heart Gluten-Free Sweet Dough Mix. You could use Hand + Heart Sweet Dough Mix to make jelly donuts, but follow the company’s instructions for making the dough. Once the dough is ready, you can shape and fry them as instructed in this post.
Gluten-Free Jelly Donuts (Sufganiyot)
Equipment
- 1 Standing mixer fitted with dough hook
- 1 Heavy-bottomed pan
Ingredients
Yeast Mixture
- 1/3 cup whole milk warm but not hot
- 1 tbsp granulated sugar
- 1 tbsp active dry yeast
Psyllium Husk Mixture
- 1/2 cup water cold from the tap
- 2 tbsp psyllium husk
Batter
- 2 cups Bob's Red Mill 1-to-1 Gluten-Free Flour Blend 296 grams
- 1/4 cup granulated sugar
- 2 tsp baking powder
- 1 tsp salt
- 1 egg large
- 3 Tbsp unsalted butter softened
- vegetable oil for frying I used avocado oil
- 8 tbsp jelly more as needed (I used raspberry jelly)
Cinammon-Sugar Mixture
- 1/2 cup granulated sugar
- 1 tsp cinnamon
Instructions
Make the Dough
- In a small bowl, combine the warm milk, 1 tbsp sugar, and 1 tbsp yeast. Mix and set it aside for 5 minutes. The yeast is activated when the mixture is bubbly on top.
- In a second small bowl, combine the cold water and psyllium husk. Mix and set it aside for 5 minutes to form a gel.
- In the bowl of your standing mixer fitted with a dough hook attachment, combine the flour, 1/4 cup sugar, baking powder, and salt. Whisk the ingredients together, then form a well in the middle of the mixture.
- Add the egg, yeast mixture, and psyllium husk mixture to the well of the dry ingredients and mix for 2 minutes on medium-high speed, scraping the sides as needed. The mixture will be dry but will start to come together.
- Add the softened butter and continue to mix for another 2 minutes on medium-high speed until a sticky ball of dough forms or a sticky dough ball can be formed by hand by pulling the dough together.
- Lightly grease a medium-sized glass bowl. Place the dough ball in the bowl and cover it with plastic wrap. Place it in your fridge to chill for 2 hours or overnight. Cold dough is easier to work with.
- Cut eight squares of parchment paper and place the papers on a baking sheet.
- After sufficiently chilling the dough, remove it from the bowl and place it on a lightly floured surface. Knead the dough for one minute to reduce stickiness, then roll it into a fat log. Divide the log into eight even portions. Weigh each portion with a kitchen scale to ensure they're equal in size, about 80 grams each.
- Roll each of the eight portions into a small ball, smoothing out any cracks as possible. Place each dough ball on one of the parchment squares and press down on it to slightly flatten the bottom. Repeat until all dough balls have been formed.
- Cover the dough pieces with plastic wrap and place them in a warm place to rise for 1-2 hours. If your house is cold, you could turn your oven to the lowest setting and allow it to heat up for a few minutes before turning it off. Then place the baking sheet in the warm oven to rise (proof). The dough will about double in size.
- In a heavy-bottomed pot, add the vegetable oil until it's about 2-3 inches deep. Heat the oil until the temperature reaches 320-330º F.
- Place 2-4 donuts in the oil at a time, depending on the size of your pot. To avoid splashing and misshaping the dough, place the dough into the oil on top of the parchment square, then use tongs to remove the parchment paper. Cook the donuts for about 2 1/2 minutes on each side.
- Remove the donuts from the oil using a slotted spoon and place them on a wire cooling rack to cool slightly.
- In a small bowl, combine the sugar and cinnamon and whisk the ingredients together. While the donuts are warm (but not hot), coat them with the cinnamon-sugar mixture and place them back onto the wire rack to finish cooling.
- Fill the donuts with jelly using a jelly injector tool (or a large syringe) or a piping bag fitted with a tip (I recommend a Bismarck tip). Before adding the jelly, use a skewer or straw to poke a hole into the top or side of the donut and try to clear out space for the jelly filling, then add the jelly until it starts to overflow from the hole.
- Serve the donuts immediately for best results, or store cooled donuts in a zip-top bag at room temperature for 1-2 days. The donuts will taste best immediately, and the quality will fade with time.
Notes
- 160 grams tapioca starch
- 130 grams of brown rice flour
- 25 grams of gluten-free oat flour (or sorghum flour if you can find it)
- 1 tsp xanthan gum
Yes I’ve used non dairy milk. I typically use cashew milk. It’s creamy.
Have you tried making this with non dairy milk or recommend a substitute for whole milk?
Yes for sure!
Hello – do you think it would be possible to make the dough the day before and let it chill overnight? Then cut it the next day and let it rise before frying? Thanks so much for this recipe! We are looking forward to trying it!
You can place the dough on top of parchment square in the oil to make it easy to place the dough in the hot oil. Then use tongs to remove the parchment and leave the dough.
I don’t understand what you said about the oil and the parchment paper
It’s very close and should work. Ive tested both ways. My family prefers the 1-to-1 and it’s easier.
When you make your own flour it makes more than 296 grams of flour. What should I do?
I made these for the first time for Chanukah this year. I used Bob’s 1:1 GF flour and made it dairy free substituting almond milk (unsweetened vanilla) and Earth Balance DF/vegan butter. They came out great. I also made half with powdered sugar. I did not flatten them enough so they looked like huge donut holes, but it worked. The next day we heated them up in the air fryer and it was like we had just made them fresh.
160 tapioca
140 or 160 tapioca?
I’m in the process of updating this recipe and testing alternatives to Bob’s Red Mill 1-to-1 – coming soon!
This recipe worked well with the bob red mills gf 1:1 baking flour??? I have found that when I use yeast with this flour, the product comes out heavy and dry but I will try this donut out
Made these yummiest today. Let the dough double and did add almost a cup of flour on the dough when I turned out the dough on the board after the 1st rise. Good directions and photos. Very nice recipe. Gluten free cooking is a lot different. Thanks fir your hard work!
I’m so sorry. It’s fixed. I had shifted my recipes to a new platform and this one seemed to have glitches. Thank you for catching it.
The amount of flour is unclear as it seems it is either 21 cups or 2 and 1/ cups. I would like to try this recipe.