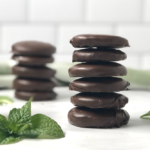
Gluten-Free Thin Mints
I miss Thin Mints so much now that I can't eat gluten. Instead of feeling sorry for myself, I decided to recreate a gluten-free Thin Mint cookie recipe of my own. And dare I say that my copycat Thin Mint recipe tastes better than the OG.
Servings: 40 cookies
Calories: 123kcal
Equipment
- 1" - 1.5" cookie cutter
Ingredients
Cookie Dough
- 3/4 cup unsalted butter room temperature
- 1 cup granulated sugar
- 1 large egg room temperature
- 1 tsp vanilla extract 1/4
- 1/4 tsp peppermint extract
- 200 grams Bob's Red Mill 1-to-1 Gluten-Free Flour Blend approximately 1 1/2 cups, spooned and leveled
- 3/4 cup unsweetened cocoa powder
- 1 tsp baking powder
- 1/8 tsp salt pinch
Topping
- 2 cups semi-sweet chocolate chips
- 1 tsp avocado oil or other vegetable oil
- 1/4 tsp peppermint extract
Instructions
Cookies
- Beat butter for one minute in a large bowl using your handheld or standing mixer until it's smooth and creamy. Add sugar and continue mixing on medium-high speed, then add the egg, vanilla extract, and peppermint extract and mix until well combined. Set aside.
- Sift the flour, cocoa powder, baking powder, and salt in a separate bowl. Whisk until combined.
- Add the dry ingredient mixture slowly to the wet ingredients and mix on low speed until the flour is fully incorporated. The dough will come together when handled, but it looks a little crumbly in the bowl.
- Divide the dough into two equal-sized balls. Use your rolling pin to flatten each ball between two pieces of plastic wrap (or parchment paper) until about 1/4" thickness. Put the rolled-out dough discs in your refrigerator and chill for 1 hour or up to two days. If chilling the dough longer than a few hours, make sure the dough is wrapped in plastic wrap.
- Once chilled, preheat oven to 350º F. Line two large baking sheets with parchment paper. Use 1-1.5" round cookie cutters to cut out cookies and place them on the lined baking sheets about 1" apart. Re-roll the remaining dough to create more cookies. You should have about 40 cookies depending on the size of the circles and the thickness of the dough.
- Bake the cookies in batches for 8 minutes. The batch of cookies waiting to be baked should be stored in the fridge to keep cool. After the baked cookies cool for 5 minutes on the baking sheet, transfer them to a wire rack to cool completely. Depending on the thickness of the cookie, they may spread/expand a bit, but generally, they keep their shape/size. Allow cookies to cool fully before coating them with chocolate.
Chocolate Topping
- Line two baking sheets with parchment paper. Set aside.
- Add the chocolate and oil to a large microwave glass bowl and microwave on high in 15-30 second increments until completely melted, mixing often. Add peppermint extract and mix well until the chocolate is smooth.
- Place each cookie, one by one, top-side down into the chocolate, then use a fork to flip it over. Lift the cookie (on top of the fork) out of the melted chocolate and tap off the excess chocolate. This will allow the chocolate to form a thin layer over the cookie and eliminate any bubbles on top. Gently place the cookie on a parchment-lined baking sheet to cool.
- Once the chocolate sets, you can eat the cookies or store them in the fridge or freezer.
Notes
This recipe will make about 40-50 cookies, depending on the thickness of the dough and the size of your cookie cutter.
To make this recipe dairy free, use dairy-free chocolate chips and dairy-free butter.
Chocolate matters. I recommend using semi-sweet chocolate. Milk chocolate is too sweet, and bittersweet chocolate is too bitter. Semi-sweet is just right.
These cookies freeze well. Store in a zip-top bag. I prefer to eat them frozen anyway.
If using a different gluten-free flour blend than Bob's Red Mill's 1:1 gluten-free flour blend (in the blue bag), make sure it contains xanthan gum (or another binder) or add about 1 tsp of xanthan gum to your mix.
This recipe was adapted to be gluten-free and was originally found in Sally's Baking Addiction.
Nutrition
Calories: 123kcal | Carbohydrates: 14g | Protein: 1g | Fat: 7g | Saturated Fat: 4g | Trans Fat: 1g | Cholesterol: 14mg | Sodium: 11mg | Potassium: 89mg | Fiber: 2g | Sugar: 8g | Vitamin A: 117IU | Calcium: 17mg | Iron: 1mg