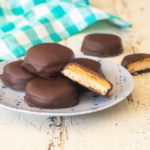
Gluten-Free Tagalongs (Peanut Butter Patties)
Get ready to enjoy Tagalongs (aka, Peanut Butter Patties) again with my gluten-free copycat version of this beloved Girl Scout Cookie. The shortbread cookie is light and crisp. The peanut butter is creamy. And the chocolate coating perfectly encases the entire cookie in one fell swoop.
Servings: 24 cookies
Calories: 220kcal
Equipment
- 1 Electric standing or handheld mixer
- Mixing bowls
- Rolling pin
- Parchment paper or plastic wrap
Ingredients
- ½ cup butter, vegan butter, or shortening
- ½ cup granulated sugar
- 1 ¼ cup gluten-free flour blend (185 grams) I used Bob’s Red Mill’s 1-to-1 Gluten-Free Flour Blend
- ¼ tsp xanthan gum omit if you are using a blend that already contains xanthan gum
- ¼ tsp salt
- 1 tsp vanilla extract
- 1 cup creamy peanut butter
- 1 cup powdered sugar
- 1 ½ cups semi-sweet chocolate chips
Instructions
For the cookies:
- Preheat the oven to 350°F and line a baking sheet with parchment paper or a silicone baking mat.
- In a medium mixing bowl, cream together the butter and sugar using a handheld electric or stand mixer until light and fluffy.
- Add the gluten-free flour, xanthan gum if using, and salt and mix until thoroughly combined.
- Add the vanilla extract and mix until you have a crumbly dough. It will look like a pie crust or breadcrumbs but should form a dough when you squeeze it together. If the dough still crumbles, add water, a teaspoon at a time, until a dough forms when the dough is pressed together. Gently form the dough into a ball.
- Place the gluten-free shortbread cookie dough between two pieces of plastic wrap or parchment paper and roll out until about ¼ inch thick. Cut the cookies using a 2 ½ inch round cookie cutter.
- Place each cookie on the lined baking sheet. The cookies won't spread, so they can be close together but not touching.
- Bake the cookies for 12-14 minutes or until golden brown on the edges. The cookies will be soft to the touch and will set as they cool.
For the peanut butter filling:
- In a medium mixing bowl with a handheld electric mixer or a stand mixer, cream together the peanut butter and powdered sugar. It will seem very crumbly at first, but as you continue mixing, it will form a crumbly dough.
- Form the peanut butter filling into a ball and roll it out between two pieces of parchment paper or plastic wrap until it is about ¼ inch thick. Cut it out using a 2 ½ inch round cookie cutter. Place each round on top of a cooled shortbread cookie. If the peanut butter filling is a bit too soft and misshapes as you move it, chill it in the freezer for 5-10 minutes, and it will be easier to handle.
For the chocolate coating:
- Place the chocolate chips in a microwave-safe bowl. Heat for 15-30 second increments, stirring between increments until the chocolate melts. Allow the chocolate to cool (about 1 minute) before using it.
- Using a fork, gently dip each cookie topped with peanut butter filling into the chocolate, and set it on a parchment paper lined baking sheet to cool. If it is warm, you may need to put your cookies into the fridge or freezer to help the chocolate set.
- Store in an airtight container at room temperature for 3-5 days or a month in the freezer.
Notes
Is the Dough Too Crumbly? The dough is a bit more crumbly if you use shortening. If it's crumbly, add water, one teaspoon at a time, until you have a workable dough that comes together in a ball when you squeeze it. Add water judiciously.
Peanut Butter Filling: I recommend making the peanut butter filling thick so you can see and taste it in every bite. I made it thick in my recipe; you can adjust it to your preferences. If the peanut butter is too soft for rolling out and cutting, place it in your fridge for 15-30 minutes.
Melting Chocolate: If using vegan chocolate chips, I recommend mixing the chocolate with 1 1/2 teaspoons of coconut oil. It will make the chocolate smoother and easier to dip, and the chocolate will also set up better in the end.
Gluten-Free Flour: Make sure you use a gluten-free flour blend that contains a variety of rice flour, starches, and xanthan gum (for binding). You cannot use plain rice flour. I used Bob's Red Mill 1-to-1 Gluten-Free Flour (in the blue bag), which worked well.
Cookie Shortcut: If you don't want to make the gluten-free shortbread cookie base, you can use gluten-free vanilla wafers instead. Top them with the peanut butter mixture, coat them in chocolate, and call it a day. You won't get the same crispy cookie texture as homemade cookies, but you'll save time!
Nutrition
Calories: 220kcal | Carbohydrates: 22g | Protein: 4g | Fat: 14g | Saturated Fat: 6g | Polyunsaturated Fat: 2g | Monounsaturated Fat: 5g | Trans Fat: 0.2g | Cholesterol: 11mg | Sodium: 103mg | Potassium: 126mg | Fiber: 2g | Sugar: 15g | Vitamin A: 124IU | Calcium: 18mg | Iron: 1mg