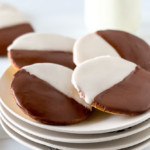
Gluten-Free Black and White Cookies
These gluten-free black and white cookies are topped with half chocolate and half vanilla icing so you don't have to decide which flavor you like best. Many consider black and white cookies to be the quintessential New York dessert and a cookie of unity. They're surprisingly easy to master and are guaranteed to be the talk of any [gluten-free] cookie-exchange parties.
Servings: 8 cookies
Calories: 333kcal
Equipment
- 1 Standing mixer fitted with paddle attachment
- 1 Cookie scooper medium
- 2 baking sheets
- 2 silicone baking mats or parchment paper
Ingredients
For the Cookie Batter:
- 1/3 cup whole milk
- 1 tsp lemon juice
- 160 grams Bob's Red Mill 1-to-1 Gluten-Free Flour Blend approximately 1 cup + 1 tbsp of flour, spooned and leveled - SEE NOTES if using another flour blend
- 1/2 tsp baking soda
- 1/2 tsp salt
- 6 Tbsp unsalted butter softened
- 100 grams granulated sugar 1/2 cup
- 1 large egg room temperature
- 2 tsp vanilla extract
For the Vanilla Glaze:
- 120 grams powdered sugar 1 cup
- 1 tsp lemon juice fresh
- 1/2 Tbsp corn syrup see notes
- 1/4 tsp vanilla extract
- 1 Tbsp boiling water more if needed
For the Chocolate Glaze:
- 120 grams powdered sugar 1 cup
- 3 Tbsp cocoa powder see notes
- 1 tsp lemon juice fresh
- 1 Tbsp corn syrup see notes
- 1/4 tsp vanilla extract
- 2 Tbsp boiling water more if needed
Instructions
For the Cookie Batter:
- Preheat the oven to 350º F and line two baking sheets with parchment paper or silicone baking mats. Set them aside.
- Combine the milk and lemon juice in a cup for 5-10 minutes to form buttermilk. Set it aside.
- Whisk together the flour, baking soda, and salt in a medium bowl. Set it aside.
- In the bowl attached to your standing mixer fitted with the paddle attachment, add the softened butter and sugar and mix on medium-high, about 1 minute, until the mixture is fluffy.
- Scape down the sides, add the egg and vanilla, and continue mixing for another minute until well combined.
- Add half of the flour mixture and half of the buttermilk mixture to your standing mixer and mix on medium speed until combined. Add the other half of the flour mixture and buttermilk mixture and mix well until combined, about 1 minute. Scape down the sides as needed.
- Use a medium-sized cookie scoop to drop balls of the sticky batter onto the lined baking sheets. Use a greased ice cream scoop if you don't have a cookie scoop as the batter is too sticky to scoop by hand. You'll have enough batter to make 8 large rounded scoops of batter, 4 per baking sheet. Leave plenty of space between the cookies.
- Bake in batches for 12-13 minutes or until the bottoms begin to brown. Remove them from the oven and allow them to cool for 2-3 minutes before transferring them to a wire rack to cool completely.
For the Vanilla Icing:
- Mix the vanilla icing ingredients in a bowl, adding hot water as needed to get the just-right consistency. You want it to be thick but spreadable. Air on the side of it being more thick than watery, adjusting the amount of water and powdered sugar to get a spreadable, thick mixture.
- Flip the cookie over to ice the bottom (flat side) of the cookie. Use a spatula to spread the vanilla icing over half of the cookie. Allow the icing to set in place for about 20-30 minutes before adding the chocolate icing.
For the Chocolate Icing:
- Mix the chocolate icing ingredients in a bowl until well combined and the consistency is thick but spreadable. Carefully add the chocolate icing to the other half of the cookie to form a neat line down the middle. Allow the icing to set before eating.
Notes
Corn Syrup: Do not skip the corn syrup. It gives the icing a shiny coating and makes your cookies look bakery-style vs. dull. If you don't have or want to use corn syrup, you can use glucose syrup instead.
Cocoa Powder: If you want a darker chocolate color, use Dutch-processed cocoa powder.
Storing the Cookies: Once the icing is set, I recommend placing the cookies in your fridge for 1-2 hours to fully allow the icing to harden. Store them in an air-tight container or cover them with plastic wrap. You can also individually wrap each cookie with plastic wrap like they do in New York.
The cookies will keep in the fridge for 4-5 days. They freeze well too. I recommend eating them within 1-2 days for the best taste and texture.
Use Room Temperature Ingredients: Make sure you take the butter and egg out of the fridge to come to room temperature for 1-2 hours before making this recipe. Please see above for tips on how to bring butter and eggs to room temperature quickly.
Ice the Bottom of the Cookie: Make sure you ice the bottom (flat-side) of the cookie, not the mounded part of the cookie.
Gluten-Free Flour: I tested this recipe with Bob's Red Mill 1-to-1 Gluten-Free Flour blend and found the cookies spread as desired and had a nice flaky-but-cakey texture. I also used Lorraine's All-Purpose Gluten-Free Flour and Better Batter Flour and found the cookies didn't spread properly and were more doughy. I generally don't like using Bob's Red Mill 1-to-1 Gluten-Free Flour for cookies, but in this recipe, it's the only flour that works well for me. Remember, results WILL vary from flour to flour. It's best to use the recommended flour noted in this recipe.
Measuring Flour: Always use a kitchen scale to measure flour. If you don't, use the spoon and level method but spoon the flour into the measuring cup vs. scooping it with the measuring cup. Do not pack the flour into the measuring cup.
That's a Big Cookie! A traditional black-and-white cookie is larger than your average cookie. These oversized cookies, once baked, measure about 3.5-4 inches in diameter.
Keep them Cool: The icing will soften if kept at room temperature, especially in warm climates. Keep the cookies in the fridge until you're ready to enjoy them.
Dairy-Free: I have not tested this recipe without dairy. Many articles online say you can use plant-based milk combined with lemon juice to make dairy-free buttermilk. You can also use dairy-free butter, such as these buttery sticks from Earth Balance.
Egg-Free: I haven't tested this recipe without eggs.
Nutrition
Calories: 333kcal | Carbohydrates: 60g | Protein: 3g | Fat: 10g | Saturated Fat: 6g | Polyunsaturated Fat: 1g | Monounsaturated Fat: 3g | Trans Fat: 0.3g | Cholesterol: 44mg | Sodium: 231mg | Potassium: 59mg | Fiber: 2g | Sugar: 46g | Vitamin A: 309IU | Vitamin C: 1mg | Calcium: 34mg | Iron: 1mg