Pull Apart Gluten-Free Dinner Rolls
These pull apart gluten-free dinner rolls are buttery, doughy and delicious. They are the perfect accompaniment to your Thanksgiving or holiday celebrations. Remember, just because you eat gluten-free doesn't mean you can't enjoy a yummy dinner roll (or two)!
Servings: 20 rolls
Calories: 134kcal
Equipment
- 1 Standing or handheld mixer
- 1 9x13 casserole dish
- 1 medium cookie scoop
- cooking spray
Ingredients
For the Dinner Rolls
- 1 1/2 cups warm milk Temperature should be between 95-115º F
- 1/4 cup raw honey
- 1 Tbsp active dry yeast
- 4 Tbsp butter unsalted, melted
- 2 large eggs
- 1 Tbsp apple cider vinegar
- 1/2 Tbsp Kosher salt
- 4 cups gluten-free flour blend with xanthan gum I highly recommend Hand + Heart All Purpose Gluten-Free Flour - see notes
For the Egg Wash
- 1 egg
- 1 tsp water
Instructions
- Lightly grease a 9x13" baking dish. Set aside.
- Combine warm milk and honey in a large bowl. Add the active dry yeast and gently whisk the mixture to combine. Let the yeast mixture sit for 8-10 minutes until the yeast blooms. The mixture will bubble up and look very frothy. If it doesn’t, your yeast may be dead because your milk mixture was too hot or your yeast is too old.
- Once the yeast is activated, add the yeast mixture, melted butter, eggs, and apple cider vinegar to the bowl of your standing mixer. Combine for 20 seconds.
- Add the gluten-free flour and salt, and mix on low for 30 seconds, then crank up the mixer to medium-high speed and mix the dough for 4 minutes.
- With a medium-sized cookie scoop or large spoon, portion out the dough into 18-20 equal parts. The cookie scoop helps create uniform scoops. Lightly grease the cookie scoop to prevent the dough from sticking to it.
- Place each scoop of dough in the prepared baking dish (5 rows of 4). Smooth out the top with wet fingers or a wet spatula, if desired.
- Cover the dish with plastic wrap and let it rise for an hour in a warm environment free from drafts. I use the proofing setting on my oven. If your house is cold, you may need to allow an additional 1-2 hours of rise time. Once the dough has doubled in size, preheat the oven to 400º F.
- In a small bowl, beat an egg and water to create an egg wash. Carefully brush the egg wash on the top of each dough ball, ensuring not to deflate the dough.
- Bake for 18-20 minutes until the bread has reached an internal temperature of 210º F and the tops are browned. Let the rolls slightly cool before serving.
- Optional: For an extra buttery roll, brush the rolls with melted butter as soon as they come out of the oven.
Notes
Storing Leftovers: Leftovers will quickly deteriorate, as all gluten-free bread made with preservatives doesn't last long. I recommend baking the rolls right before you want to enjoy them so they're soft, fresh, and warm. Store leftovers in an airtight container or zip-top bag. Heat each roll in the microwave for 10-15 seconds to bring it back to life. They will only taste good for a few days after baking.
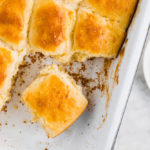
Flour Matters: I highly recommend using Hand + Heart All-Purpose Flour for this recipe. Not all gluten-free flour blends work well for making bread. I used to use Bob's Red Mill 1-to-1 Gluten-Free Flour, but I found it didn't work well for making bread, so I switched to Hand + Heart with excellent results. The Hand + Heart dough feels thicker, and the bread rises higher and fluffier than the pictures show. Please note the pictures were taken when I first developed this recipe using Bob's Red Mill 1-to-1 Flour (before Hand + Heart existed!).
Measuring Flour Properly: For the best results, spoon the flour into your measuring cup and then level it off. Do not directly scoop the flour with the measuring cup. It will add too much flour to the dough and create a heavier, denser roll.
Yeast: Be sure to use fresh active yeast. Old yeast will lose its luster and won't rise. Fresh yeast will ensure this recipe rises high. If you have instant (vs. active) yeast, you can use that instead. You can add the yeast right into the bowl with the rest of the ingredients without letting it sit in the warm milk mixture first.
Warm Milk Tips: It is best to have a thermometer to ensure the milk mixture is at the correct temperature. You want it to be between 95-115º F. If it’s any lower, it will not activate the yeast. If it’s higher, it will kill the yeast. I like to keep my milk around 105-110º F. You can heat it in the microwave or a small saucepan on the stovetop.
Type of Milk: I recommend using whole or 2% milk. Dairy-free milk will work but will give the bread a slightly denser texture.
No Kneading Needed: Typically, when making bread, you knead the dough for about 10 minutes to develop the gluten, and then you let the dough do a first rise before shaping and proofing. Gluten-free dough does not work the same way. It's best to shape the dough after preparing it, then let it go through one rise before baking.
Shaping the Dough: A cookie scoop is the best way to portion the dough evenly. You won’t be able to shape the dough by hand because the dough is very sticky. Spray the cookie scoop with cooking spray to prevent the dough from sticking to it.
Oven Temperatures Vary: All ovens work differently, so it’s best to check the internal temperature of the rolls to know if they’re done. They should reach 210º F in the center of the bread. If the bread is browning too fast, cover it with aluminum foil.
Nutrition
Calories: 134kcal | Carbohydrates: 22g | Protein: 4g | Fat: 4g | Saturated Fat: 2g | Polyunsaturated Fat: 0.4g | Monounsaturated Fat: 1g | Trans Fat: 0.1g | Cholesterol: 33mg | Sodium: 209mg | Potassium: 42mg | Fiber: 3g | Sugar: 5g | Vitamin A: 135IU | Vitamin C: 0.02mg | Calcium: 43mg | Iron: 1mg